
How to plan an essay: Essay Planning
- What's in this guide
- Essay Planning
- Additional resources
How to plan an essay
Essay planning is an important step in academic essay writing.
Proper planning helps you write your essay faster, and focus more on the exact question. As you draft and write your essay, record any changes on the plan as well as in the essay itself, so they develop side by side.
One way to start planning an essay is with a ‘box plan’.
First, decide how many stages you want in your argument – how many important points do you want to make? Then, divide a box into an introduction + one paragraph for each stage + a conclusion.
Next, figure out how many words per paragraph you'll need.
Usually, the introduction and conclusion are each about 10% of the word count. This leaves about 80% of the word count for the body - for your real argument. Find how many words that is, and divide it by the number of body paragraphs you want. That tells you about how many words each paragraph can have.
Remember, each body paragraph discusses one main point, so make sure each paragraph's long enough to discuss the point properly (flexible, but usually at least 150 words).
For example, say the assignment is
Fill in the table as follows:
| Discuss how media can influence children. Use specific examples to support your views. | |
|---|---|
| 120 words | |
| 240 words | |
| 240 words | |
| 240 words | |
| 240 words | |
| 120 words |
Next, record each paragraph's main argument, as either a heading or topic sentence (a sentence to start that paragraph, to immediately make its point clear).
| Discuss how media can influence children. Use specific examples to support your views. | ||
|---|---|---|
|
| 120 words | |
|
Not all media can be treated as the same. | 240 words | |
|
Media can have beneficial outcomes. | 240 words | |
|
Media can also have harmful effects. | 240 words | |
|
Amount, type, variety and quality of content are all-important. | 240 words | |
|
| 120 words | |
Finally, use dot points to list useful information or ideas from your research notes for each paragraph. Remember to include references so you can connect each point to your reading.
| Discuss how media can influence children. Use specific examples to support your views. | ||
|---|---|---|
| 1. General introduction statement 2. Thesis statement 3. Order of arguments | 120 words | |
|
Not all media can be treated as the same.
- There are many types of media/programs. - People use media in many different ways. - We can't assume it always has the same effects. - Media such as tablets give children active control over their consumption ( ). | 240 words | |
|
Media can have beneficial outcomes.
- A wide range of programs are tailored for children ( ). - A lot of media builds social skills or is educational ( ). - Media is a major way of introducing new themes and topics to a child's awareness. | 240 words | |
|
Media can also have harmful effects.
- Parents can't always monitor the child's consumption (amount or type). - Media can create peer pressure and/or feelings of entitlement ( ). - Overconsuming media reduces contact with real people ( ). | 240 words | |
|
Amount, type, variety and quality of content are all-important.
- Studies find no harmful effects from average consumption ( ). - Studies find various harms from overconsumption/meaningless consumption ( ). | 240 words | |
| 1. Restate thesis 2. General conclusions 3. Final concluding statement | 120 words | |
The other useful document for essay planning is the marking rubric .
This indicates what the lecturer is looking for, and helps you make sure all the necessary elements are there.
Pathways and Academic Learning Support

- << Previous: What's in this guide
- Next: Additional resources >>
- Last Updated: Feb 15, 2024 1:23 PM
- URL: https://libguides.newcastle.edu.au/essay_planning
Comfort in the Classroom with Flexible Seating
I’m excited to be teaming up with more than two dozen secondary ELA teachers to give you ideas on how to incorporate comfort and joy into your classroom (and to give you the chance to win a $200 Amazon gift card). Enter the giveaway here!
For the “comfort and joy” theme, I decided to write about something that has brought lots of comfort and joy to my classroom: FLEXIBLE SEATING!!!
Take a second to imagine the optimal environment for comfort, collaboration, learning, and productivity. You’re probably not thinking of the stifling rows of desks and harsh fluorescent lighting that dominate most classrooms today, but something refreshingly different, with enough structure to support learners but enough flexibility to adapt to unique needs and preferences.

This was my previous classroom. No matter how many times I rearranged the desks, I could never find a layout that supported my teaching style and my learners’ unique needs.
This is flexible seating, and the most empowering part of it is that flexible seating will look and function differently for each educator and student.
Ultimately, the goal of flexible seating is to better engage students and empower them with choices by providing diverse seating options. Flexible seating facilitates student-centered, collaborative learning, fosters a positive classroom community, and even promotes healthy, kinesthetic learning.
This sounds great, right? Or does trading desks for more comfortable flexible seating make you uncomfortable? You may be used to the stability and structure of the rows of detached desks that face toward you, the teacher.
I, too, was initially a little hesitant, but then I realized that flexible seating was not only a physical change, but a mental one, too: a part of shifting educational paradigm. Flexible seating is more than just a few new pieces of furniture and a cute, comfortable classroom. Rather, it represents a shift in my own teaching philosophy to support more student-directed, 21st-century learning.
After fully embracing this change last year, I was able to begin planning for this year’s flexible seating. Luckily, I had the opportunity to move to a larger classroom for this year, so I jumped at the chance for an entirely fresh start and a completely redesigned classroom.
By empowering students with a choice, even one as seemingly small as where to sit for a 42-minute class period, I have been able to foster a more authentic learning environment that adapts to the unique needs of ALL of my students. With flexible seating, I am a better teacher and they are better students. It’s that simple.

Here’s a partial view of my flexible seating classroom. Admittedly, my new room IS larger, but flexible seating frees up so much space.
If you are intrigued by the freedom flexible seating can offer, but overwhelmed with how to get started, here’s some step-by-step advice to help:
Research and think about how flexible seating will transform your teaching.
You might be here because you’ve seen my coffee shop-esque flexible seating classroom, and others like it, on Instagram or Pinterest. But don’t let Insta-envy be your reason for implementing flexible seating. Some people already have the perception that flexible seating is just a fad or an excuse to make your classroom look cute. IT’S NOT!
Flexible seating is best practice and supported by research, but make sure it’s the right decision for you and your students. To do this, I recommend you spend some time researching and reflecting upon how flexible seating will transform your teaching, and consequently, your students’ learning. You will need to be able to clearly articulate the purpose and goals of flexible seating in your classroom–first to your administration, then to your students and their parents.
Luckily, my administration was incredibly supportive of my flexible seating plan, so I didn’t have to rationalize my decision to them. But when I decided to apply for a grant, I was forced to think more deliberately about flexible seating and how it would change my teaching. The grant application even asked for a 6-10 word summary “describing the impact your grant will have on others.” 10 WORD MAX?! My English teacher self simultaneously hated and loved that word limit. By forcing me to be precise and concise, that word limit helped me articulate the purpose of flexible seating in my classroom:
Flexible seating engages and empowers students while promoting physical health.
In my grant proposal, I specifically outlined my vision for a student-centered fluid workspace, a malleable learning lab that supports instructional best practices and promotes collaborative learning. I explained how flexible seating would empower me as an educator, allowing me to structure better lessons and increase student engagement. I also talked about the simple power of choice in order to illustrate how flexible seating could build classroom community, promote accountability, and minimize off-task behaviors. The theme of my proposal was that flexible seating helps meet the unique needs of all learners, so I also explained the positive impact this would have on students with ADHD, Autism, and other needs.
I hope the above information gives you ideas if you find yourself writing your own grant proposal. If you would like to see a copy of the entire proposal, email me at [email protected] . Here are some links to other articles I found helpful during the grant-writing process:
- Flexible Seating and Student-Centered Classroom Redesign
- Why the 21st Century Classroom May Remind You of Starbucks
- Effects of a Classroom-Based Program on Physical Activity and On-Task Behavior
- Farewell Desks, Here Come the ‘Starbucks Classrooms’
If you find any other helpful articles or blog posts, please let me know in the comments!
Find funding and cut costs!

I purchased my futon and coffee table from Walmart.com, thanks to a grant I received from my district’s education foundation.
Admittedly, the price tag of flexible seating can be the most intimidating factor. But it doesn’t have to be! There are ways to secure funding and even more ways to be thrifty when spending your hard-earned money on flexible seating. Although I did not receive funding from https://www.donorschoose.org/ , I know many teachers who have successfully used it for flexible seating purchases. I was lucky enough to receive a grant from my school district’s education foundation. This grant money helped me purchase my big-ticket items, including my futon, coffee table, round bistro tables, bean-bag chairs, and exercise balls (all from Walmart).
I did not pay full price for ANYTHING else. Instead, I stalked sales and clearance at stores. I also stalked Goodwill, other thrift stores, garage sales, and FACEBOOK MARKETPLACE. Facebook Marketplace was actually a gold mine for me. I purchased my two cute cafe-style tables and stools from two different sellers on Facebook Marketplace.

I scored this simple table from Goodwill and the stools from Home Goods.
When buying items from garage sales or Facebook Marketplace, I learned that “playing the teacher card” was immensely helpful. By this, I mean that I simply told people that I was hoping to purchase the items for my classrooms, and then I attempted to negotiate a lower price. This worked like a charm, multiple times. I was happy, but the sellers were even happier! Many people expressed that they were glad to know that their old furniture was going to a good home.
I also reached out to friends and family on social media, and I ended up getting a cute storage ottoman for free from one of my middle school teachers! If you’re reading this, THANK YOU, Mrs. Johnson! 🙂

I found this on Facebook Marketplace and played my “teacher card” when negotiating with the seller!
The expenses do add up, so it’s helpful to set a budget and know your limits. There is nothing wrong with implementing flexible seating gradually, so you can space out your purchases and slowly add to your flexible seating collection.
Design with a purpose
My goal for flexible seating was to make it work for ME and MY STUDENTS. I wanted my classroom layout to be conducive to my style of teaching. As an English and journalism teacher, I emphasize discussion and collaborative learning in my classroom. I love using group work, learning stations, “question trails,” and other kinesthetic activities that get my students moving and interacting. I abhorred my previous classroom’s 30 isolated, clunky desks that impeded authentic learning.
When I began the flexible seating design process, I knew I wanted my classroom space to help facilitate the types of lessons I would be teaching. To do this, I designed my room to have distinct areas, each a different space for a small group or learning station. I created 7 zones, and being me, I had to think of cute names for each: the library, the lounge, the cafe, the bistro, the patio, the coffee bar, and the office. I also ensured that there was space for kinesthetic learning and a clear path for movement around the room — aka “flow.”

Like a real library, our “library” includes spots for both independent and group work.

The heart of the classroom is the “lounge.” The futon, sofa chair, and bungee chairs make this a natural favorite among students.

The “cafe” features two counter-height tables and stools, as well as additional stool seating along the countertop against the back wall.

The “bistro” is situated in a cozy corner of my classroom. Here, you can find adjustable bistro tables with stools, as well as taller bistro tables for students who prefer to stand while working.

This is the “patio,” a great place for natural collaboration.

The “coffee bar” is a perfect place for independent work. I also sometimes seat students here when they are off-task and need to be facing away from everyone else in order to focus.

I call this “the office,” because it’s a group work table directly in front of my desk.
Designing my room was probably the most laborious and intimidating, but FUN, step of implementing flexible seating. I am somewhat of a perfectionist, and I love using my creativity to design. (Before deciding on teaching, I entertained ideas of being an architect or graphic designer.) I actually made blueprint-like sketches of different layouts and reflected upon how each layout would affect the teaching and learning going on in my classroom. That might have been overkill, but the lesson is simple: Be deliberate in your design. You are switching from a traditional paradigm of teaching to a more student-centered, collaborative 21st-century learning environment. It’s kind of a big deal, so force yourself to critically think about how you can change your classroom for the better.
Here are a few questions to help you guide your design process:
How can I maximize my learning space to make it conducive to…
- My style of teaching and classroom management?
- My students’ various learning styles and unique needs?
- Student-centered learning?
- Discussion?
- Collaboration?
- Engagement?
- Technology you use? (We are 1:1 with Chromebooks at my school)
Have a plan for implementation
By the time you are ready to implement flexible seating, you will have invested a lot of time, effort, and thought into the whole process. In fact, you’ll probably be sick of spending so much time arranging your classroom and just ready for your kids to get there. But I would urge you to spend just a little more time thinking about how you will introduce flexible seating to your students and their parents.
The second your students walk into your classroom, they will have comments and questions about flexible seating, since it’s so new and unique. In fact, on the first day of school, one student walked into my classroom (when I happened to be using the restroom during the passing period) and was so confused that he walked right back out, convinced that it was “not a real classroom.” He walked down to his former English teacher’s room just to fact-check that the room was indeed my classroom before he walked back. Other people, including parents and strangers on Instagram, have expressed similar confusion with my atypical layout. “But where do they sit?” has actually been a frequent question, too!

On the second day of school, I formally introduced flexible seating. First, I gave my students a letter that explained the purpose of flexible seating. Then, we reviewed expectations and I gave students a chance to ask questions before they each signed a contract, agreeing to my expectations. Finally, I explained how students would test out different seats for the next week, so that they could reflect upon how each seat affected their engagement and learning. If you’re interested in this implementation plan, check out my Flexible Seating Resource Bundle.
Don’t be afraid to BE FLEXIBLE!
When I do something, I want to be all in. I want to do it right, and I don’t want to give up. I want to do precisely what I said I would, in the way that I set out to do it.
As a teacher, I’ve had to force myself to abandon this stubborn, perfectionist mentality, especially when it comes to flexible seating.
Disclaimer: FLEXIBLE SEATING IS NOT GOING TO BE PERFECT, CONTRARY TO WHAT INSTAGRAM AND PINTEREST MIGHT LEAD YOU TO BELIEVE.
It’s not a magical “happily-ever-after” solution to all of your classroom’s problems, but it IS a step toward more student-centered, authentic learning. You will still encounter issues, some unique to flexible seating, so you must stay flexible and find ways to adapt to your group of learners.
My biggest piece of advice is to not be afraid to change things up when they’re not working. I’ve rearranged my room multiple times this semester. I’ve had to put certain kiddos on flexible seating probation. I moved a few extra traditional desks back to my classroom for this purpose.
I’ve even had to create seating charts for 2 classes. Luckily, one class earned the privilege back and all it takes to redirect them is a simple reminder that we can go back to the seating chart. My other class with a seating chart is my 8th period class with 20 boys and 4 girls. They’re great kids, but the blend of personalities and the anticipation of the end of the school day just created too much chatter during transitions. The seating chart solved my issues, but it also helped me pinpoint and isolate the students causing the disruptions. I am hoping to reintroduce the privilege of flexible seating at the start of next semester; I’ll give the disruptive kids another chance, but I’ll be quick to intervene and isolate them if the problems persist.
Gonna #keepitreal ••• Yes, that's a seating chart I'm about to make. No, I don't have perfect classroom management. Yes, I rearranged my entire classroom. No, not all of my students have been choosing their seats wisely lately. Yes, I am still adapting to flexible seating and experimenting with what works best. No, we won't have assigned seats forever. Yes, I am aware that a seating chart defeats the purpose of flexible seating. No, I don't have all the answers. In fact, I need them. 😂 Hopefully this is a temporary wake-up call for some of my kiddos. IG tends to be a highlight reel but please know it's not perfect up in here. You're not alone! We all struggle in this whole teaching thing! Keep on doing what YOU know is best for the students in YOUR classroom. ❤ Happy Fri-Yay, y'all! A post shared by Write On With Miss G (@writeonwithmissg) on Nov 10, 2017 at 2:50pm PST
Thanks for reading, and don’t forget to enter the giveaway . Also, check out Tracee Orman’s ideas for celebrating the holidays in your classroom and Shana from Hello Teacher Lady’s ways to add warmth and joy to your classroom space . We are the last round of the blog hop, but you can check out all the previous posts linked below!

Share this:
- Click to share on Twitter (Opens in new window)
- Click to share on Facebook (Opens in new window)
16 Comments
This is a excellent guide to implement flex seating. I have had flex seating in my 8th grade classroom for 3 years now, and I modify it every year based on student need. I love the idea of the specific labeled areas, that is definitely the direction I want to go.
Thank you so much for all the wonderful ideas. I am going to share this with other teachers in my building who are considering flex seating.
I love your classroom! Thanks so much for sharing with us! 🙂
- Pingback: 10 Reasons to Implement Learning Stations in the Secondary Classroom | Write on with Miss G
What type of covering do you have on your wall to give it the barn wood look?
I would also like to know the size of your room?
I absolutely love these ideas and feel so inspired!!! Is the woodlike paper on your wall peel and stick? Where is that from?
Thanks so much! It’s just regular bulletin board paper. I stapled it to my wall. You can find it on Amazon: https://www.amazon.com/dp/B00IWSHJPG/?coliid=I3HGM5TJTBDMUF&colid=15ORP71MGLN9D&psc=1&ref_=lv_ov_lig_dp_it
Is it possible that you would share with me the copy of your grant proposal? I am currently writing one myself and would love to see it!
- Pingback: How to Facilitate Successful Learning Stations in the Secondary Classroom | Write on with Miss G
Hey, I sent you an email but haven’t heard back just yet so I wanted to cover my bases and send one here. I would LOVE to see the grant you wrote on flexible seating. Also, I am very impressed with your blog and all your helpful advice and would appreciate to hear from you. Thanks for posting!
Thank you so much for your in-depth explanation of your experience. I’m So intrigued and want to give this a try next year and you spoke directly to me hesitancies!
How many seats does your classroom accomodate with this set up? I have a small-ish room and am curious to know if incorporating different seating arrangements allows for more seats or less (I know this varies depending on the types of arrangements and furniture I would have).
I love this idea and am hoping to implement it in my classroom next year! My biggest concern is on test/quiz days. I rearrange my desks from a Double U shape into rows when they are taking a big quiz or test and of course have multiple versions of each quiz/test to cut down on cheating, but it still happens. What do you do for seating on test days to make sure they’re not cheating? Also, when we have to give the Baseline Midyear, and Mock End of Course Exams, they’re supposed to be set up in rows as if it were the real thing. Do you have any restrictions or difficulties with that?
I have a challenge! I am a middle school art teacher who is about to be teaching only ART 1 (high school credit) at the middle school level. I have been interested in flexible seating for a while now and am wondering what it might look like to have this in an art room.
I am interested in finding out how you do seating for testing? We have so many rules to follow during standardized testing that I worry how flexible seating will have to be adjusted.
Michaels also has bulletin board paper and it is less expensive. You can also get a teacher discount
Leave a Reply Cancel reply
Your email address will not be published. Required fields are marked *
Notify me of follow-up comments by email.
Notify me of new posts by email.
Check out my most popular posts!
August 5, 2018: why i don’t review the syllabus on the first day …, december 16, 2018: 10 ideas for planning engaging novel units, december 11, 2017: comfort in the classroom with flexible seating, july 21, 2018: teaching american literature: my units & favorite lessons.
A clear, arguable thesis will tell your readers where you are going to end up, but it can also help you figure out how to get them there. Put your thesis at the top of a blank page and then make a list of the points you will need to make to argue that thesis effectively.
For example, consider this example from the thesis handout : While Sandel argues persuasively that our instinct to “remake”(54) ourselves into something ever more perfect is a problem, his belief that we can always draw a line between what is medically necessary and what makes us simply “better than well”(51) is less convincing.
To argue this thesis, the author needs to do the following:
- Show what is persuasive about Sandel’s claims about the problems with striving for perfection.
- Show what is not convincing about Sandel’s claim that we can clearly distinguish between medically necessary enhancements and other enhancements.
Once you have broken down your thesis into main claims, you can then think about what sub-claims you will need to make in order to support each of those main claims. That step might look like this:
- Evidence that Sandel provides to support this claim
- Discussion of why this evidence is convincing even in light of potential counterarguments
- Discussion of cases when medically necessary enhancement and non-medical enhancement cannot be easily distinguished
- Analysis of what those cases mean for Sandel’s argument
- Consideration of counterarguments (what Sandel might say in response to this section of your argument)
Each argument you will make in an essay will be different, but this strategy will often be a useful first step in figuring out the path of your argument.
Strategy #2: Use subheadings, even if you remove them later
Scientific papers generally include standard subheadings to delineate different sections of the paper, including “introduction,” “methods,” and “discussion.” Even when you are not required to use subheadings, it can be helpful to put them into an early draft to help you see what you’ve written and to begin to think about how your ideas fit together. You can do this by typing subheadings above the sections of your draft.
If you’re having trouble figuring out how your ideas fit together, try beginning with informal subheadings like these:
- Introduction
- Explain the author’s main point
- Show why this main point doesn’t hold up when we consider this other example
- Explain the implications of what I’ve shown for our understanding of the author
- Show how that changes our understanding of the topic
For longer papers, you may decide to include subheadings to guide your reader through your argument. In those cases, you would need to revise your informal subheadings to be more useful for your readers. For example, if you have initially written in something like “explain the author’s main point,” your final subheading might be something like “Sandel’s main argument” or “Sandel’s opposition to genetic enhancement.” In other cases, once you have the key pieces of your argument in place, you will be able to remove the subheadings.
Strategy #3: Create a reverse outline from your draft
While you may have learned to outline a paper before writing a draft, this step is often difficult because our ideas develop as we write. In some cases, it can be more helpful to write a draft in which you get all of your ideas out and then do a “reverse outline” of what you’ve already written. This doesn’t have to be formal; you can just make a list of the point in each paragraph of your draft and then ask these questions:
- Are those points in an order that makes sense to you?
- Are there gaps in your argument?
- Do the topic sentences of the paragraphs clearly state these main points?
- Do you have more than one paragraph that focuses on the same point? If so, do you need both paragraphs?
- Do you have some paragraphs that include too many points? If so, would it make more sense to split them up?
- Do you make points near the end of the draft that would be more effective earlier in your paper?
- Are there points missing from this draft?
- picture_as_pdf Tips for Organizing Your Essay
7 Steps for Writing an Essay Plan

Chris Drew (PhD)
Dr. Chris Drew is the founder of the Helpful Professor. He holds a PhD in education and has published over 20 articles in scholarly journals. He is the former editor of the Journal of Learning Development in Higher Education. [Image Descriptor: Photo of Chris]
Learn about our Editorial Process
Have you ever started writing an essay then realized you have run out of ideas to talk about?
This can make you feel deflated and you start to hate your essay!

The best way to avoid this mid-essay disaster is to plan ahead: you need to write an Essay Plan!
Essay planning is one of the most important skills I teach my students. When I have one-to-one tutorials with my students, I always send them off with an essay plan and clear goals about what to write.
Essay Planning isn’t as dull as you think. In fact, it really does only take a short amount of time and can make you feel oh so relieved that you know what you’re doing!
Here’s my 7-Step method that I encourage you to use for your next essay:
The 7-Step Guide on How to write an Essay Plan
- Figure out your Essay Topic (5 minutes)
- Gather your Sources and take Quick Notes (20 minutes)
- Brainstorm using a Mind-Map (10 minutes)
- Arrange your Topics (2 minutes)
- Write your topic Sentences (5 minutes)
- Write a No-Pressure Draft in 3 Hours (3 hours)
- Edit your Draft Once every Few Days until Submission (30 minutes)
I’ve been using this 7-Step essay planning strategy since I was in my undergraduate degree. Now, I’ve completed a PhD and written over 20 academic journal articles and dozens of blog posts using this method – and it still works!
Let’s go through my 7 steps for how to write an essay plan.
Prefer to Watch than Read? Here’s our video on writing an Essay Plan.
how to write an essay plan
1. figure out your essay topic. here’s how..
Where did your teacher provide you with your assessment details?
Find it. This is where you begin.
Now, far, far, far too many students end up writing essays that aren’t relevant to the essay question given to you by your teacher. So print out your essay question and any other advice or guidelines provided by your teacher.
Here’s some things that your assessment details page might include:
- The essay question;
- The marking criteria;
- Suggested sources to read;
- Some background information on the topic
The essay question is really important. Once you’ve printed it I want you to do one thing:
Highlight the key phrases in the essay question.
Here’s some essay questions and the key phrases you’d want to highlight:
| Will artificial intelligence threaten the future of work? | Artificial Intelligence, Work |
| How does the film ‘Frozen’ challenge and/or for children who watch it? | Frozen, gender roles, children |
| What are the reasons behind the rise of right-wing nationalism in the past 10 years? | Nationalism, Past 10 years |
| What are the most effective strategies for raising developing nations out of poverty? | Developing Nations, Poverty, Strategies |
This strategy helps you to hone in on exactly what you want to talk about. These are the key phrases you’re going to use frequently in your writing and use when you look for sources to cite in your essay!
The other top thing to look at is the marking criteria. Some teachers don’t provide this, but if they do then make sure you pay attention to the marking criteria !
Here’s an example of a marking criteria sheet:
Sample Essay Topic: Is Climate Change the Greatest Moral Challenge of our Generation?
| Takes an informed position on the issue of climate change | 30% |
| Critically examines competing perspectives on the topic | 30% |
| Applies theoretical ideas to practical situations | 30% |
| Academic writing and referencing | 10% |
Now, if you have a marking criteria you really need to pay attention to this. You have to make sure you’ve ticked off all the key criteria that you will be marked on. For the example above, your essay is going to have to make sure it:
- Takes a position about whether climate change is a serious challenge for human kind;
- Discusses multiple different people’s views on the topic;
- Explores examples and case studies (‘practical situations’);
- Uses referencing to back up your points.
The reason you need to be really careful to pay attention to this marking criteria is because it is your cheat sheet: it tells you what to talk about!
Step 1 only takes you five minutes and helps you to clearly clarify what you’re going to be talking about! Now your mind is tuned in and you can start doing some preliminary research.
2. Gather your Sources and take Quick Notes. Here’s how.
Now that you know what your focus is, you can start finding some information to discuss. You don’t want to just write things from the top of your head. If you want top marks, you want some deep, detailed and specific pieces of information.
Fortunately, your teacher has probably made this easy for you.
The top source for finding information will be the resources your teacher provided. These resources were hand picked by your teacher because they believed these were the best sources available our there on the topic. Here are the most common resources teachers provide:
- Lecture Slides;
- Assigned Readings.
The lecture slides are one of the best resources for you to access. Lecture slides are usually provided online for you. Download them, save them on your computer, and dig them up when it’s time to write the essay plan.
Find the lecture slides most relevant to your topic. To take the example of our climate change essay, maybe climate change is only discussed in three of the weeks in your course. Those are the three weeks’ lecture slides you want to hone-in on.
Flick through those lecture slides and take quick notes on a piece of paper – what are the most important topics and statistics that are relevant to your essay question?
Now, move on to the assigned readings . Your teacher will have selected some readings for you to do for homework through the semester. They may be eBooks, Textbooks or Journal Articles.
These assigned readings were assigned for a reason: because they have very important information to read ! Scan through them and see if there’s any more points you can add to your list of statistics and key ideas to discuss.
Next, try to find a few more sources using Google Scholar. This is a great resource for finding more academic articles that you can read to find even more details and ideas to add to your essay.
Here’s my notes that I researched for the essay question “Is Climate Change the Greatest Moral Challenge of our Generation?” As you can see, it doesn’t have to be beautiful #Studygram notes! It’s just rough notes to get all the important information down:

Once you’ve read the assigned lecture slides and readings, you should have a good preliminary list of ideas, topics, statistics and even quotes that you can use in step 3.
3. Brainstorm using a Mind-Map. Here’s how.
Do your initial notes look a little disorganized?
That’s okay. The point of Step 2 was to gather information. Now it’s time to start sorting these ideas in your mind.
The best way to organize thoughts is to create a Mind-Map. Here’s how Mind-Maps often look:

For your essay plan Mind-Map, write the essay question in the middle of the page and draw a circle around it.

Then, select the biggest and most important key ideas that you think are worth discussing in the essay. To decide on these, you might want to look back at the notes you took in Step 2.
Each key idea will take up around about 200 – 350 words (1 to 2 sentences).
Here’s a rough guide for how many key ideas you’ll want depending on your essay length:
- 1000-word essay: 3 to 4 key ideas
- 1500-word essay: 5 to 7 key ideas
- 2000-word essay: 6 to 8 key ideas
- 3000-word essay: 9 to 12 key ideas
Once you’ve selected your key ideas you can list them in a circle around the essay question, just like this:

Last, we need to add detail and depth to each key idea. So, draw more lines out from each key ideas and list:
- Two sources that you will cite for each key idea;
- A statistic or example that you will provide for each key idea;
- Any additional interesting facts for each key idea
Here’s how it might look once you’re done:

4. Arrange your Topics. Here’s how.
You’re well and truly on your way to getting your essay down on paper now.
There’s one last thing to do before you start getting words down on the manuscript that you will submit. You need to arrange your topics to decide which to write first, second, third, fourth, and last!
Here are some things to keep in mind:
- Start and end with your strongest points;
- Ensure the points logically flow.
To ensure your points logically flow, think about how you’re going to transition from one idea to the next . Does one key point need to be made first so that the other ones make sense?
Do two key points seem to fit next to one another? If so, make sure you list them side-by-side.
Have a play around with the order you want to discuss the ideas until you’re comfortable. Then, list them in order. Here’s my order for my Climate Change essay:
| [Introduction] | 125 |
| What is climate change? | 250 |
| Is climate change caused by humans? | 250 |
| What are the current impacts of climate change? | 250 |
| What are the future impacts of climate change? | 250 |
| Is climate change reversible? | 250 |
| [Conclusion] | 125 |
Each of these key ideas is going to turn into a paragraph or two (probably two) in the essay.
5. Write your topic Sentences in just 5 minutes. Here’s how.
All good essays have clear paragraphs that start with a topic sentence . To turn these brainstormed key points into an essay, you need to get that list you wrote in Step 5 and turn each point into a topic sentence for a paragraph.
It’s important that the first sentence of each paragraph clearly states the paragraph’s topic. Your marker is going to want to know exactly what your paragraph is about immediately. You don’t want your marker to wait until the 3 rd , 4 th or 5 th line of a paragraph before they figure out what you’re talking about in the paragraph.
So, you need to state what your key idea is in the first sentence of the paragraph.
Let’s have a go at turning each of our key ideas into a topic sentence:
| What is climate change? | Climate change is the term used to explain rising atmospheric temperatures caused by carbon build-up in the atmosphere. |
| Is climate change caused by humans? | Most scientists believe climate change is caused by humans. |
| What are the current impacts of climate change? | Climate change is having an impact on people and environments right now. |
| What are the future impacts of climate change? | The effects of climate change are expected to increase in coming decades. |
| Is climate change reversible? | The window for reversing climate change is rapidly closing. |
6. Write a No-Pressure Essay Draft in just 3 Hours. Here’s how.
Okay, now the rubber hits the road. Let’s get writing!
When you write your first draft, don’t put pressure on yourself. Remind yourself that this is the first of several attempts at creating a great essay, so it doesn’t need to be perfect right away. The important thing is that you get words down on paper.
To write the draft, have a go at adding to each of your topic sentences to turn them into full paragraphs. Follow the information you wrote down in your notes and Mind-Map to get some great details down on paper.
Forget about the introduction and conclusion for now. You can write them last.
Let’s have a go at one together. I’m going to choose the paragraph on my key idea “Is climate change caused by humans?”
I’ve already got my first sentence and my brainstormed ideas. Let’s build on them to write a draft paragraph:

- “Most scientists believe climate change is caused by humans. In fact, according to the IPCC, over 98% of climate change scientists accept the scientific data that climate change is caused by humans (IPCC, 2018). This figure is very high, signalling overwhelming expert consensus. This consensus holds that the emission of carbon from burning of fossil fuels in the 20 th Century is trapping heat into the atmosphere. However, a minority of dissenting scientists continue to claim that this carbon build-up is mostly the fault of natural forces such as volcanoes which emit enormous amounts of carbon into the atmosphere (Bier, 2013).”
Your turn – have a go at your own draft paragraphs based on your Mind-Map for your essay topic! If you hit a rut or have some trouble, don’t forget to check out our article on how to write perfect paragraphs .
Once you’ve written all your paragraphs, make sure you write an introduction and conclusion .
Gone over the word count? Check out our article on how to reduce your word count.
7. Edit your Draft Once every Few Days until Submission. Check out this simple approach:
Okay, hopefully after your three hour essay drafting session you’ve got all your words down on paper. Congratulations!
However, we’re not done yet.
The best students finish their drafts early on so they have a good three or four weeks to come back and re-read their draft and edit it every few days.
When coming back to edit your draft , here’s a few things to look out for:
- Make sure all the paragraph and sentence structure makes sense. Feel free to change words around until things sound right. You might find that the first time you edit something it sounds great, but next time you realize it’s not as good as you thought. That’s why we do multiple rounds of edits over the course of a few weeks;
- Check for spelling, grammar and punctuation errors;
- Print out your draft and read it on paper. You notice more mistakes when you read a printed-out version;
- Work on adding any more details and academic sources from online sources like Google Scholar to increase your chance of getting a top grade. Here’s our ultimate guide on finding scholarly sources online – it might be helpful for this step!
Before you go – Here’s the Actionable Essay Plan Tips Summed up for you
Phew! That essay was tough. But with this essay plan, you can get through any essay and do a stellar job! Essay planning is a great way to ensure your essays make sense, have a clear and compelling argument, and don’t go off-topic.
I never write an essay without one.
To sum up, here are the 7 steps to essay planning one more time:
The 7-Step Guide for How to Write an Essay Plan

- Chris Drew (PhD) https://helpfulprofessor.com/author/chris-drew-phd-2/ 25 Number Games for Kids (Free and Easy)
- Chris Drew (PhD) https://helpfulprofessor.com/author/chris-drew-phd-2/ 25 Word Games for Kids (Free and Easy)
- Chris Drew (PhD) https://helpfulprofessor.com/author/chris-drew-phd-2/ 25 Outdoor Games for Kids
- Chris Drew (PhD) https://helpfulprofessor.com/author/chris-drew-phd-2/ 50 Incentives to Give to Students
1 thought on “7 Steps for Writing an Essay Plan”

Nice fun and concise approach to essays, thank you
Leave a Comment Cancel Reply
Your email address will not be published. Required fields are marked *

Essay writing
- Introduction
Answering the question
Generating ideas, planning your essay, different planning methods.
- Writing your essay
- Developing your essay writing
Useful links for writing essays
- Study Advice Helping students to achieve study success with guides, video tutorials, seminars and appointments.
- Academic writing LibGuide Expert guidance on punctuation, grammar, writing style and proof-reading.
- Guide to citing references Includes guidance on why, when and how to use references correctly in your academic writing.
- Reading and notemaking LibGuide Expert guidance on managing your reading and making effective notes.
- Academic Phrasebank Use this site for examples of linking phrases and ways to refer to sources.
- Ten stages of assignment success (Prezi) Based upon Burns and Sinfield, Essential Study Skills.
- Critical Thinking A short video on Critical Thinking that the BBC have prepared in partnership with The Open University
The first thing to do when preparing to write an essay is to make a plan. You could just rush in and write everything that comes into your head, but that would make it difficult for your marker to read and would reduce the effectiveness of your ideas. These will make much stronger arguments if you group them together than they would do on their own.
The guidance on this page will show you how to plan and structure your essay to produce a strong and focused response to the question.
A very common complaint from lecturers and examiners is that students write a lot of information but they just don't answer the question. Don't rush straight into researching – give yourself time to think carefully about the question and understand what it is asking.
|
Set the question in context – how does it fit with the key issues, debates and controversies in your module and your subject as a whole? An essay question often asks about a specific angle or aspect of one of these key debates. If you understand the context it makes your understanding of the question clearer. |

Underlining key words – This is a good start point for making sure you understand all the terms (some might need defining); identifying the crucial information in the question; and clarifying what the question is asking you to do (compare & contrast, analyse, discuss). But make sure you then consider the question as a whole again, not just as a series of unconnected words.
Re-read the question – Read the question through a few times. Explain it to yourself, so you are sure you know what it is asking you to do.
Try breaking the question down into sub-questions – What is the question asking? Why is this important? How am I going to answer it? What do I need to find out first, second, third in order to answer the question? This is a good way of working out what important points or issues make up the overall question – it can help focus your reading and start giving your essay a structure. However, try not to have too many sub-questions as this can lead to following up minor issues, as opposed to the most important points.
- Answering the question and planning (video) Watch this brief video tutorial for more on the topic.
- Answering the question and planning (transcript) Read the transcript.

The kinds of things to note briefly are:
- What you already know about the topic – from lectures, seminars, general knowledge.
- Things you don't know about the topic, but need to find out in order to answer the question.
- Initial responses or answers to the question – what you think your conclusion might possibly be.
This helps you start formulating your argument and direction for answering the question. It also helps you focus your reading, as you can pinpoint what you need to find out and go straight to the parts of books, chapters, articles that will be most relevant.
After reading - After your reading, it is often good to summarise all your findings on a page. Again, a spider diagram can help with this.
Bringing together the key points from your reading helps clarify what you have found out, and helps you find a pathway through all the ideas and issues you have encountered. If you include brief details of authors and page nos. for key information, it can act as a quick at-a-glance guide for finding the evidence you need to support your points later.
It also helps you see how your initial response to the question might have changed or become more sophisticated in light of the reading you've done. It leads into planning your essay structure.

- It enables you to work out a logical structure and an end point for your argument before you start writing.
- It means you don't have to do this type of complex thinking at the same time as trying to find the right words to express your ideas.
- It helps you to commit yourself to sticking to the point!
You need to work out what to include, and what can be left out. It is impossible to cover everything in an essay, and your markers will be looking for evidence of your ability to choose material and put it in order. Brainstorm all your ideas, then arrange them in three or four groups. Not everything will fit so be prepared to discard some points (you can mention them briefly in your introduction).
Outline what you are going to include in each section:
- Introduction : Address the question, show why it's interesting and how you will answer it.
- Main body : Build your argument. Put your groups of ideas in a sequence to make a persuasive argument. One main point in each paragraph.
- Conclusion : Summarise your arguments and evidence, and show how they answer the original question.
Writing a summary - Some people plan best once they have written something, as this helps clarify their thinking. If you prefer to write first, try summarising the central idea of your essay in a few sentences. This gives you a clear direction for working out how you are going to break it down into points supported by evidence. You can then use one of the methods below to write a more detailed plan.
- Structuring your essay (video) Watch this brief video tutorial for more on the topic.
- Structuring your essay (transcript) Read the transcript

Bullet points / linear plans - This type of plan lists the main points using bullet points or numbers. It can be a brief outline of the main point per paragraph, or a more detailed plan with sub-points and a note of the evidence to support each point (e.g. source and page no.).
|
If you know you tend to write too much, cut down the number of individual points in your plan. If you find it difficult to write enough, expand on some of your points with sub-points in the planning stage. |
No plan is perfect, so be prepared for your ideas to change as you write your essay. However, once you have an initial plan it is much easier to adapt it and see where new things fit if your thinking does change.
- << Previous: Home
- Next: Writing your essay >>
- Last Updated: Jul 23, 2024 2:41 PM
- URL: https://libguides.reading.ac.uk/essays
- Link to facebook
- Link to linkedin
- Link to twitter
- Link to youtube
- Writing Tips
How to Write a Perfect Essay Plan

- 4-minute read
- 9th December 2019
Every good essay starts with a good essay plan. And planning your essay is important, as it will help you express each point you need to make clearly and in a logical order. But what goes into a good essay plan? And how can you write one? Join us for a quick look at how this works.
1. Read the Question Closely
The first step in any essay plan is to look at the question you’ve been set. It should provide some clue as to the kind of essay required, such as whether it is an open or closed question . These differ as follows:
- An open question permits various answers. For instance, if you were set an English literature essay, you might be asked What are the main social themes in the writing of Charles Dickens? This would allow you to discuss a range of concepts in response. Writing you essay plan would then involve narrowing down your subject matter so you can focus on one issue.
- A closed question focuses on a specific issue, often asking you to agree or disagree with something. For instance, a closed question could be Is technology a destructive force in the writing of Charles Dickens? In this case, the question dictates the form of the essay, as you would need to look at arguments for and against the claim and, finally, come to a conclusion.
Keep in mind that both question types require an in-depth answer! Some closed questions could technically be answered by writing ‘Yes’ or ‘No’ on a piece of paper, but this won’t get you great marks. Instead, think of the question as a prompt for you to show off what you know on the topic.
And if you’re not sure about anything, such as how a question is worded, you will want to check this with whomever set the assignment.
2. Brainstorm Ideas and Organise Your Research
After studying the essay question, the next step is to brainstorm ideas for answering it. And the starting point for this is to organise your research.
In other words, it’s time to get out those lecture notes! In fact, you should make a mind map of everything you know on the essay topic.
Find this useful?
Subscribe to our newsletter and get writing tips from our editors straight to your inbox.

Look for anything that is relevant to the essay question. You can then narrow down the possible answers to the topics that interest you most. This should also help you identify any gaps in your knowledge, so you can make notes on what else you may need to research for your essay.
3. Draft an Essay Outline
The last step in writing an essay plan is to outline your essay. This means breaking it down section by section, paragraph by paragraph, so you know exactly what you need to write to answer the essay question.
The exact content will depend on the topic and word count . But, as a rule, most essays will have a basic structure along the following lines:
- Introduction – A paragraph or two that sets out your main argument.
- Main Body – This is the main chunk of your essay. To plan this, break down your argument into paragraphs or sections, sticking to one main idea per paragraph. Once you’ve done this, note down how each point supports your argument, plus any quotes or examples you will use.
- Conclusion – A brief summary of your arguments and evidence.
- References – A list of sources you plan to use in your essay.
This will then guide the writing process, making sure you always stay on topic.
Expert Essay Proofreading
Planning your essay is just the first step: you then need to write it! And to make sure it’s the best it can be, you’ll want to have it proofread . Our expert editors can help with that, making sure that your writing is always academic in tone and completely error free. Just let us know how we can help!
Share this article:
Post A New Comment
Get help from a language expert. Try our proofreading services for free.
5-minute read
Free Email Newsletter Template (2024)
Promoting a brand means sharing valuable insights to connect more deeply with your audience, and...
6-minute read
How to Write a Nonprofit Grant Proposal
If you’re seeking funding to support your charitable endeavors as a nonprofit organization, you’ll need...
9-minute read
How to Use Infographics to Boost Your Presentation
Is your content getting noticed? Capturing and maintaining an audience’s attention is a challenge when...
8-minute read
Why Interactive PDFs Are Better for Engagement
Are you looking to enhance engagement and captivate your audience through your professional documents? Interactive...
7-minute read
Seven Key Strategies for Voice Search Optimization
Voice search optimization is rapidly shaping the digital landscape, requiring content professionals to adapt their...
How to Ace Slack Messaging for Contractors and Freelancers
Effective professional communication is an important skill for contractors and freelancers navigating remote work environments....
Make sure your writing is the best it can be with our expert English proofreading and editing.
Trending Post : Easy Fixes for Behavior Challenges
The secret to classroom seating arrangements – How to decide what’s right for you.
Deciding on a seating chart in your classroom can be a challenge. Who should sit together? Who MUST sit apart? However, before you can begin assigning seats in class, you must make the challenging decision about how to arrange the desks or tables. While it seems simple, there are so many different classroom seating arrangements to choose from and each has its own pros and cons. You’ve also got to take into account any flexible seating options you might have. So how do you decide the best seating arrangement for your classroom?
The reality is there is no single correct answer to the age-old question of how to best arrange your desks. Even when you try to find the research, it is difficult to find empirical evidence to support putting desks in rows, pairs, or table teams. So what’s a teacher to do?

How does your seating arrangement affect learning for students?
You probably aren’t surprised to read that the seating arrangement has an impact on student learning. Studies have shown that students who are in the front rows are typically more attentive than those in the back. They are more likely to ask questions and actively participate.
However, few elementary classrooms offer open seating, where students self-select their desk. Instead, we select students that need close proximity to maintain attention or get adequate support to sit in the front rows. Our goal is to improve those students’ time on task and learning through our consistent interaction.
While you probably already knew that front row seats encourage engagement, did you know that your seating arrangement has also been shown to impact how you communicate with your class and how they communicate with peers? This makes it critical that we create seating arrangements that align with our instructional goals and activities so we can maximize student learning.
The Pros & Cons of Common Classroom Layouts
As you begin to consider your seating chart for this year, check out the pros and cons of several popular classroom seating arrangements. Hopefully, this will help you decide what is right for you, your students, and your classroom.
Rows/ Traditional Seating
This arrangement likely needs little explanation. It was designed for a lecture, where students sit facing the instructor with their backs to one another.
Students in the front rows have the highest rates of engagement while back rows tend to be less engaged.
This style of seating can also be done on an angle, often called stadium seating. In this layout, the desks are in angled rows and may or may not touch.

Pros of Rows:
Rows work well if you have lots of space and there is little expectation for group or partner work at desks.
This set up also encourages less talking during instruction. With all students facing you, they are easily able to see the board.
Cons of Rows:
Most classrooms are not spacious, meaning that you’ll most likely need to do a modified version of this (like stadium seating) or choose a different seating arrangement.
Rows are not conducive to cooperative learning or group work, and they can be challenging when it comes to classroom management unless you have a small class. Once you have three or more rows, it can be challenging to see and keep all students on task.
These cons were a reason my classroom was very seldom in traditional rows outside of state testing. Occasionally, we would do modified rows or stadium seating if the group was having difficulties staying on task and listening. However, cooperative learning and discussion is a huge part of my teaching so the cons of this format majorly outweighed any benefits for me.
The pair arrangement can be done with desks or tables, and allows the teacher to move around the room between pairs.
Two students can sit at a single trapezoid table, if your classroom has tables instead of desks.
Alternatively, two desks can be pushed together to create a pair.

Pros of Paired Seating:
This is a great classroom seating arrangement for controlled conversations and partner work. Since you’ve selected the pairs, you can purposefully partner students who may work well together.
I loved using this arrangement later in the year, once I got to know my students and their personalities a little better because it allowed me to purposefully partner students in a way that allowed both partners to shine and lift one another up, academically. The partnerships often led to very rich discussions, which could then be shared in the larger class discussion.
This arrangement typically uses slightly less floor space than traditional rows, and it creates an environment where partnership and cooperative learning is expected.
Cons of Paired Seating:
Sitting in pairs also has some downsides. Since students are in partners, it can be more difficult to stop talking or off-task behavior. You may find that 1-2 students need to be “islands” and sit separated from a partner to do their best learning and maintain focus. Depending on how you present this, it can be stigmatizing for a student to have to sit alone.
I found that it was really important to explain why the student was becoming an island when I made this move. I also made sure to explain what he or she needed to do to become part of a pair again.
Depending on the parent, I also communicated this adjustment to parents to let them know why their child had been placed away from peers, making sure to discuss the benefits for their child and his or her learning rather than the idea of this being a punishment.
The arrangement also tends to still take up quite a bit of classroom space, so it can be difficult to pull off with large classes or in small rooms. You may also need to make a trio if you have an odd number of students.
Semi-circle or U-shape
This is a modification of a round-table format, where students and teachers share one large table area (or desk area) for discussion.
The traditional round-table arrangement is uncommon in classrooms due to the number of students and space needed to accommodate the arrangement. Therefore, it is not included in the layouts discussed.
For the semi-circle or u-shape arrangement, participants face each other, but the teacher has space to move around the room.
This arrangement has also been referred to as a horseshoe, and there is a modified version called the double horseshoe that involves an inner and outer semi-circle.

Pros of U-shape seating:
This layout is great for classrooms that want to encourage discussion between the students and teacher. Students can still see anything projected onto the board, which makes it great for classroom conversations.
The double horseshoe layout, which has the inner and outer semi-circles, offers a slightly more restricted format for conversation. This can be a good alternative if you need some additional control of student interaction or in cases where you have a large number of desks in a small space.
I loved the double horseshoe those years that I had a rambunxious group where several students were able to set off peers because I could still make sure the students were seated in a way that reduced their likelihood of interactions. I could also have the kiddos who needed extra support closer to the front without the distractions from the entire class.
Cons of U-shape seating:
There are several major cons to this arrangement, but there are also a few fixes that I will share. This was an arrangement I used in my room regularly, but I had to find some adjustments.
The U-shape format requires lots of room, which means most classrooms will need to use a double horseshoe layout to make this work. One negative of the double horseshoe is that students often turn around and get chatty with peers behind them.
One of the biggest cons of this arrangement, however, is that kids move! When they move their desks tend to move with them.
Since my students sat on yoga balls, this was likely a bigger issue in my class than I would’ve seen with traditional desks and chairs, but we were constantly having to push desks back into their U-shaped format. I occasionally debated about using zip-ties to keep the desks together, but never actually went that far.
Another con was the fact that it was harder to get to the students in the outer U when I did the double horseshoe format. I solved this by leaving a space in the center of each so I could quickly and easily access all of my students if they needed help or had questions during work times. Here’s what the layout looked like with that modification:

Table Groups
Finally, table groups are a common arrangement in many classrooms. Depending on how many students you have and whether you use desks or have tables in your room, you can create groups of 4-5 students.
Since this is one of the most common classroom layouts, I won’t spend too much time digging into what it looks like. Instead, let’s talk about the pros and cons of this classroom seating arrangement.
P ros of Table Groups:
This type of classroom seating arrangement is amazing for group work and cooperative learning.
This was typically how I started my school year because I wanted to encourage students to get to know one another.
This arrangement is great for large classes or small classrooms because it saves space.

By purposefully planning your groups, you can build upon student strengths and use the format as a part of your behavior management plan. Table points were a great way to build some friendly competition in my classroom, and they were great for encouraging on-task behavior.
Cons of Table Groups:
Remember how I mentioned that I liked to start the year in table groups? Well, we never stayed there for long. Here’s why –

This classroom seating arrangement is great for cooperative learning, but it is TERRIBLE for keeping talking to a minimum.
After the first few weeks, I typically had to move my students out of this arrangement because it was becoming a barrier to their learning.
Facing peers promotes off-task behavior for many students, and with groups, it can be challenging to separate behavior issues or chatty friends from one another. There are just too few places to keep them apart.
This is why I typically moved my students’ desks into a double horseshoe layout for the middle chunk of the year. As they matured we were able to transition back into groups or table teams (like below) to finish up the year.

The table teams were the closest I could come to a round-table format, and they really encouraged some interesting discussion. However, they were definitely much harder to manage.
How can I improve my classroom arrangement?
As you can see, there is no one-size-fits-all solution to a classroom seating arrangement. You’ve got to take into account a number of factors to find what is best for you.
There are so many variables to consider, and you don’t need to feel like a failure of groups don’t work for you. (This was a feeling I often struggled with when I reached the point that I needed to move my desks from the table groups they began the year in.)
Instead, consider your classroom layout as a piece of your classroom management system. You use different classroom seating arrangements to serve different purposes and to keep your classroom on-task and learning.
If you are like me, you see grouping as the ideal seating arrangement and feel like you’ve somehow failed when you’re not able to keep your students in groups and still keep everyone on task. I’m giving you permission to let yourself off the hook. Being a great teacher does NOT mean a one size fits all seating plan. Every year is different, and it’s okay for the seating plan to change as well.
That being said, here are some ways you can improve your classroom seating arrangement.
Align your classroom seating arrangement to the activities you use most often.
When you plan your classroom seating arrangement, consider the goals of your instruction and the activities you commonly use.
If you’re working through a unit that will have lots of whole group discussion, you may want to use a horseshoe or double horseshoe arrangement.
Working on some cooperative projects, table groups might be perfect!
There is no hard-and-fast rule about how often you should re-arrange your seating assignments, so you can make these adjustments as needed throughout the year. If your class is really on top of it, you can even practice transitioning between 2 different seating arrangements so your students can make a quick change to better meet the needs of the learning experience.
Take the classroom flow into account.
No matter how badly you might want to do a certain arrangement, if it impedes the flow of your classroom, it just isn’t going to work.
Make sure that you’ve got adequate space for any arrangement you decide to try. This means that desks aren’t too close to your small group space or classroom library.
It also means making sure you’re easily able to reach all students to address questions or needs.
Don’t be afraid to go your own way.
Consider a combination configuration if your classroom or students need it. By mixing and matching the arrangements described above you can find a way to meet the needs of all students.
There is no rule that says you can’t create your own layout, so don’t be afraid to play with your seating arrangement until you find a format that works for you. For example, the layout below is great if you have some students who are able to focus in groups, but others that need to fewer distractions or can only handle being partnered during instruction.

The reality of choosing a classroom seating arrangement
Your seating arrangement may seem like a small thing, but it is an important part of creating an effective classroom . Deciding on a good seating arrangement isn’t easy, and you might discover the great ideas you thought you had are a total mess. There are also so many factors that come into play with your decision.
For example, I once worked with a principal that dictated classroom set-up, right down to the seating arrangement.
While I strongly believe that your seating arrangement should be determined by the individual teacher based on personality, teaching style, and the needs of the current class, there was only so much I could do in that situation so we spent a lot of time out of our desks.
Seating arrangements can certainly be changed throughout the year as students become more independent, more comfortable with each other, or as the needs in your room change.
Some years my team had a running joke that if you wanted to find me, listen for the movement of desks because I strongly believe we should all play around with seating arrangements until we find the one that works best for our class.
This might look different every few weeks as student friendships and maturity grow and change or we move into different units with new activities and goals. That’s okay!
I’ve rarely had students care about the fact that the seating arrangement is changing because I do my best to be upfront about the reasons for the change. Sometimes it is to increase focus or separate chatty friends. Other times I make moves to help students work with someone new.
Quite honestly, my more introverted students are relieved when they can have their own space to work in peace and quiet so many of my moves work out better for everyone in the end.
Don’t be afraid to get creative when it comes to classroom seating arrangements.

If you enjoyed this article, here are others you’ll love, too!
- Flexible Seating for Beginners – How to get started
- How to Identify the Perfect Classroom Seating Plan
- 20 Questions to Get Kids Talking & Build Classroom Community
Similar Posts

8 Things to Say Goodbye to on the Last Day of School

Getting Ready for Back to School: 10 Easy Summer Prep Tips for Teacher

Organize for Better Home-School Communication

Flexible seating for beginners: How to Get Started

Classroom Community Books: My 26 Favorites for Back to School

Why transitions are the key to an effective classroom & how to improve them
Leave a reply cancel reply.
You must be logged in to post a comment.
Search form
- About Faculty Development and Support
- Programs and Funding Opportunities
Consultations, Observations, and Services
- Strategic Resources & Digital Publications
- Canvas @ Yale Support
- Learning Environments @ Yale
- Teaching Workshops
- Teaching Consultations and Classroom Observations
- Teaching Programs
- Spring Teaching Forum
- Written and Oral Communication Workshops and Panels
- Writing Resources & Tutorials
- About the Graduate Writing Laboratory
- Writing and Public Speaking Consultations
- Writing Workshops and Panels
- Writing Peer-Review Groups
- Writing Retreats and All Writes
- Online Writing Resources for Graduate Students
- About Teaching Development for Graduate and Professional School Students
- Teaching Programs and Grants
- Teaching Forums
- Resources for Graduate Student Teachers
- About Undergraduate Writing and Tutoring
- Academic Strategies Program
- The Writing Center
- STEM Tutoring & Programs
- Humanities & Social Sciences
- Center for Language Study
- Online Course Catalog
- Antiracist Pedagogy
- NECQL 2019: NorthEast Consortium for Quantitative Literacy XXII Meeting
- STEMinar Series
- Teaching in Context: Troubling Times
- Helmsley Postdoctoral Teaching Scholars
- Pedagogical Partners
- Instructional Materials
- Evaluation & Research
- STEM Education Job Opportunities
- Yale Connect
- Online Education Legal Statements
You are here
Classroom seating arrangements.
The physical configuration of a classroom is more than an organizational or stylistic choice by the instructor. In-person classroom seating arrangements affect student learning, motivation, participation, and teacher-student and student-student relationships (Fernandes, Huang & Rinaldo 2011). In the virtual classroom space, such as real-time platforms like Zoom, instructional choices to employ engagement strategies and provide opportunities for feedback also have a positive impact on student learning outcomes (Francescucci and Rohani 2019). Below are specific strategies and examples to enhance student learning in a variety of classroom spaces.
In-Person Classroom Learning Spaces
An instructor can maximize student engagement by changing the physical setup of chairs, tables, and presentations in the classroom. Instructional communication theory suggests that seating arrangements can impact how the instructors communicate with students and how students interact with one another, impacting engagement, motivation, and focus (McCorskey and McVetta, 1978). More recent research suggests that the set-up of the classroom space shapes instructor pedagogy, choice of activities, and on-task student behavior. For example, a classroom with seating affixed and directed toward a podium at the front of the room results in instructors spending more time in lecture and students demonstrating less active engagement. In contrast, roundtable seating arrangements lead to instructors and students engaging in more active learning activities, resulting in improved learning outcomes (Brooks 2012). Further studies demonstrate that students prefer more flexible seating arrangements (Harvey and Kenyon, 2013). In particular, students express a preference for classrooms with mobile vs. fixed chairs, and trapezoidal tables with chairs on casters vs. rectangular tables with immobile chairs.
In general, spaces designed in a student-centered manner, focusing on learner construction of knowledge and collaboration, can support student learning (Rands and Gansemer-Topf, 2017). In reality, many classrooms at colleges and universities have been built using more conventional models for lecture and seminar-type courses. Instructors can consider ways to modify seating arrangements and align those arrangements with the demands of classroom activities to maximize student learning.

Figure 1: Six options for classroom seating arrangements
Traditional
The traditional lecture setup typically consists of rows of fixed seating. Students face the instructor with their backs to one another. This classroom seating arrangement is historically common in colleges and universities, minimizing student-student communication and largely supporting a “sage on the stage” learning environment. The highest communication interactions between professors and students typically occurs with students in the first row or along the middle of the classroom. Students in back rows are more likely to be less engaged.
Many seminar-course room arrangements may consist of an instructor and students sitting around a single large table. This seating arrangement can also be formed using individual desks. Students and instructors all face one another in this setup, which can support whole-class as well as partner dialogue.
Horseshoe or Semicircle
The horseshoe or semi-circle offers a modified roundtable setup, where all participants face each other while the instructor can move about the room. The horseshoe encourages discussion between students and with the instructor, although this setup tends to encourage more engagement between the instructor and students directly opposite, with slightly lesser amounts for students immediately adjacent to the instructor. A horseshoe setup can be particularly effective when the instructor wishes to project and discuss course-related material in the front of the class.
Double Horseshoe
This seating arrangement involves an inner and outer horseshoe, and similar to the conventional horseshoe, invites greater discussion than the traditional format. It is more limited by the backs of students within the inner circle facing students in the outer circle. However, students may also more easily interact with those nearest to them or turn around and face students behind them for group work.
Pods (Groups, Pairs)
The pod or pair arrangement can be designed with rectangular, circular or trapezoidal tables, or individual desks. With regards to stations, instructors can place several tables together to form student groups (e.g. 3 - 4 students), or pairs. This arrangement can be especially advantageous when students will work in groups or pairs with their classmates for a large portion of class time. More generally, this arrangement communicates a learning community where students are expected to work with one another.
Recommendations
Book a classroom.
Instructors can consider booking spaces at Yale where the furniture setup closely aligns with course goals. Specific features and pictures of Yale classrooms can be found at classrooms.yale.edu .
Align Arrangement with Activity
Instructors are encouraged to map the classroom seating arrangement to the goals of instruction. For instance, classes involving group work might utilize group pods, while whole class discussion might benefit from a horseshoe. Instructors can also strategically change arrangements during class to suit shifting learning goals.
Bolster Arrangement With Engagement
When dynamic change to seating arrangements proves difficult, instructors can bolster the physical space through intentional engagement . For example, in a typical horseshoe arrangement where students along the sides may experience less attention, an instructor may be more deliberate in their interactions with those particular learners. In a traditional classroom setup where the instructor cannot change the seating arrangements, they can maximize student engagement by implementing Think-Pair-Share or other active learning activities conducive to students working with a neighbor. They can also encourage student groups to work in other spaces of the classroom as needed (e.g. on the steps, front of the room, etc.).
Set Up Early
To the extent possible, an instructor can designate time for setting up the classroom and/or can ask students to help. If there is no class immediately before, this can be done prior to class, or alternatively during the first few minutes. Similar consideration should be given to resetting the room after class ends.
Virtual, Synchronous Learning Spaces
Students are engaged in synchronous online learning when effective interaction occurs among students and between the students and instructor (Watts 2016). There are a variety of Zoom features that can enhance student engagement when aligned with the instructor’s learning outcomes:
Gallery View : With the ability to display up to 49 squares on one screen, this view is optimal when an instructor wants to facilitate a synchronous discussion with all or most of the students.
Break-out Rooms : Instructors who want their students to work in small groups on a task, set of discussion questions, problem set, or lab may find break-out rooms particularly effective. Students may be added to breakout rooms manually, automatically from pre-assignment, or by self-selection.
Share Screen : This feature is frequently used for a mini-lecture during a synchronous learning session, so that the instructor or a student presenting may share slides while talking through the disciplinary content. Instructors and students might also share and possibly collaborate on documents, programs or visuals, as well as interactive Zoom features, such as the whiteboard .
Spotlighting : When an instructor has invited a guest speaker or a group of panelists, the spotlight feature in Zoom enables an instructor to feature up to nine people for students at the top of the gallery view. This feature also works well for student presentations.
Display names: Instructor and students can change their display name in Zoom to reflect the name they want to be called as well as their use of pronouns–enabling everyone in the learning space to personalize the experience. To change your display name in a live meeting, right click your video and click “Rename.” To change your name in all of your Zoom meetings, edit the name provided in your Zoom profile .
Given that many people experience Zoom fatigue, instructors might consider designating specific times for cameras to be on or off during synchronous learning. Some students may need to opt out of camera use altogether for issues related to internet reliability and privacy in relation to the personal space from which they are participating.
Brooks, D. Christopher (2012). Space and Consequences: The Impact of Different Formal Learning Spaces on Instructor and Student Behavior. Journal of Learning Spaces, 1(2).
Fernandez, AC, Huang, J, and Rinaldo, V. (2011). Does Where a Student Sits Really Matter?–The Impact on Seating Locations on Student Classroom Learning. International Journal of Applied Educational Studies, 10(1).
Francescucci, A and Laila Rohani, L. Exclusively Synchronous Online (VIRI) Learning: The Impact on Student Performance and Engagement Outcomes. Journal of Marketing Education 2019, Vol. 41(1) 60–69.
Harvey EJ, Kenyon MC. (2013). Classroom Seating Considerations for 21st Century Students and Faculty. Journal of Learning Spaces, 2(1).
McCorskey JC and McVetta RW. (1978). Classroom Seating Arrangements: Instructional Communication Theory Versus Student Preferences. Communication Education, 27, 99-111.
Rands ML and Gansemer-Topf AN. (2017). The Room Itself is Active: How Classroom Design Impacts Student Engagement. Journal of Learning Spaces, 6(1).
Watts, L. (2016) Synchronous and Asynchronous Communication in Distance Learning: A Review of the Literature. Quarterly Review of Distance Education, 17(1), 23-32.
YOU MAY BE INTERESTED IN

The Poorvu Center for Teaching and Learning routinely supports members of the Yale community with individual instructional consultations and classroom observations.

Reserve a Room
The Poorvu Center for Teaching and Learning partners with departments and groups on-campus throughout the year to share its space. Please review the reservation form and submit a request.

Instructional Enhancement Fund
The Instructional Enhancement Fund (IEF) awards grants of up to $500 to support the timely integration of new learning activities into an existing undergraduate or graduate course. All Yale instructors of record, including tenured and tenure-track faculty, clinical instructional faculty, lecturers, lectors, and part-time acting instructors (PTAIs), are eligible to apply. Award decisions are typically provided within two weeks to help instructors implement ideas for the current semester.
Have a language expert improve your writing
Run a free plagiarism check in 10 minutes, generate accurate citations for free.
- Knowledge Base
The Beginner's Guide to Writing an Essay | Steps & Examples
An academic essay is a focused piece of writing that develops an idea or argument using evidence, analysis, and interpretation.
There are many types of essays you might write as a student. The content and length of an essay depends on your level, subject of study, and course requirements. However, most essays at university level are argumentative — they aim to persuade the reader of a particular position or perspective on a topic.
The essay writing process consists of three main stages:
- Preparation: Decide on your topic, do your research, and create an essay outline.
- Writing : Set out your argument in the introduction, develop it with evidence in the main body, and wrap it up with a conclusion.
- Revision: Check your essay on the content, organization, grammar, spelling, and formatting of your essay.
Instantly correct all language mistakes in your text
Upload your document to correct all your mistakes in minutes

Table of contents
Essay writing process, preparation for writing an essay, writing the introduction, writing the main body, writing the conclusion, essay checklist, lecture slides, frequently asked questions about writing an essay.
The writing process of preparation, writing, and revisions applies to every essay or paper, but the time and effort spent on each stage depends on the type of essay .
For example, if you’ve been assigned a five-paragraph expository essay for a high school class, you’ll probably spend the most time on the writing stage; for a college-level argumentative essay , on the other hand, you’ll need to spend more time researching your topic and developing an original argument before you start writing.
| 1. Preparation | 2. Writing | 3. Revision |
|---|---|---|
| , organized into Write the | or use a for language errors |
Receive feedback on language, structure, and formatting
Professional editors proofread and edit your paper by focusing on:
- Academic style
- Vague sentences
- Style consistency
See an example

Before you start writing, you should make sure you have a clear idea of what you want to say and how you’re going to say it. There are a few key steps you can follow to make sure you’re prepared:
- Understand your assignment: What is the goal of this essay? What is the length and deadline of the assignment? Is there anything you need to clarify with your teacher or professor?
- Define a topic: If you’re allowed to choose your own topic , try to pick something that you already know a bit about and that will hold your interest.
- Do your research: Read primary and secondary sources and take notes to help you work out your position and angle on the topic. You’ll use these as evidence for your points.
- Come up with a thesis: The thesis is the central point or argument that you want to make. A clear thesis is essential for a focused essay—you should keep referring back to it as you write.
- Create an outline: Map out the rough structure of your essay in an outline . This makes it easier to start writing and keeps you on track as you go.
Once you’ve got a clear idea of what you want to discuss, in what order, and what evidence you’ll use, you’re ready to start writing.
The introduction sets the tone for your essay. It should grab the reader’s interest and inform them of what to expect. The introduction generally comprises 10–20% of the text.
1. Hook your reader
The first sentence of the introduction should pique your reader’s interest and curiosity. This sentence is sometimes called the hook. It might be an intriguing question, a surprising fact, or a bold statement emphasizing the relevance of the topic.
Let’s say we’re writing an essay about the development of Braille (the raised-dot reading and writing system used by visually impaired people). Our hook can make a strong statement about the topic:
The invention of Braille was a major turning point in the history of disability.
2. Provide background on your topic
Next, it’s important to give context that will help your reader understand your argument. This might involve providing background information, giving an overview of important academic work or debates on the topic, and explaining difficult terms. Don’t provide too much detail in the introduction—you can elaborate in the body of your essay.
3. Present the thesis statement
Next, you should formulate your thesis statement— the central argument you’re going to make. The thesis statement provides focus and signals your position on the topic. It is usually one or two sentences long. The thesis statement for our essay on Braille could look like this:
As the first writing system designed for blind people’s needs, Braille was a groundbreaking new accessibility tool. It not only provided practical benefits, but also helped change the cultural status of blindness.
4. Map the structure
In longer essays, you can end the introduction by briefly describing what will be covered in each part of the essay. This guides the reader through your structure and gives a preview of how your argument will develop.
The invention of Braille marked a major turning point in the history of disability. The writing system of raised dots used by blind and visually impaired people was developed by Louis Braille in nineteenth-century France. In a society that did not value disabled people in general, blindness was particularly stigmatized, and lack of access to reading and writing was a significant barrier to social participation. The idea of tactile reading was not entirely new, but existing methods based on sighted systems were difficult to learn and use. As the first writing system designed for blind people’s needs, Braille was a groundbreaking new accessibility tool. It not only provided practical benefits, but also helped change the cultural status of blindness. This essay begins by discussing the situation of blind people in nineteenth-century Europe. It then describes the invention of Braille and the gradual process of its acceptance within blind education. Subsequently, it explores the wide-ranging effects of this invention on blind people’s social and cultural lives.
Write your essay introduction
The body of your essay is where you make arguments supporting your thesis, provide evidence, and develop your ideas. Its purpose is to present, interpret, and analyze the information and sources you have gathered to support your argument.
Length of the body text
The length of the body depends on the type of essay. On average, the body comprises 60–80% of your essay. For a high school essay, this could be just three paragraphs, but for a graduate school essay of 6,000 words, the body could take up 8–10 pages.
Paragraph structure
To give your essay a clear structure , it is important to organize it into paragraphs . Each paragraph should be centered around one main point or idea.
That idea is introduced in a topic sentence . The topic sentence should generally lead on from the previous paragraph and introduce the point to be made in this paragraph. Transition words can be used to create clear connections between sentences.
After the topic sentence, present evidence such as data, examples, or quotes from relevant sources. Be sure to interpret and explain the evidence, and show how it helps develop your overall argument.
Lack of access to reading and writing put blind people at a serious disadvantage in nineteenth-century society. Text was one of the primary methods through which people engaged with culture, communicated with others, and accessed information; without a well-developed reading system that did not rely on sight, blind people were excluded from social participation (Weygand, 2009). While disabled people in general suffered from discrimination, blindness was widely viewed as the worst disability, and it was commonly believed that blind people were incapable of pursuing a profession or improving themselves through culture (Weygand, 2009). This demonstrates the importance of reading and writing to social status at the time: without access to text, it was considered impossible to fully participate in society. Blind people were excluded from the sighted world, but also entirely dependent on sighted people for information and education.
See the full essay example
The conclusion is the final paragraph of an essay. It should generally take up no more than 10–15% of the text . A strong essay conclusion :
- Returns to your thesis
- Ties together your main points
- Shows why your argument matters
A great conclusion should finish with a memorable or impactful sentence that leaves the reader with a strong final impression.
What not to include in a conclusion
To make your essay’s conclusion as strong as possible, there are a few things you should avoid. The most common mistakes are:
- Including new arguments or evidence
- Undermining your arguments (e.g. “This is just one approach of many”)
- Using concluding phrases like “To sum up…” or “In conclusion…”
Braille paved the way for dramatic cultural changes in the way blind people were treated and the opportunities available to them. Louis Braille’s innovation was to reimagine existing reading systems from a blind perspective, and the success of this invention required sighted teachers to adapt to their students’ reality instead of the other way around. In this sense, Braille helped drive broader social changes in the status of blindness. New accessibility tools provide practical advantages to those who need them, but they can also change the perspectives and attitudes of those who do not.
Write your essay conclusion
Checklist: Essay
My essay follows the requirements of the assignment (topic and length ).
My introduction sparks the reader’s interest and provides any necessary background information on the topic.
My introduction contains a thesis statement that states the focus and position of the essay.
I use paragraphs to structure the essay.
I use topic sentences to introduce each paragraph.
Each paragraph has a single focus and a clear connection to the thesis statement.
I make clear transitions between paragraphs and ideas.
My conclusion doesn’t just repeat my points, but draws connections between arguments.
I don’t introduce new arguments or evidence in the conclusion.
I have given an in-text citation for every quote or piece of information I got from another source.
I have included a reference page at the end of my essay, listing full details of all my sources.
My citations and references are correctly formatted according to the required citation style .
My essay has an interesting and informative title.
I have followed all formatting guidelines (e.g. font, page numbers, line spacing).
Your essay meets all the most important requirements. Our editors can give it a final check to help you submit with confidence.
Open Google Slides Download PowerPoint
An essay is a focused piece of writing that explains, argues, describes, or narrates.
In high school, you may have to write many different types of essays to develop your writing skills.
Academic essays at college level are usually argumentative : you develop a clear thesis about your topic and make a case for your position using evidence, analysis and interpretation.
The structure of an essay is divided into an introduction that presents your topic and thesis statement , a body containing your in-depth analysis and arguments, and a conclusion wrapping up your ideas.
The structure of the body is flexible, but you should always spend some time thinking about how you can organize your essay to best serve your ideas.
Your essay introduction should include three main things, in this order:
- An opening hook to catch the reader’s attention.
- Relevant background information that the reader needs to know.
- A thesis statement that presents your main point or argument.
The length of each part depends on the length and complexity of your essay .
A thesis statement is a sentence that sums up the central point of your paper or essay . Everything else you write should relate to this key idea.
The thesis statement is essential in any academic essay or research paper for two main reasons:
- It gives your writing direction and focus.
- It gives the reader a concise summary of your main point.
Without a clear thesis statement, an essay can end up rambling and unfocused, leaving your reader unsure of exactly what you want to say.
A topic sentence is a sentence that expresses the main point of a paragraph . Everything else in the paragraph should relate to the topic sentence.
At college level, you must properly cite your sources in all essays , research papers , and other academic texts (except exams and in-class exercises).
Add a citation whenever you quote , paraphrase , or summarize information or ideas from a source. You should also give full source details in a bibliography or reference list at the end of your text.
The exact format of your citations depends on which citation style you are instructed to use. The most common styles are APA , MLA , and Chicago .
Is this article helpful?
Other students also liked.
- How long is an essay? Guidelines for different types of essay
- How to write an essay introduction | 4 steps & examples
- How to conclude an essay | Interactive example
More interesting articles
- Checklist for academic essays | Is your essay ready to submit?
- Comparing and contrasting in an essay | Tips & examples
- Example of a great essay | Explanations, tips & tricks
- Generate topic ideas for an essay or paper | Tips & techniques
- How to revise an essay in 3 simple steps
- How to structure an essay: Templates and tips
- How to write a descriptive essay | Example & tips
- How to write a literary analysis essay | A step-by-step guide
- How to write a narrative essay | Example & tips
- How to write a rhetorical analysis | Key concepts & examples
- How to Write a Thesis Statement | 4 Steps & Examples
- How to write an argumentative essay | Examples & tips
- How to write an essay outline | Guidelines & examples
- How to write an expository essay
- How to write the body of an essay | Drafting & redrafting
- Kinds of argumentative academic essays and their purposes
- Organizational tips for academic essays
- The four main types of essay | Quick guide with examples
- Transition sentences | Tips & examples for clear writing
Get unlimited documents corrected
✔ Free APA citation check included ✔ Unlimited document corrections ✔ Specialized in correcting academic texts
I Tried a Flexible-Seating Classroom. Here’s What I Learned

- Share article
At first, I cringed when I thought about a classroom without perfectly tidy desks, pushed-in chairs, and thoughtfully chosen seating assignments. I thought, “Why would any teacher want to lose control of his or her classroom that way?”
While I despised making seating charts every month, I prided myself on it, too. Doing it well was kind of like solving a Rubik’s cube or complicated equation. But I started to warm to the idea of a flexible-seating classroom, where students can pick their own seats from a variety of options, when I visited one in action. What I saw was kids looking comfortable and engaged in their work.
Being ready to make the change was the easiest part of the process. There are many considerations to think about when implementing flexible seating: designing a classroom layout, purchasing items, logistics, and communication.
Pinterest and teacher blogs are flooded with idyllic-looking flexible-seating classrooms. The tricky part about them is that no two classrooms will look the same, so you have to do many sketches and adjustments to find what works for your space, your kids, and your style.
At first, I took out many desks, took off the legs of some desks, and raised other desks. I started the year with standing desks, wobble stools, stability cushions, scoop seats, crate seats, and our tent as seating choices.
I noticed that when kids didn’t have a desk, their belongings were everywhere (surprise, surprise) and it was harder to get their attention. I ended up adding all of my desks back into the classroom so that everyone has a desk. Some are standard height, and others are tall or very low. But all the children have a “home base” for their materials. It works better for my teaching, too, because when I teach whole group lessons, I can get students’ attention more quickly when they’re all sitting at desks.

Another consideration in implementing flexible seating is actually buying different kinds of seats. Some seats can cost more than $100 each. A shopping outlet mall near me has a program called TangerKIDS Grants . I won a $600 grant from this program, and that let me buy items I needed for this project. I bought scoop seats, stability cushions, six wobble stools, and log-shaped pillows for my tent.
Scholastic Book Club also has alternative seating that teachers can buy with points. And teachers can get bonus points at the beginning of the school year, which can aid in some of the most expensive purchases for alternative seats, like yoga balls and wobble stools. To encourage participation, I suggest telling parents this will be the only time you will send home catalogs, so they aren’t pressured repeatedly during the year.
How Will It Work?
The next consideration is classroom organization. Since the kids are not always going to work at the same spot, their materials need to be able to move around easily. This is where I thought I could simply use book bins that I already had.

As the year progressed, we added workbooks, packets, papers, and other items along the way. But we ended up having materials spill out of fallen book bins every few minutes or get tripped on. I decided to take the dingy-looking crate seats that I had made over the summer, remove the cushions, and zip-tie two horizontal crates together for every seating group so they had storage shelves. That way kids can put their book bins in the crates so their materials don’t spill constantly.
I ended up going back to collaborative groups of four, but with different seats and levels. It helps to have a “home base” for everyone because that allows me to hold supplies that don’t need to be moved around each day, like books and privacy folders, in each desk.
Learning a New System
Doing my flexible-seating arrangement, I quickly learned that the kids need to be taught very explicitly how to use each seat and what to expect. I created a video showing the dos and don’ts of each seating option so that they can visualize appropriate behavior and responsibility.

We also created some guidelines as a group and they each signed them like a contract. During the first month of school, the kids tried all of the seating options because we rotated through each choice. Then when they had the choice to pick spots, they knew which spots were best for them.
Flexible seating can be frustrating and expensive. It can take a while for the kids to make good choices about where they should sit to be successful. Once that metacognition piece starts and they understand how they learn and work best, it’s worth all of the challenges. I’ve observed more thoughtful conversations, better peer relations, more teamwork, and fewer frustrations since they are in collaborative groups and can exert their energy through constant movement.
Sign Up for EdWeek Update
Edweek top school jobs.

Sign Up & Sign In


Flexible Seating 101: All You Need to Know Before You Transform Your Classroom
by AuthorAmy
Ready to try flexible seating but aren’t sure where to start? This guide will help you find your way through the sometimes-confusing world of flexible seating. Follow it step-by-step and get ready to transform your classroom!
1. Read the research and understand the benefits
Be prepared for administrators, families, other teachers and even students to ask why you made the shift to flexible seating. What is the point of rearranging a classroom to look more like a living room than a traditional classroom? The research, as yet, is inconclusive though promising – and with the newfound popularity of flexible seating, more research is sure to follow.
There are many benefits of flexible seating. One that research does wholeheartedly support is the benefit of getting students up and moving. Former teacher and current researcher Eric Jensen concludes in his article “Moving with the brain in mind” that “active learning has significant advantages over sedentary learning. The advantages include learning in a way that is longer-lasting, better remembered, more fun, age-appropriate and intelligence independent and that reaches more kinds of learners.”
A 2012 study in the Journal of Learning Spaces titled “Space and Consequences: The Impact of Different Formal Learning Spaces on Instructor and Student Behavior” concludes with three findings about how space influences classroom learning.
First, the study concludes that “space shapes instructor behavior and classroom activities;” next, that “instructor behavior and classroom activities shape on-task student behavior;” and three, that “ therefore, space shapes on-task student behavior.”
Many teachers cite anecdotal evidence about the benefits of flexible seating. Teachers who have used flexible seating report that it increases student comfort and allows them choice in their environment, both of which are important to optimize focus. Other teachers say that flexible seating facilitates increased collaboration among students.
Read: 16 Awesome Flexible-Seating Classrooms That’ll Blow Your Teacher Mind
2. Consider your goals
The way you will re-envision and rearrange your classroom should be shaped by the goals you have for your instruction. For example, the 2012 study cited above demonstrated that a traditional classroom space in which rows of desks face the teacher are best in a lecture-based classroom, whereas small groupings of seats are best for discussions and group activities. A teacher who plans for hands-on learning might want lots of table space for students to conduct experiments and build projects, while yet another teacher might want to design their classroom with comfortable nooks to facilitate reading and creative writing.
3. Talk to your administrator
Any classroom shift as major as moving to flexible seating requires administrator support. Given that flexible seating has taken the teaching world by storm, your administrator with likely be familiar with the concept and, possibly, the benefits. Be prepared to address concerns your administrators might raise. Expect to address concerns about cost and perceived advantages for your students (see below for more ideas about getting the most bang for your buck in terms of funding flexible seating).
4. Talk to custodial staff
After you get the stamp of approval from your admin, you need to pay a visit to your school’s facilities manager and loop in your classroom custodian. Custodial staff have additional concerns you need to address, such as making sure your new furniture is up to fire code. Your custodian may want to make sure they can easily move between furniture to vacuum and clean your classroom after students are gone for the day.
You, too, may want to consider cleanliness as you plan your new classroom layout and before you invest in new types of seating. Traditional classroom furniture and flooring are designed with industrial cleaning in mind. Desks are easier to wipe down than a soft, fabric-covered easy chair, and the same applies to floors. The age of your students and the materials commonly used in your classroom (glitter versus formaldehyde, for example) will influence what types of furniture you are comfortable bringing into your room.
5. Draw up a plan
Take the measurements of your room (length and width) and then look into online floor-planning software such as RoomSketcher, Floorplanner or SmartDraw. (A quick search for “floor plan software will yield all sorts of results). The digital age makes drawing up a classroom blueprint really easy. You simply give the program parameters such as the square footage of your classroom, and then you can digitally insert fixed furniture (such as your desk and cabinets) and play around with the remaining space.
This pre-planning will give you an idea of how your classroom will look without you having to actually move any furniture. You are also able to plan for walkways and storage space when drawing up a room rearrangement plan.
6. Decide how you will assign seats
Different teachers approach seat assignments in different ways, and you will have to decide what suits you best. No matter how you design your new classroom, there will always be some seats/spaces the students deem more desirable than others, and it’s up to the teacher to decide who gets these spaces and when.
Some teachers have a seating rotation or a seating chart, where students rotate through the flexible seating options in your space. Students might sit in a given seat for a day or a week before moving on to the next space.
Other teachers use the desirable spots in their classrooms as good behavior rewards. Say, for example, that your students covet your new classroom couch. You can assign the couch spaces to students who demonstrated particularly good behavior or citizenship the week before.
Read: The 10 Most Popular Seat Types For Today’s Flexible Seating Classroom
7. Consider costs
No doubt about it, switching to flexible seating is expensive, and while you may have a supportive administrator, chances are you will be setting up your new space with funds from your own pocketbook.
First, start slow. Budget a set amount of money out of each paycheck, and start purchasing flexible seats a few at a time. Perhaps you can afford one new seat (be it a bean bag or scoop chair or stool) with each paycheck. Set a goal and you’ll get there soon enough.
Also, consider shopping around at thrift stores and garage sales. Sturdy, inexpensive furniture can often be found for a steal at these sales.
Finally, you might think about fundraising for your new classroom space on crowdfunding sites like DonorsChoose or GoFundMe. Or, there might be grants in your community that could support your flexible seating goals.
8. Communicate with families
Most parents and guardians aren’t as versed in education trends as you are, so the concept of flexible seating may be entirely new to them. Consider sending a newsletter or email home explaining the new classroom arrangement as well as benefits to their students.
9. Build in time to rearrange your classroom
Some teachers switch to flexible seating arrangements a little at a time. Say you buy one or two new seats a month. You may want to bring these to your classroom right away and start incorporating them with your current classroom furniture. This is a great option, especially if you plan to use the new seats as a reward for good behavior.
Or, you might want to make the switch all at once. If you go this route, plan to spend a sizable chunk of spring or winter break, or even the summer, setting up your new seating arrangement. Make sure to coordinate with custodial staff in terms of where your old furniture will go.
10. Teach expectations
Flexible seating is new to students, too, and as with every other classroom routine, they need to be taught your expectations. You will certainly want to cover seating arrangements, so students know where to sit when they enter the classroom and so you avoid any tussles over the most popular seats. In addition to your new seating chart, you will also want to cover learning behaviors such as how to hand papers in, and how to take notes or do work without a desk surface (in the event they are sitting on a couch, cushion, or bean bag chair).
11. Be flexible and adjust as needed
Finally, flexible seating isn’t just a space rearrangement – it’s also an attitude rearrangement! The most successful teachers are the ones who are able to go with the flow, to identify problems and adjust as needed so both teachers and students can be successful in their new space.
Read: Are Flexible Learning Spaces the Future of Education?

TREAT YO' INBOX!
All the trending teacher stories, resources, videos, memes, podcasts, deals, and the laughter you need in your life!
Sweet 'N' Sauer Firsties
The Ultimate Flexible Seating Guide
Have you thought about implementing flexible seating in your classroom, but you’re not sure where to begin? You’ve come to the right place! In this post you are going to learn EVERYTHING you need to get flexible seating up and running in your classroom, and have a solid foundation for it to run smoothly for the rest of the year with students. So what are we waiting for?! Let’s dive into ALL things flexible seating!

There are SO many amazing benefits to flexible seating and I applaud you for giving your students this opportunity. Just a few of my favorite benefits are allowing for more choice and flexibility that can ultimately enhance student engagement and learning in the classroom. Believe it or not, flexible seating alleviates SO many behaviors students exhibit because they are better catering to their movement needs and are able get all those wiggles out. Think about it. How many times have you had a student fall out of a seat? Jump up and down in their chair? Sit on their knees? Boys in particular really enjoy flexible seating because they can MOVE. Whether they wiggle on a wiggle stool or simply stand, it makes a HUGE difference for them. Learn more about the why of flexible seating HERE !
Seating Substitutes
First things first when planning for flexible seating is deciding on all the seating options you’ll have available. There are so many awesome seating substitutes out there and chances are, anything different from your normal chairs will be beneficial and comfortable for your students. There is no shame in starting with one or two options the first year! One of my favorite quotes is, “Go slow to go fast.” Whether you want to dive all in or go slow, take your time acquiring different types of seating and do what feels right for you and your students. I have included a list of some of my students’ favorites with links:
- Yoga Balls – I ended up buying the ones with the legs because the other ones rolled everywhere and it drove me crazy.
- Wobble Stools – These are a bit pricey but they hold up well and the kids love them.
- Crate Seats – You’ll find the link to how I made mine. These hold up really well and make for great storage.
- Scoop Rockers – I bought these from Walmart when they were on sale.
- Lap Desks – You can find these at tons of places, such as Target, Walmart, Michaels, Hobby Lobby, and sometimes dollar stores! I always look for whoever has the cheapest price and/or best coupon.
- Regular Desks are also pretty popular with students. Sometimes they just like to sit in a regular desk and chair! Although, I do like to put these fidget bands on the chair legs for students to still help with the wiggles.
- Standing Desks- These are pretty popular for students who don’t like sitting for long periods of time.
*These are the options that worked best in my classroom. Be open-minded to trying different options and see what works best with you and your students. There are affiliate links included which means I get a small commission if you purchase a seat at no cost to you.
Once you transform your classroom with seating options, another consideration is what to do for nights where parents will be in attendance, especially Meet the Teacher. With flexible seating, this meeting looks MUCH different. Parents aren’t sure where to sit, siblings are playing with yoga balls, and it can get a bit chaotic. To help with this to run smoother, you might want to consider displaying a few seating choices for parents to see that you can speak to, but mostly having chairs for everyone to sit on. Totally your choice!
Flexible Funding
Getting enough seats to accommodate all your little learners can definitely get expensive. Lucky for you, I’ve learned some great ways to acquire seats without breaking the bank. Donors Choose is an amazing tool where you can create a project to get funded and this is how I got a lot of my seats. They even have a feature that allows you to pick out options from Amazon so as soon as your project hits its goal, you can get your seats delivered quickly and conveniently with their 2-Day Prime shipping. Amazon obviously has tons of options to choose from and many have great reviews. Ikea has many cheap options that kids love, while Hobby Lobby and Michaels usually have great sales and coupons to use. Don’t forget to also utilize your teacher discount at Hobby Lobby and Michaels to save even more!
Garage sales are also a great resource for furnishing your room on a budget. You can usually find some seats that you can make your own with a little DIY project. I personally have collected different seating choices over the years to slowly build up our options so the cost didn’t overwhelm me. My best advice is to try and get as much funding as possible and if you have to pay yourself, look for sales and deals to slowly start acquiring seating options over time.
Planning for Success
Once you’ve acquired seating options, it’s time to make a plan to implement starting day one with students. The biggest piece of advice I have when teaching students about flexible seating is, model, model, model, and then model some more. The next piece of advice is to organize to a tee because it will help everyone out so much! When deciding to implement flexible seating options in the classroom, organization of all things has to be thought about thoroughly. Below you’ll find some of the guiding questions from my flexible seating checklist and planning guide . These are questions that help you begin to think through and plan out how different a flexible seating classroom looks.
- Will you have individual or classroom supplies? A combination of both?
- Where will students store their materials, books, folders and such?
- Where will you store different seat choices?
- How will students access seats and materials?

With the flexible seating planning guide, I’ll walk you through each step of your plan so that you know exactly how your classroom is going to be set up and organized for students. When I restructured my classroom for flexible seating, I did a combination of individual and classroom supplies. Students used pencil boxes to store their personal materials which also doubled as their Portable Name Plates . This resource also helped them ensure they were able to spell their first and last name. Another huge planning piece with flexible seating is setting up the classroom space FOR students. This can be achieved by labeling ALL the things so they have access to whatever they need, whenever they need it! Sterilite bins are great for housing materials such as scissors, glue, crayons, etc., for students to grab during independent work.

Editable Pencil Box Name Tags

Editable Classroom Supply Labels
Deciding where to store seats is another huge part that should be thoroughly thought through. I knew my plan was to have several spaces that they would live in so that students weren’t all going to the same place all at once. I also knew my plan would probably have issues that I’d have to later work though. It’s ok if you have to change things around multiple times. The way I started the year with flexible seating, is not the way I ended the year. Things change but you and your students adapt and it’s all a learning experience. Below are some different ways flexible seating has been organized and setup in the past.

To start the year, I had different table options that would be “The Yoga Ball Table” or “The Wobble Stool Table”. If they wanted those choices, they would have to sit at that table. Other options, like scoop rockers or lap desks, were stored around the room where they could grab and find a spot. The tables later changed so that students could grab a seat and sit wherever they wanted to work. This set up worked for my classroom and my students. You may want things to look different for your students. It’s whatever you feel comfortable with. It’s ok if things don’t work out how you plan….. that’s usually how it goes anyway right? Just learn from the experience and remember that this will push you farther than expected, but so many great things happen because of it. Stick with it and watch the magic happen!

Flexible Seating Essentials
To house remaining student materials such as textbooks, folders, and notebooks, we labeled bins with a number that corresponded to each student. You can grab those labels as a freebie HERE ! These bins also became the way students would choose their seat. Students would arrive, grab their bin for the day and place it at the spot they wanted. It was a first come, first serve basis and this is just one way students can choose their seats. We’ll discuss how students choose their seats in the next section!

Student Number Label Freebie
The biggest mind shift in changing my classroom environment was for the space to be more student centered and to remember this is what helped my students thrive. With the planning guide, you’ll work through all these details so that you feel confident from day one. Of course things will change as you learn and grow with students and that’s ok! Plans are meant to be revised, so remember to document the changes you made for the following year so you won’t forget what worked best!
Put it in Action
So now that you have your seats, you’ve organized and set up your classroom, you have your materials to teach expectations for all your seating options, we’re ready to go teach right? Oddly enough, this is the moment when I totally panicked. I started wondering, “Where are they going to put all their stuff when they come in?” “Where are they going to sit on the first day of school?” “How in the world am I going to teach them how to use all these seats?!” Amongst a million more worries and fears. This is your support telling you ‘I’m here to help you not panic!’
For the first day of school, I found it most effective to have students bring their backpack and other belongings right to the carpet. This became routine because it is where we start out every morning. After getting to know each other, unloading, collecting and sorting supplies, we began to learn about a few seat choices. It’s best to start slow and introduce a few seats at a time. Starting with the most basic options, such as regular chairs and standing desks, can help students get comfortable and learn expectations. With THESE editable posters, rules, and practice slides, students can learn expectations and practice what it looks and sounds like with a low level task. Students actually really enjoy this time and it eases them into the first few days of school with quick and fun activities like THESE practice sheets. These editable posters are perfect for printing and displaying or presenting digitally and adding your own images!

It’s important to spend the first week of school learning about different seats and practicing how to treat them. With every seat, they always learned the same way. We would sit on the carpet together with our expectations poster and practiced what it looks, what it sounds like, and what it doesn’t. This is the way I teach all expectations to students. Everything is clear and concise when and they walk away knowing exactly how we use these seats. Learn more about teaching routines and procedures HERE !
During our whole group, we would discuss what seat choices we would like to try and how we would use them. I would then randomly call on students in a way where everyone had a chance to get to pick a seat first. After picking seats, we would practice doing a low level activity, such as reading or completing a simple activity sheet, to get students used to being in the seat. After all the seats have been taught, which usually takes about a week or so, I encourage students to try out each type of seat to see which they like best and what helps them work the most efficiently. We discuss how they may not like every seat and that’s ok. When introducing options, we talk about choosing just right seats . This means it’s a spot where we work best, with a seat we want to sit in and how it might not be super smart if it’s a place near our friends that may distract us. We create an anchor chart to hang up and remind students what a just right seat is and what it isn’t. With some groups, you’ll have to have this discussion often and give PLENTY of reminders on how we simply don’t just choose a spot near our friends. The expectation is set that students get one warning and I’m very strict on this rule. ONE warning and then I can move them. They know that these seat choices are a privilege and can be taken away if not used correctly. Check out more of this fun lesson below!

Flexible Seating Expectations
Choosing Seats and Handling Conflict
Let’s discuss how students will choose their seats. This is something that is all up to you when you think through your planning and you’ll eventually find ways that work best for you and your classroom. I’ve allowed students to choose seats in a couple different ways and they both had different benefits. At first, I created a magnetic board that displayed all of our seating options with the amount of those seats available. For example, there might be a section for “3 Wobble Seats”. Each student had a magnet with their number on it and when they came in for the day, they would place their magnet on the board under the seat they wanted. If three magnets were under ‘Wobble Seats’, the rest of the students knew they could no longer pick that option. This way worked well for us but the board I made wasn’t the sturdiest for the high daily traffic and eventually I tried something else. However, this was and I still think it is a great option for choosing seats.

Flexible Seating Choice Board
When students used the board to pick their seats, I realized that the next step in our routine was for them to grab their bin and put it at the spot they would be at. It came to me that I could skip the board altogether and gain some instructional time by simply having students pick their spot with their bin. They would come in the door in the morning and put their bin at the spot they wanted to be at. Other students knew that they could not move that bin or that seat because it was taken. This process took practice and we had to focus on paying attention to other people’s belongings, but in time this became pretty fluid. This also taught them that if they wasted time, they might not get the seat they wanted. After a while, students knew exactly what to do when they came into the classroom every morning.
Of course, even after all of the practicing and all of the modeling, everything will not be perfect. They’re kids! There will be arguing, upset people, and it’s ok. Many days were spent learning how to manage conflict. I really encouraged my students to be understanding and kind with one another. In the beginning of the year, a student might have come in really wanting a yoga ball only to find that they’re all gone. I might ask my students if anyone is willing to give up a yoga ball, especially one who has already had the yoga ball recently. I would facilitate these solutions, but over the year, most of the time students were able to handle this on their own.
Another scenario that might often come up is when students weren’t attentive to their classmate’s belongings. Again they are encouraged to manage the conflict with kindness. Imagine John, Katie, and Michael have their bins in front of the Wobble Stools. Lucy didn’t pay attention and put her bin in front of one too, even though there aren’t any left. Now it’s time to do work and there is an argument about who can sit there. What do you do? 9 out of 10 times someone will just move somewhere else with no problem because they know someone would do the same for them. They also recognize that they will get another opportunity to sit there throughout the week. This behavior and conflict management comes with modeling and praising when you see it happen without you facilitating it. It’s all about encouraging kindness and fairness and helping students manage conflicts on their own and believing that yes, first graders can do this!!
The biggest take away here is… MODEL, MODEL, MODEL! Be very explicit with your students so they know exactly what it looks like and exactly what it doesn’t look like. Just like with any classroom expectations, be firm and consistent! Flexible seating is a new challenge, but so worth it. Students love being given choices and you will be amazed at what they can do when they’re empowered to do it. I believe if this works with my firsties, this can definitely work with your kiddos! With the flexible seating bundle, I promise feeling completely planned and organized and you’ll walk in the door day one ready to go with your students!
Save Yourself The Stress!
If you’re looking for more beginning of the year tips and set up, you’ll love the Back to School Teacher Guide . I go through every detail of setting up a classroom to help you have a smoothly run classroom all year long. Even if you’re a veteran teacher this guide can still help you think about things you may not have before!
I know when I was getting started with flexible seating, I felt so overwhelmed and lost. I had no idea where to start or what to look for. But have no fear! I’ve created this jam packed Flexible Seating Bundle so you don’t have to scramble for resources or put a modge podge of random things together. Instead, you’ll have EVERYTHING you need to begin flexible seating from DAY ONE with students! Included in the bundle you’ll find detailed lesson plans, parent information, editable anchor charts, and SO much more. Check it out HERE !

Flexible Seating Bundle
With flexible seating, it’s a whole new ball game. It’s important to learn how to let some things go. Let go of some of the control, let go of how things look and sound because trust me, it’s going to be different. But if you do let go, wonderful things can happen! Did I know everything diving into this? No. Did things go wrong? Absolutely! But I promise it is well worth it and the difference you see with your students is UNREAL!
I really hope you enjoyed learning more about how to successfully implement flexible seating in your classroom! Stuck on planning and want help? Please reach out and I’d be more than happy to help you plan through things! Don’t forget to subscribe to my email list! Not only will you get the most up to date tips, tricks, and classroom projects… and of course more fun FREEBIES including the Flexible Seating Setup Checklist FREEBIE! You will also have exclusive access to tons of digital how to videos! If you would like to learn about this and other things happening in my classroom follow me @sweetnsauerfirsties on Instagram.
To follow me on TPT and get all the latest updates on HALF OFF new products, click HERE !

Love these ideas but don’t want to lose them? Don’t forget it, PIN it below!
Share this:
- Click to share on Twitter (Opens in new window)
- Click to share on Facebook (Opens in new window)
Leave a Reply Cancel reply
Your email address will not be published. Required fields are marked *
Notify me of follow-up comments by email.
Notify me of new posts by email.
This site uses Akismet to reduce spam. Learn how your comment data is processed .

The Benefits Seating Plans Can Have in Your Classroom
Author: Bethany Spencer
Posted: 06 Mar 2018
Estimated time to read: 4 mins
There’s more to a student’s academic success than just great teaching and great content; the environment in which they learn has a major impact on their progression.
Effective classroom management plays a huge role in this and includes class seating plans. How and where students are seated can have a positive impact on student behaviour, academic performance and class participation.
Studies have also found that students perform better in seats that are allocated to them as opposed to choosing where they sit themselves.
What are the effects of having seating arrangements in the classroom?
The use of seating plans in the classroom supports teachers in their overall management of the classroom and further supports students’ learning. A well thought out and considered seating arrangement should take into consideration the layout of the classroom, groupings of students and their inclusion data to create the optimum learning environment.
Benefits of seating arrangements include:
- Improved classroom management
- Well-behaved students
- Students’ individual needs catered for
- A classroom that reflects a teacher’s teaching style
- Safe and accessible classroom environment
The role of seating plans in classroom management
Effective classroom management is more complex than just creating a seating arrangement for your students, but we do identify seating plans as one of the core pillars of good classroom management.
Classroom seating plans allow teachers to exert a level of control over their students. By constructing their classroom and making informed decisions on where their pupils sit, they can take actions to solve problems before they occur - for example, not seating two chatty best friends next to each other or placing the student who is visually impaired at the front of the class.
Additionally, assigning seats to your students can set the tone that you are the teacher and in control as soon as they set foot in class.
The impact of seating plans on student behaviour
If you’re experiencing issues with poor student behaviour and you haven’t yet tried a seating plan, we would advise you do. Simple actions like separating the students who don’t like each other and not pairing the chattiest groups together can help minimise low-level classroom disruptions and control noise levels. Additionally, the way in which you choose to layout your classroom has an impact on student behaviour - cluster groupings make it easier for students to chat and angle themselves away from the board, whereas rows ensure students’ eyes are on you. These steps should also be applied to any classroom that does have a seating plan and is experiencing some behavioural issues. Usually, seating plans will need to be tweaked throughout the year as students’ relationships, attitudes and personal lives can change which may impact the way in which they behave and interact with their peers - all of which influence their behaviour.
It’s important to remember that seating plans are a work in progress due to the very nature of students and to not get disheartened if you need to mix yours up.

Supporting individual student needs through seating arrangements
By looking at your students’ inclusion data and personal learning needs, you can help to create a class seating plan that builds a learning environment whereby their personal needs are supported and their learning thrives.
Student data and information that should be considered include medical issues - does this pupil need to be seated somewhere specific to support their medical needs? Are they partially sighted and need to sit close to the board? Does this child need to be close to the exit in order to discreetly leave the room if they become overwhelmed?
The personality of students should also be considered - if a pupil is exceptionally shy and you want to encourage them speaking up, consider placing them next to a student who answers questions in class and is encouraging so they can support their peer.
Additionally, if you have a mixed ability group this may include putting the lower achieving students with someone who is performing at a higher level in a bid to motivate the lower achiever, whilst encouraging the higher achiever to consolidate learning through explanations.
Finding a seating arrangement that suits your style
As a teacher, the way in which your tables are organised are not only important to your students and their learning - they’re also important to you, your pedagogy, teaching style and what you want to elicit from your class.
When creating the layout of your classroom consider what you want your class to look like - do you want students to collaborate with each other in groups or do you want a room that facilitates discussion?
Also consider your movement in the class - when you’re teaching, do you walk around the room a lot, or do you primarily teach from the front of the class?
These factors will influence the layout of your classroom - for collaborative classrooms, cluster tables are best, a horse shoe shape for discussion and for teachers who like independent working, rows that face the front of class are preferable.
In order to teach effectively both the students’ and the teacher’s needs need to be catered for.
Ensuring your seating plans are safe
As in any classroom, the safety of students should be of utmost importance and the seating layout in secondary school and primary school will impact this.
In order to ensure a safe and secure classroom there should be enough walking room in your classroom for students to file in and out of class without risk of tripping and away from any hazards. Also, make sure that no fire exits are blocked.
Additionally, given the current climate, it’s important to ensure that any seating arrangements created during the reopening of schools are socially distanced to ensure the safety of students and staff.

Get a roundup of our articles once per month.
Subscribe to Email Updates
Recent posts, can ai be used for curric..., let's talk about homework..., should we be worried abou..., using character education..., popular posts, what is behaviourism, how has technology changed education for schools, the impact of effective classroom management, the difference between formative and summative assessments.
- Homework (22)
- Teacher Wellbeing (21)
- Student Wellbeing (20)
- Distance Learning (15)
- Classroom Management (14)
- Mental Health (13)
- Ofsted (12)
- Wellbeing (12)
- Skills (11)
- Teacher Workload (11)
- Parental Engagement (10)
- Satchel One MIS (10)
- Staff Wellbeing (10)
- Teachers (10)
- School Culture (9)
- Behaviour Management (8)
- School Improvement (8)
- School Management (8)
- Teacher Resources (8)
- Back to School (7)
- Parental Involvement (7)
- Parents (7)
- Pedagogy (7)
- Student & Parent Resources (7)
- Students (7)
- Assessment (6)
- Cloud-based MIS (6)
- Covid-19 (6)
- Guest Blog (6)
- Leadership (6)
- Online Safety (6)
- Technology (6)
- Bullying (5)
- Digital Literacy (5)
- Marking (5)
- Ofsted framework (5)
- School Closures (5)
- Lesson Plans (4)
- Network Managers (4)
- Revision (4)
- Teacher (4)
- Teaching (4)
- Attendance (3)
- Autonomy (3)
- Data Management (3)
- Education Reform (3)
- Education Technology (3)
- Feedback (3)
- Gender Equality (3)
- Network Manager Resources (3)
- SLT Resources (3)
- School Technology (3)
- Student Engagement (3)
- Students & Parents (3)
- Summer Holidays (3)
- Articles (2)
- Attainment 8 and Progress 8 (2)
- Autonomous Learning (2)
- Children (2)
- Classroom (2)
- Classroom Techniques (2)
- Communication (2)
- Differentiated Homework (2)
- Education (2)
- Education Technolgy (2)
- Embracing Technology (2)
- Exam Results (2)
- Grading (2)
- Home-school Communication (2)
- Homework Debate (2)
- Homework Policy (2)
- Raising Standards (2)
- Reading (2)
- Reducing Workload (2)
- Saving Time (2)
- School Marketing (2)
- School Reopenings (2)
- Security (2)
- Sidekick (2)
- Software Training (2)
- Strategy (2)
- Teaching Crisis (2)
- Teaching and Learning (2)
- Time Management (2)
- Time-saving (2)
- Tips & Tricks (2)
- Workload (2)
- Abuse in the Classroom (1)
- Anti-bullying (1)
- Appreciation (1)
- Attainment 8 (1)
- Benefits of Homework (1)
- Body Image (1)
- British Values (1)
- Career Advice (1)
- Character Education (1)
- Collaboration (1)
- Collaborative Learning (1)
- Continuing Professional Development (1)
- Conversation (1)
- Cost of living (1)
- Cyber-bullying (1)
- Cyberbullying (1)
- Damian Hinds (1)
- Digital Classroom (1)
- Dyslexia Awareness (1)
- E Learning (1)
- Eating Disorders (1)
- Education Secretary (1)
- Empathy (1)
- Exam-ready (1)
- Flipped Classroom (1)
- Formative Assessment (1)
- Girls in STEM (1)
- Global Education (1)
- Global Learning (1)
- Government (1)
- Healthy Eating (1)
- Homework Excuses (1)
- Inspire (1)
- International Learning (1)
- Internet Access (1)
- Interventions (1)
- Job Satisfaction (1)
- Language (1)
- Lead by Example (1)
- Learning Environment (1)
- Manager (1)
- National Curriculum (1)
- Outstanding (1)
- Parent Tips for Homework (1)
- Parent-teacher Relationships (1)
- Parents Evening (1)
- Phased Reopenings (1)
- Physical Health (1)
- Planning (1)
- Preparation (1)
- Productivity (1)
- Progress 8 (1)
- Quality Assurance (1)
- Recognition (1)
- Safeguarding (1)
- School Improvements (1)
- Schools (1)
- Secondary School (1)
- Senior Leaders (1)
- Sharing (1)
- Sharing Best Practice (1)
- Show My Homework (1)
- Slow Processing (1)
- Social Media (1)
- Soft Skills (1)
- Software (1)
- Student (1)
- Student Independence (1)
- Summative Assessment (1)
- Super Union (1)
- Support (1)
- Teaching Schools (1)
- Technology in the classroom (1)
- Tracking & Monitoring (1)
- Training (1)
- Truancy (1)
- Year 6 SATs (1)
- example (1)
- first day of school (1)
- gained time (1)
- homework benefits (1)
- influence (1)
- ofsted inspections (1)
- practice (1)
- quiz creation (1)
- raising awareness (1)
- satchel (1)
- school involvement (1)
- well-balanced education (1)
FREE quiz tool
Browse through over 500k questions created by teachers on Neeto , create a quiz and share back to Satchel One. It's free!
- Satchel One learning platform
- About Satchel
- Get in touch
- Back to all blog posts

SAT & ACT Products
Magoosh is the proven, engaging, and accessible way to prepare for college entrance exams. We have the tools for groups as small as 10 or districts with over 100,000 students!
- ACT & SAT Prep for Schools and Districts
Other Products
Our full suite of products assist your students with achieving the scores they want and the instructor tools you need.
Have Questions
We are here to work with you to purchase 10+ accounts to use with your business or school.
If you are an individual looking to purchase 1 account, please view our consumer site.
Individual Purchase
Pros and Cons of Classroom Seating Arrangements
When students walk into your classroom, one of the first things that they want to know is where they should sit. Many teachers choose to take away the mystery by creating classroom seating arrangements. However, there are lots of advantages and disadvantages to consider. Think about the following pros and cons to determine if a seating chart is right for your class.

- Classroom seating arrangements are beneficial at the beginning of the school year since they can help you learn your students’ names quickly . Using your seating chart, you’ll know who is sitting where and recognize faces in the classroom faster.
- If your seating chart is arranged in alphabetical order, turning in papers for grading (especially if you hope to grade papers quickly ) is a cinch. When all papers are in alphabetical order already, you can enter them into your computer in order.
- Making a seating chart may also prevent classroom management issues. You can separate students that tend to talk to one another. Move students who struggle to pay attention to the front of the class or near your desk, so you can keep an eye on them and encourage them to focus.
- By choosing who students sit next to, you can help them meet new people. Put students near people that can help them in class. You may also help create lasting friendships.
- At the beginning of the year, you don’t know which students are best friends or worst enemies. You could end up putting the wrong people near each other. Then, you’ll have more management issues than you would have otherwise.
- The lack of seating charts can be advantageous to students who are introverts. When sitting next to friends, they might be more likely to speak up and participate in class.
- Students need to take responsibility for their own education. By choosing their own seats, you encourage them to practice discipline and self-control . They will have to focus on their studies even with their friends next to them.
- When you create a seating chart, some students will think that you’re picking favorites. It might create resentment and distrust. Since you want mutual respect in your classroom, this could be detrimental to the learning process.
Weigh the pros and cons. Whether you decide to have classroom seating arrangements or not, you should set strict rules for your students. Have high expectations, and hold them to it!

- Our Mission
The Optimal Seating Plan? Letting Your Students Choose
Allowing students to move the furniture can help you differentiate instruction and give your students more agency in their learning.

How you arrange your seating can be an asset for differentiating instruction. Summit Preparatory Charter High School in Redwood City, California, uses different seating configurations for independent work, collaborative work, mini lessons, and large-group discussions.
Through scaffolded guidance from their teachers —which includes a personalized learning platform, daily goals, and a culture of formative assessment—students understand how they learn best and what resources they need, enabling them to choose and set up the seating arrangement that works best for them each day.
Summit uses furniture with wheels—trapezoidal and rectangular tables and soft fabric lounge chairs with tablet arms—to make it easy for students to move the furniture. Used furniture networks, like The Reuse Network , can be great resources, says Myron Kong, a Summit real estate team member, who adds that another way to lower costs when purchasing furniture is to aggregate all school orders into one.
Here’s how Summit creates a flexible learning environment to support differentiated instruction.
Understand Your Students’ Needs
Before you can plan your physical space, you need to know the needs of your students, and surveys can you help you figure those out. Try questions like “Do you want to work independently or with a group?” and “Do you want to learn from a Socratic discussion or a video?”
To learn more about creating surveys—and to learn about other free tools Summit uses to differentiate student learning—see “ Challenging Every Student in the Room .”
Summit Preparatory Charter High School
Per pupil expenditures, free / reduced lunch, demographics:, plan your physical space.
Design different seating configurations students can choose from when they come in. Chris Kelly, a history teacher, suggests asking yourself about the best spaces for independent and collaborative work, and how many students will want mini lessons.
“Have a clear, data-driven objective for why you want students to rearrange the space in the classroom. It is easier to articulate, get buy-in, and have students appreciate the personalized ways that you are helping them to learn,” explains Cady Ching, a biology and AP environmental science teacher.
Post-it Note Goals

Before breaking out into the different seating options, Kelly’s students write their goals for the day on Post-it notes and stick them on the whiteboard. They write down what they want to accomplish for the day, noting specific tasks or what they hope to achieve by working alone, with a group, or in a mini lesson. The goals can be things like helping their fellow students after they finish a chapter or unit, understanding specific skills, or reaching certain checkpoints.
This increases transparency and allows Kelly to better help his students. It also enables students to make the best choices for their own learning, choosing their seating arrangement and their collaboration partners.
Independent Work
Have your students move tables against the walls. Their backs will face you, increasing transparency. “If they’re working with their computers [or other materials], I can see specifically what they’re working on at a given moment,” says Kelly. This transparency enables you to check in on your students, offering encouragement or guidance when needed. This table configuration also limits distraction, moving students away from others’ discussions.
Collaborative Work
Have your students move tables to the sides of the classroom and work in groups of two to four students per table. With one group per table, your students will be able to make direct eye contact with each other and share their screens or resources with each other, says Kelly. For larger groups of up to six students, push two tables together. Make sure there’s enough space for you to walk around each table so you’re able to check in with every student.

Mini Lessons
When doing mini lessons for small groups of two to three students, have them move a table to the middle of the room. “For a larger mini lesson, place students at the center in collaborative seating, preventing a ‘teacher-at-the-front-talking’ mode. Facilitate think/pair/shares during the lesson,” suggests Kelly. When doing mini lessons for larger groups, resources such as overhead displays can be a factor in determining the placement of groupings. Media carts with a projector and speaker can create more flexibility, or a projector can be ceiling-tracked to save floor space.
Large-Group Discussions
For group discussions, like Socratic seminars or fishbowl discussions, group students in the middle of the classroom. “They sit in a circle, facing each other, usually with no tables so that open body language is encouraged. It gives them an opportunity to both show knowledge they researched in preparation for the Socratic seminar and to have the quiet space for discussion,” says Ching. Aukeem Ballard, a Habits, Community, and Culture teacher, uses this same table-less circle configuration for whole-class discussions. In fishbowl discussions, 15 students sit in a circle at the center of the room and discuss a topic, and the other 15 sit outside the inner circle, listening and taking notes on the discussion.

“No matter what the physical space might be, it’s the students making decisions to learn that marks a culture of learning,” says Kelly. “It matters more on who is in that space and the kinds of decisions that educators make to set students up to make positive choices for their learning.”
Why We Chose Summit Prep for Our Schools That Work Series
Summit Prep is a high-performing charter high school that leverages a personalized pedagogy and smart use of technology to help a largely underserved demographic achieve impressive results and success in college. With 68 percent minority enrollment and 41 percent eligibility for subsidized lunch, the school boasts a 95 percent graduation rate, which is 12 points higher than the national average for all students. And Summit Prep has a 99 percent four-year college acceptance rate.
In 2015, 58 percent of 11th-grade students in Summit’s district, Sequoia Union, scored proficient or above on the Smarter Balanced Assessment for English language arts. At Summit Prep, 82 percent of students scored proficient or above on that test. Summit students similarly outperformed both Sequoia and the state of California on the Smarter Balanced Assessment for math in the same year.
Furthermore, the school has a replicable model of instruction, as evidenced by its continued expansion—there are now eight Summit schools in California and three in Washington, and more communities have requested that Summit open schools in their areas. And Summit makes its innovative personalized learning platform available to other schools for free.
Article Options
Presentation View
Should Students Have Assigned Seats?
Students in Jenny Umland's class choose their own seats.
When students walk into Jenny Umland’s class, they don’t automatically go to the same seat they sat in the day before. In her classroom at Riverdale Heights Elementary School in Bettendorf, Iowa, students are allowed to sit wherever they want. Umland doesn’t assign seats. In fact, she has done away with most of the regular desks and uses beach chairs, standing desks, and rocking chairs instead.
Riverdale Heights is one of a growing number of schools that have ditched assigned seats. Many teachers say letting kids choose where to sit helps them learn how to make good choices. Some teachers point out that students are often more comfortable speaking up when they’re sitting near kids they like the most.
“If kids are happy and comfortable, they are more willing to learn,” says Umland. After 19 years of teaching, she tried non-assigned seating for the first time this year. She says she’ll never go back.
But not all teachers are ready to get rid of their seating charts. Some say having assigned seats helps students focus on their work, instead of where they’ll sit. Teachers also argue that it cuts down on distracting talk in the classroom because kids can’t choose to sit next to their friends.
Here’s what two of our readers think.
Letting students sit wherever they want can create chaos..
Assigned seating helps keep classrooms under control. Without specific seats to go to, students might argue over who gets to sit in the best spots. I would find it hard to work in that environment.
A more controlled classroom leads to better learning. A 2012 study by Montana State University found that high school students did better on tests when a teacher assigned their seats.
Kevwe Emoghene, Texas
Students should be comfortable when they learn..
My teacher, Mrs. Umland, allows us to choose our own seats, and it’s great!
I used to dread sitting in the same seat every day. Being allowed to sit wherever I want makes school more enjoyable. I can sit where I’m most comfortable.
Plus, the setup in my class helps kids get along better. If two students want to sit in the same spot, they have to talk it out and compromise.
Zach Zuiderveen, Iowa
Considering Students Seating and Three Effective Classroom Seats Arrangements

- Ahmadu Bello University
Abstract and Figures

Discover the world's research
- 25+ million members
- 160+ million publication pages
- 2.3+ billion citations
- CURR PSYCHOL

- Veronica Cerina

- Hue Ming-tak
- Li Wai-shing

- James C. McCroskey
- Rod W. McVetta
- Support Learn
- Rachel Wannarka
- Christopher
- Dianala Bernard
- Kathryn Starke
- Recruit researchers
- Join for free
- Login Email Tip: Most researchers use their institutional email address as their ResearchGate login Password Forgot password? Keep me logged in Log in or Continue with Google Welcome back! Please log in. Email · Hint Tip: Most researchers use their institutional email address as their ResearchGate login Password Forgot password? Keep me logged in Log in or Continue with Google No account? Sign up
Creating the Perfect Seating Plan for Your Classroom

- Posted by Ryan Crawley
- Categories Blog , Learning Styles , Professional Development , Teaching
- Date May 17, 2022
I was usually the only male elementary school teacher in the districts I worked with. Because of this, I was often placed with some of the most troubled students that perhaps just needed a strong male influence in their lives.
When faced with a classroom of up to 30 students and a few of them needing constant attention to stay on task, I always looked at the classroom seating chart as a treasure map. I will admit that I spent probably an hour every month of the school year trying to figure out a “solution” for student conduct difficulties and academic problems by adjusting the seating plan for the classroom.
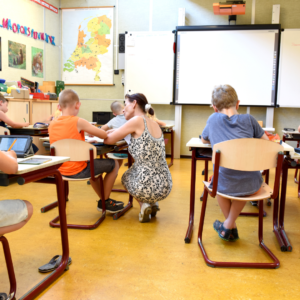
Give Space to Students Who Need Space (Even If They Don’t Want It)
I had students who just could not focus if they had another desk remotely close to them. It just caused distraction after distraction. With these students, I often placed them in the corner of the rooms to give them the space they needed. And when I say the corners of the room, I mean the very corners. Their desks would be tucked into corners and sometimes 8 to 10 feet away from other students.
Of course, if you don’t quite have the classroom space for this, you must get creative. I taught in a small trailer attached to the back end of the school in one district. I had almost 30 students, and all the desks were touching at least one other desk just to fit everyone in the room. In this situation, I literally had the students who needed space to cut down on distractions have their desks connected to the mind. Were they getting space? No. But I was there to remind them to get to work constantly.
Paired Seating or Desks Spread Out
Some students work better with other students, either acting as their mentor or being seated next to someone as intelligent and clever as they were. Don’t worry about doing this with all of your students in the classroom or just a few. Some students will want to experience paired seating, and others will not. Just remember you make the rules, and the final decision is yours.
Rows, Semi-Circle, Horseshoe, Tables, or Something Else
The main goal of a teacher is to keep students actively learning, keep them on task, and eliminate as many behavior problems as possible. The seating design can partially accomplish this, but it also comes down to the teacher and their teaching style.
What may work for you may not work for other educators. And if anyone questions your seating plan, shrug them off. In your classroom, you are the architect and the designer. It is literally your own little world, and you are in charge. Plus, nothing is set in stone. If you want to change it after a couple of days, do it. Whatever you can do to make this job easier and still see great results, consider it.
If you are interested in learning more helpful professional development ideas and concepts, iAchieve can assist individual teachers or staff.
RELATED BLOG POSTS
5 Classroom Management Tips for Every Classroom
Ways to Incorporate Important Life Lessons into the Classroom Curriculum
6 Smart Ways to Bring Spontaneity into Your Classroom
Tag: classroom , education , elementary school , high school , learning , learning styles , teaching

Ryan Crawley is an educator and writer that lives in Illinois. He greatly enjoys reading, working out, and playing with animals. He can be found online at: https://www.linkedin.com/in/ryan-crawley-b854bb146/
Previous post
Podcasts that Should Interest Students, Parents, and Teachers
Summer learning to strengthen weaknesses, you may also like.

9 Ways to Improve Your Math Score on the ACT

Reading Tips for Children with Learning Disabilities

4 Ways to Make Note-Taking Fun for Students
Free download the only act prep guid you’ll need.
🙌 Awesome, you're subscribed!
Thanks for subscribing! Look out for your first newsletter in your inbox soon!
Get us in your inbox
Sign up to our newsletter for the latest and greatest from your city and beyond
By entering your email address you agree to our Terms of Use and Privacy Policy and consent to receive emails from Time Out about news, events, offers and partner promotions.
Awesome, you're subscribed!
The best things in life are free.
Sign up for our email to enjoy your city without spending a thing (as well as some options when you’re feeling flush).
Déjà vu! We already have this email. Try another?
- Things to Do
- Food & Drink
- Arts & Culture
- Coca-Cola Foodmarks
- Feeling Curious?
- Los Angeles
Billy Joel at Cardiff’s Principality Stadium: start time, seating plan and what you need to know
Tonight‘s show is the piano man’s first ever Cardiff gig and only European performance this year

‘Uptown Girl’, ‘Piano Man’, ‘Vienna’, ‘We Didn’t Start the Fire’ — Billy Joel has loads of truly classic bangers guaranteed to get the crowd going. Now, imagine the incredible vibes when those songs are played live by Billy and sung back to him by a crowd of 70,000. Tonight (August 9), Cardiff is being treated to just that.
The legendary musician’s gig at the Principality Stadium is his first ever show in Wales ’ capital and his only European show for 2024, following the end of his ten-year residency at New York’s Madison Square Gardens. Aren’t the Welsh a lucky bunch, eh?
If you’re heading to Cardiff for the exclusive performance or keen to get your mits on some last-minute tickets, here’s everything you need to know.
When is Billy Joel playing at Cardiff’s Principality Stadium?
He’ll be playing to the Welsh capital tonight (Friday August 9).
The stadium doors for Billy Joel are set to open at 5pm.
What time will Billy Joel come on stage?
Fans can expect Billy to appear at approximately 8pm. The show will last two hours, with the star taking his final bow at around 10pm.
We can’t guarantee it, but based on his recent string of shows in the US, Billy’s setlist could look a little something like this:
- Miami 2017 (Seen the Lights Go Out on Broadway)
- The Entertainer
- Start Me Up (The Rolling Stones cover)
- An Innocent Man
- The Downeaster ‘Alexa’
- Don't Ask Me Why
- New York State of Mind
- This Is the Time
- Live and Let Die (Wings cover)
- Highway to Hell (AC/DC cover)
- Movin' Out (Anthony's Song)
- Only the Good Die Young
- The River of Dreams
- Scenes From an Italian Restaurant
- We Didn't Start the Fire
- Uptown Girl
- It's Still Rock and Roll to Me
- You May Be Right
Support acts
Billy is being supported by Chris Isaak, a US singer best-known for his 1989 single ‘Wicked Game’. He’s due to take to the stage at around 6.45pm.
Are there still tickets available?
Yes! If you head to Ticketmaster , you’ll find a bunch of last-minute resale and standard tickets on sale from £114.
Seating plan
Here’s a map of the stadium tonight, according to Ticketmaster.

Road closures
Scott Road and Park Street next to the Principality Stadium will be shut from 7am on Friday. A full city centre closure will then come into effect from 3pm until midnight. The following roads will be closed off:
Duke Street
High Street
St Mary Street
Caroline Street
Wood Street
Central Square
Westgate Street
Quay Street
Guildhall Place
Park Street
Havelock Street
Kingsway from its junction with North Road to its junction with Duke Street
Cowbridge Road East from its junction with Cathedral Road to its junction with Westgate Street
Tudor Street from its junction with Clare Road to its junction with Wood Street
Plantagenet Street and Beauchamp Street from their junctions with Despenser Place to their junctions with Tudor Street
Station Terrace and Guildford Street from the junction with Newport Road to the junction with Churchill Way
Penarth Road will be closed 30 minutes before the concert finishes and up to an hour after the concert ends
Stay in the loop: sign up to our free Time Out UK newsletter for the latest UK news and the best stuff happening across the country.
Been there, done that? Think again, my friend.
Discover Time Out original video
- Press office
- Investor relations
- Work for Time Out
- Editorial guidelines
- Privacy notice
- Do not sell my information
- Cookie policy
- Accessibility statement
- Terms of use
- Modern slavery statement
- Manage cookies
- Advertising
- Time Out Market
Time Out products
- Time Out Worldwide
- Undergraduate Admission
- Graduate Admission
- Tuition & Financial Aid
- Communications
- Health Sciences and Human Performance
- Humanities and Sciences
- Music, Theatre, and Dance
- IC Resources
- Office of the President
- Ithaca College at a Glance
- Awards and Accolades
- Five-Year Strategic Plan
- Fall Orientation
- Directories
- Course Catalog
- Undergraduate
STUDY ABROAD SCHOLARSHIP: Fund for Education Abroad - Spring 2025 applications due Sept. 18!
FUND FOR EDUCATION ABROAD OVERVIEW The Fund for Education Abroad (FEA) was established in 2010 as a 501(c)3 non-profit organization to enable more American college students to study abroad. Applicants from groups underrepresented in study abroad are given preference, in an effort to make the demographics of U.S. undergraduates studying abroad reflect the rich diversity of the U.S. population. Since 2010, FEA has awarded over $3.7 million in scholarships to 1186 undergraduates, helping students from all over the United States follow their dreams of studying abroad. Multiple scholarships are available through FEA, and just one application enables students to be considered for every scholarship for which they meet the criteria. Those scholarships include, in addition to the FEA General Scholarship, a range of special named & dedicated scholarships.
AWARD ELIGIBILITY FEA invests in deserving U.S. undergraduates who are least likely to study abroad. They consider financial need, demographic factors, and academic plan and preparedness to decide their scholarship recipients.
- Financial need is determined by the FEA Financial Aid Form that will be provided when you begin an application. Students must have a completed FAFSA for the current academic year.
- Demographic factors that are considered include first-generation college student status, racial identity, and community college experience.
- Academic plan and preparedness are determined by your essays and unofficial transcript.
To be eligible for an FEA scholarship, you must be a U.S. citizen, permanent resident, or DACA recipient; be currently enrolled as an undergraduate at a college or university in the US; receive credit at your home institution for the study abroad program; and have demonstrated financial need. APPLICATION DEADLINES The application deadline is September 18, 2024 for Spring 2025 programs. For Summer 2025, Fall 2025, and Academic Year 2025-26 programs, the application cycle will open in November 2024.
SPRING 2025 APPLICANT WEBINAR Watch the FEA Spring 2025 applicant webinar for information about eligibility requirements, application components, recent changes to the application form, and more: Fund for Education Abroad Spring 2025 Applicant Webinar on Vimeo
FOR MORE INFORMATION FEA Mission and Vision Additional Scholarships through FEA’s Access Partners Eligibility Application Instructions FAQs NEED MORE INFORMATION TO PLAN YOUR STUDY ABROAD EXPERIENCE? Schedule an appointment with a study abroad adviser - we'll help you find the program that's right for you. Please note: we recommend meeting with an academic adviser to discuss your study abroad needs and timeline BEFORE scheduling a one-on-one study abroad appointment.
Get notified of upcoming study abroad events, information and announcements: join the Study Abroad page on IC Engage , and follow us on Instagram and Facebook .
International Programs 074 Peggy Ryan Williams Center (607) 274-3306 [email protected]
COMMENTS
A teacher's classroom seating plan reveals a lot about what they value in education. The ways desks are set up shows, primarily, how you want your students to interact. When planning a classroom seating char,
How to plan an essay Essay planning is an important step in academic essay writing. Proper planning helps you write your essay faster, and focus more on the exact question. As you draft and write your essay, record any changes on the plan as well as in the essay itself, so they develop side by side.
The basic structure of an essay always consists of an introduction, a body, and a conclusion. But for many students, the most difficult part of structuring an essay is deciding how to organize information within the body. This article provides useful templates and tips to help you outline your essay, make decisions about your structure, and ...
This is flexible seating, and the most empowering part of it is that flexible seating will look and function differently for each educator and student. Ultimately, the goal of flexible seating is to better engage students and empower them with choices by providing diverse seating options. Flexible seating facilitates student-centered ...
Tips for Organizing Your Essay If you are used to writing essays that are similar to the five-paragraph essay (one claim and then three points that support that claim), it can be daunting to think about how to structure your ideas in a longer essay. Once you've established your thesis, you need to think about how you will move your reader through your argument. In some courses, you will be ...
Want the ultimate guide to writing an essay plan? Look no further! Here's out 7 step guide on how to write an essay plan like a pro!
Learn how to write an effective essay outline with clear guidelines and examples, and improve your argument and structure in academic writing.
The guidance on this page will show you how to plan and structure your essay to produce a strong and focused response to the question.
The first step in a great essay? A perfect plan. Check out Proofed's Writing Tips blog for expert advice on how to write a brilliant essay plan.
The secret to classroom seating arrangements - How to decide what's right for you. 14. By purposefully planning your groups, you can build upon student strengths and use the format as a part of your behavior management plan. Table points were a great way to build some friendly competition in my classroom, and they were great for encouraging on ...
Traditional The traditional lecture setup typically consists of rows of fixed seating. Students face the instructor with their backs to one another. This classroom seating arrangement is historically common in colleges and universities, minimizing student-student communication and largely supporting a "sage on the stage" learning environment. The highest communication interactions between ...
The Beginner's Guide to Writing an Essay | Steps & Examples An academic essay is a focused piece of writing that develops an idea or argument using evidence, analysis, and interpretation.
Learning a New System Doing my flexible-seating arrangement, I quickly learned that the kids need to be taught very explicitly how to use each seat and what to expect.
Ready to try flexible seating but aren't sure where to start? This guide will help you find your way through the sometimes-confusing world of flexible seating.
With the flexible seating planning guide, I'll walk you through each step of your plan so that you know exactly how your classroom is going to be set up and organized for students.
We analyse the benefits of seating plans for students and the impact a well thought out seating arrangement can have in your classroom.
Should you create classroom seating arrangements for your students? Weigh this list of pros and cons to determine if it's right for your class.
Plan Your Physical Space Design different seating configurations students can choose from when they come in. Chris Kelly, a history teacher, suggests asking yourself about the best spaces for independent and collaborative work, and how many students will want mini lessons.
Letting students sit wherever they want can create chaos. Assigned seating helps keep classrooms under control. Without specific seats to go to, students might argue over who gets to sit in the best spots. I would find it hard to work in that environment. A more controlled classroom leads to better learning.
three popular seating arrangements: the traditional long rows (with variants including. stadium, theatre , or angled row sitting designs), the U-shape or horseshoe design and the. team/pod ...
Common themes included that students prefer a specific seating choice in the classroom, flexible seating options were selected more than traditional seating options, and some students needed teacher directed instruction on modifications needed with seating choice or reminders how to sit in a specific choice.
I will admit that I spent probably an hour every month of the school year trying to figure out a "solution" for student conduct difficulties and academic problems by adjusting the seating plan for the classroom. Is there a perfect seating plan for your classroom that will erase behavior problems and help students earn better grades? Maybe.
Billy Joel at Cardiff's Principality Stadium: start time, seating plan and what you need to know. Tonight's show is the piano man's first ever Cardiff gig and only European performance this ...
Academic plan and preparedness are determined by your essays and unofficial transcript. To be eligible for an FEA scholarship, you must be a U.S. citizen, permanent resident, or DACA recipient; be currently enrolled as an undergraduate at a college or university in the US; receive credit at your home institution for the study abroad program ...