Unlimited Access to PowerPoint Templates & more! Starting at only $49 Unlock Full Access


The Essential 5 Rules of Effective PowerPoint Presentations

PowerPoint presentations have become a cornerstone of modern communication, whether in the boardroom, the classroom, or the conference hall. When PowerPoint is used effectively, it can elevate your message, making your message engaging, clear, and memorable. There are 5 simple rules to follow to ensure your presentation doesn’t become a dreaded “death by PowerPoint” experience. In this blog, we’ll quickly explore these five essential rules of creating compelling and impactful PowerPoint presentations.
Rule 1: Keep It Simple
One of the cardinal sins in PowerPoint presentations is overcrowding your slides with text, bullet points, and too many visuals. The first rule is to keep it simple. Each slide should have a single, clear message. Use concise language, bullet points, and minimal text to convey your points. Visuals should be clean and uncluttered. Simplicity enhances comprehension and retention.
Rule 2: Visualize Your Data
Data is a critical element in many presentations, but raw numbers can be overwhelming. Rule number two is to visualize your data. Use charts, graphs, and diagrams to represent your data in a visually engaging way. Choose the right type of visualization for your information, ensuring it’s easy to understand at a glance. Well-crafted visuals make your data more accessible and memorable.
Rule 3: Tell a Story
The most compelling presentations are those that tell a story. Rule three is all about storytelling. Structure your presentation like a narrative with a clear beginning, middle, and end. Start with an attention-grabbing introduction, build your narrative with supporting points, and conclude with a memorable takeaway or call to action. A well-structured story captivates your audience and helps them connect with your message.
Rule 4: Design Matters
Effective design is crucial to a successful PowerPoint presentation. Rule four is all about design. Choose a consistent, visually appealing template. Use fonts, colors, and imagery that align with your message and branding. Ensure that text is legible and that visuals are high-quality and relevant. Good design enhances professionalism and keeps your audience engaged.
Rule 5: Practice and Rehearse
No matter how well your slides are designed, the delivery is equally important. Rule five emphasizes practice and rehearsal. Familiarize yourself with the content, so you can present confidently and naturally. Rehearse your timing, transitions, and any interactive elements. Anticipate questions and prepare for them. Practice helps you connect with your audience and come across as a confident, knowledgeable speaker.
Mastering the art of PowerPoint presentations requires following these five fundamental rules: simplicity, data visualization, storytelling, design, and practice. These rules can transform your presentations from dull and forgettable to compelling and impactful. By keeping your slides clear and uncluttered, visually representing data, weaving a narrative, paying attention to design, and practicing your delivery, you can create presentations that inform, engage, and leave a lasting impression on your audience. The next time you create a PowerPoint presentation, remember these rules to ensure your message shines.

Get Unlimited Access to EVERYTHING


5 golden rules of PowerPoint design
april 30, 2024
by Deb Ashby
Wondering how to design the perfect PowerPoint presentation? It's easier than you think–just follow five simple rules to get started:
1. Consider using templates
When building a slide deck, it’s important to maintain consistency throughout. We want to ensure we are using consistent font styles, colors and themes. This can be tricky when designing from scratch, so why not start from a template?
Microsoft Create contains hundreds of pre-made, customizable PowerPoint templates, which means you don’t have to start from scratch and the fonts and colors are already set for you.
Simply choose a template from the gallery, customize it as needed, and you are done!

2. No walls of text
We’ve all seen PowerPoint presentations where slides contain too much text. The human brain struggles to listen and read at the same time. If you are presenting to an audience, keep the text on slides to a minimum.
Consider employing the “5-5-5" rule. No more than 5 lines, no more than 5 words, no more than 5 minutes. Think short and sharp memory joggers instead of rambling paragraphs.
Where possible, consider replacing text with visuals to represent your point. People remember images more than words.

3. Be mindful of colors and fonts
No one wants their audience to leave with a headache after an hour of straining to read slides. We need to ensure that our presentation is easy to read for everyone – even for those in the nosebleed seats at the back! Think about the font you are using. Is it appropriate for the presentation? What about the font size? Can people at the back easily read? What about people with visual impairment? Ensure all text is at least 24pts.
When it comes to color, ensure all slides have good contrast. Dark backgrounds should have light font and vice versa.
4. Use animation sparingly
Animation can really liven up an otherwise flat presentation. However, it should be used thoughtfully and sparingly. Too much of the wrong type of animation with objects flying in and zooming around the screen, while fun, can look confusing and unprofessional.
Animation should be subtle (especially for pitch decks and other formal presentations). With every animation you add, ask yourself, "Is this going to enhance my presentation or distract from it?"
5. Engage your audience
When presenting to an audience, there is usually an awkward time before the presentation begins while the speaker waits for everyone to arrive. During this time, people may start scrolling on their phones or get distracted with work emails, and it can be hard to pull the audience back.
To avoid this issue, work to grab your audience's attention before the presentation even starts. Instead of just having the title slide on the screen, consider creating "kiosk slides." These are a series of slides that contain a combination of interesting things for the audience to look at or engage with. Maybe you have an interesting image? A funny quote or fun facts? Or maybe there is a question you want them to think about prior to the session?
Create these slides and have them automatically cycle round before the presentation starts.

Related topics
Unsupported browser
This site was designed for modern browsers and tested with Internet Explorer version 10 and later.
It may not look or work correctly on your browser.
- Presentations
How to Create a PowerPoint Presentation From a PPT Template
- Bahasa Indonesia
Creating a presentation from scratch can be time-consuming and complicated. Even when you try your best, the presentation design may not turn out how you want. This is why using a premium template is beneficial.
This article covers how to create a PowerPoint presentation from a quality PPT template. In addition, we’ll also look at some top premium PowerPoint presentation templates.
Download Our Free PDF eBook on Making Great Presentations
We also have the perfect complement to use alongside a professional presentation template. Download our Free eBook: The Complete Guide to Making Great Presentations , which will help you write, design, and deliver the perfect presentation.

What Is a PowerPoint Template?
PowerPoint is a popular presentation software by Microsoft. You can use PowerPoint for business and personal purposes. Presentations are a great way to use words to create an impact. For example, if you show the benefits of a product or service or present data, a presentation can make it more memorable.
A PowerPoint template is like a blueprint for your presentation. Templates typically contain slide layouts, colors, fonts, effects, and background styles. In addition, some templates come with illustrations and infographics. These tools make your presentation more visually interesting and can help you explain an important topic.
Your Preparation
Most of the work while creating a business presentation occurs before you fire up PowerPoint.
When creating a presentation, you want to achieve an objective. For example, you might need to present the results of your department for the last quarter in the form of a presentation to your colleagues. Or, you could be seeking funding and looking to impress potential investors with your business pitch presentation . Know what your presentation is aiming to communicate and accomplish.
Getting the Content Right
Everything begins with the content you'll put in the presentation to achieve your objective. Ideally, it's brief and crystal-clear. Typically, the less content (by sticking to key facts and figures), the more digestible your presentation is.

To save time, revising content while you're still preparing it (such as in Word or any other text processor) is much smarter than making content changes while designing.
Once you feel confident about your content preparation, it's time to design your presentation in PowerPoint.
Designing Your Presentation
For our tutorial, we'll be using the Business PPT template . Then, we'll show you how to use the template to customize slides for your business presentation.

Before starting any template you download, look at the initial requirements in an accompanying text file or their online description. For example, not having the correct font installed might mess up the layout of the template slides.
Getting Started
First, let's duplicate the theme. You can achieve this by right-clicking on the .pptx file and clicking Copy in the menu. You can copy and paste the file and rename the new document.
Instead of directly editing the template, we'll be copying slides that we'll use in our new document from the original theme file. This way, we're not editing the template source in which you would need to delete or hide slides you don't use.
Now let's review how to edit this PowerPoint template for your presentation:
How to Create a PowerPoint Presentation from a PPT Template
Are you ready to start creating your presentation?
Let's get started:
1. Choose a Template
The first step in how to create a PowerPoint presentation is to choose a template. The template featured in this section is the Business PowerPoint Presentation . This template comes with 50 unique PowerPoint slides. Easily add an image to the template by dragging and dropping an image of your choice into the picture placeholder.
2. Create an Outline
Creating an outline before working on your presentation is a great way to organize your thoughts. When creating a presentation, you want the audience to be clear, consistent, and organized.
Also, when you create an outline, it can help you make sure that you've got the best message. You can also use an outline to choose where you want your images or other multimedia. Also, they can help you see if you missed a topic or point.
3. The Basics

To learn the basics, let's start with slide seven. As you can see, there are a few components on the slide that we can change according to our needs. At first sight, we notice the following components available to us:
- footer text
I'd advise you to always look at the available components in a slide design as you're glancing over the different slides within a theme. This has a few benefits:
- You can identify how your content can fit the deck's structure.
- You can decide on the components you like (or dislike).
- You'll notice a pattern in the slide designs.
Now that we understand the components we can change to suit our needs, let's move ahead and start designing.
4. Removing Slide Components

For this example, I'll be making a simple slide to introduce the topic of this presentation. I've decided I don't need a footer or paragraph text underneath the title.
To remove the text, simply click on each Text Box and use the Delete key to remove the components from the slide.
To delete multiple words, highlight the words and then press Delete on your keyboard. If you want to add them again, you can use the top toolbar to insert text boxes, images, and other assets such as shapes and graphs.
5. Use the Slide Master

But wait! You might notice that you can't click on certain components within the slide. For example, you can't change the footer. This is because it's set in a Master Slide .
The easiest way to explain a Master Slide is to think of a boilerplate which forms the foundation for your slide designs.
The slide master tool lets you edit the layout from a single slide. This makes it easy to edit the layout of multiple slides at once. To access the slide master tool, click on the View tab.
Next, click on the Slide Master icon. This opens up the tool. The large slide is the slide that you make edits to. The small slides under the large slide is the group that'll be edited when you edit the large slide.
This is normal, as a master slide can have a Master Layout . Master slides use a master layout used in a group of master slides.
Let's access the master layout by looking at our master slide overview in the left panel and scrolling all the way up until we see the slide on top of the group. This is the slide that contains the master layout.
In this slide, you can change the footer. You'll also notice the child master slides updating as you change this. Click the Close Master button in the top toolbar to save your changes.
You'll notice that the elements you couldn't edit have been updated and changed in the deck design.
For more information about the Slide Master tool, read this in-depth article:

6. How to Add Animation

If you want to add something fun to your presentation, you can add animation. First, however, you need to know how to edit PowerPoint templates to add animation. For this illustration, we'll switch to slide two.
First, click on the Animations tab above the toolbar. When you click on this tab, you’ll see the different effects, such as:
- the green Entrance Effects
- the yellow Emphasis Effects
- the red Exit Effects
Next, click on the object that you want to animate. Then, choose the animations from the effects options that you want to use.
For more information about PowerPoint animation, read these articles:

7. Add an Image
You can use two methods to add an image to a presentation template.
The first method is using picture placeholders. A good premium template has picture placeholders in the template.
For example, slide one of the Business PowerPoint Presentation templates has a picture placeholder in the middle of the slide.

For example, you can find unlimited stock photos on Envato Elements. Download them to your device quickly and easily.
Download a photo you'd like to use and drag the image into the slide. Of course, essential to notice is that the picture is high enough in resolution (as a general rule, never aim for an image that's got less than 1600 pixels in width, or the quality might be poor).
You may need to adjust the image size and position.
The second method is to click on the Insert tab above the toolbar.
Next, click on the Pictures button in the toolbar. When you click on this button, a menu appears. Choose the correct option depending on where your image file is located. Your image appears on your slide. Adjust the image as needed.

8. Image Transparency

First, click on the image. Next, click on the Picture Format tab above the toolbar. You'll see a Transparency button in the toolbar. When you click on this button, a Transparency menu appears. Choose the option that you want.
You can easily change the transparency of an image to increase the legibility of the text on top of the picture.
Let's add some finishing touches. Click on the title to change its text, remove the placeholder logo using backspace, and drag in your company's logo. Should you have any issues with the formatting, double-click on the image.
9. Fitting Images

In the top toolbar under the Picture Format tab, there's a Crop button with a dropdown next to it. When you click on the dropdown menu, there's a Fit option and a Fill option. The fit option helps you fit an image within a constrained box. The Fill option is useful to cover a constrained box (for example, when using a background image).
10. Images Within Shapes

The final tricky part is updating images within a shape. Let's look at slide 23.
When you click on the graphic on the right, you'll notice it's a shape that's got multiple areas. You can double-click on the image placeholders within the shape to open a menu to select the image you'd like to add to the shape.
With that, we're all set to complete this slide!
11. Final Tips
As you notice, navigating through a theme design is very easy.
It would be best if you remembered that there's a distinction between your slide design, which uses placeholders, and recurring components , which you can't edit directly in the slide but can change in the corresponding Master Slide . If you can't access an item in the original master slide, a parent Master Slide uses a Master Layout . Multiple slides use the master layout. This allows for a consistent design across multiple presentation files.
As a quick overview, the ideal process to edit a template is the following:
- Copy and the original template into a new working document you'll save separately.
- Make edits to each slide you work with. Start with placeholders, then change the corresponding Master Slide if needed. Of course, you can add and remove text, images, and charts.
- You might notice that your changes to the Master Slide affects your other slides, which is good as you only need to update the placeholders, saving time.
- Do a final check if everything looks solid, and you're all set!
The Top Source for Premium PowerPoint Templates (With Unlimited Use)
Envato Elements is a great place to find the top premium PowerPoint templates. To gain access to premium templates, you must pay a low monthly fee to become a subscriber. Once you become a subscriber, you’ll gain access to more than just premium PowerPoint templates . You’ll have access to images, fonts, audio, and more.
Explore Premium Presentation Templates

Using a premium PowerPoint template saves you time because you aren’t creating a presentation from scratch when you use a premium template. In addition, if you use a premium template, you start with a great base. This means that all you need to do is add images and text.
Every template is made by a professional to look impressive and stylish. As a result, you’ll stand out among your peers who created their own or used a free template.
If you’re creative and like to customize your presentation with a premium template, you can still make as many customizations as much as you want. A good premium template is entirely editable.
Best Five PowerPoint Presentation Templates from Envato Elements
Here are some of the top PowerPoint templates from Envato Elements:
1. Creature PowerPoint

Creature is a multipurpose presentation with a versatile design. There are over fifty unique slides that you can use to create a PowerPoint for any topic you have.
This template also comes with charts, graphs, and icons. These elements add visual interest to your presentation.
2. Everlux PowerPoint Presentation

This presentation template is a professional presentation with a portfolio to showcase your work if you’re a creator. For example, you’ll have over 40 unique total slides when you create a PowerPoint with this template.
Easily add an image to this template by dragging and dropping an image of your choice by dragging and dropping it into the picture placeholder.
3. Kanal PowerPoint Template

This template has a minimal design that can work for any presentation topic. With this template, you’ll have 68 custom slides to use when creating a PowerPoint presentation. Plus, it's got animation and transitions, adding some interest to your presentation.
4. VERA PowerPoint Template

When creating a PowerPoint, you must consider what kind of presentation you want. This template is excellent for Creatives. This template comes with 55 creatives slides. It also comes with 50 premade color schemes.
5. Style Multipurpose PowerPoint Template

Style Multipurpose PowerPoint Template is a multipurpose presentation template. It comes with 4000 total slides making it easy to create a PowerPoint presentation. Easily add an image of your choice to this template by dragging and dropping the image into a picture placeholder.
Grab This eBook on Making Great Presentations (Free Download)
We've got just the right complement to a professional PowerPoint template that'll help you learn the complete process of how to write, design, and deliver great presentations.
Download The Complete Guide to Making Great Presentations now for FREE with a subscription to the Tuts+ Business Newsletter. Get your ideas formed into a powerful presentation that'll move your audience.

More Top PowerPoint Templates
Haven’t found a template that suits your needs? Check these articles out for more templates.

Download a Premium PowerPoint Template Today!
You've just learned how to edit a PowerPoint template and how to create a PowerPoint presentation using a template.
Once you start with a premium template , it isn’t hard to create a presentation. Next time you need to create a presentation, try using a premium template. Gain access to thousands of premium PowerPoint templates and digital assets by signing up for Envato Elements today!
Editor's Note: This tutorial was originally published in 2016 by Sven Lenaerts . It's been completely redone to make it accurate and up to date.

Center for Teaching
Making better powerpoint presentations.
Print Version
Baddeley and Hitch’s model of working memory.
Research about student preferences for powerpoint, resources for making better powerpoint presentations, bibliography.
We have all experienced the pain of a bad PowerPoint presentation. And even though we promise ourselves never to make the same mistakes, we can still fall prey to common design pitfalls. The good news is that your PowerPoint presentation doesn’t have to be ordinary. By keeping in mind a few guidelines, your classroom presentations can stand above the crowd!
“It is easy to dismiss design – to relegate it to mere ornament, the prettifying of places and objects to disguise their banality. But that is a serious misunderstanding of what design is and why it matters.” Daniel Pink
One framework that can be useful when making design decisions about your PowerPoint slide design is Baddeley and Hitch’s model of working memory .
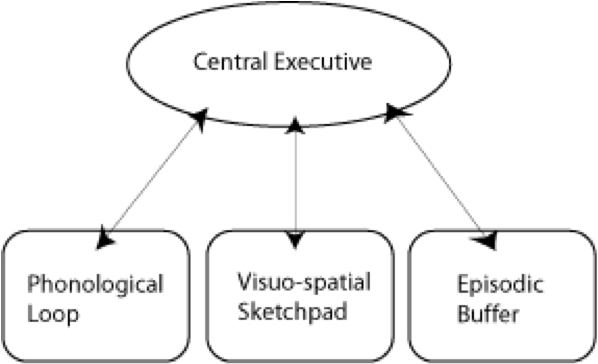
As illustrated in the diagram above, the Central Executive coordinates the work of three systems by organizing the information we hear, see, and store into working memory.
The Phonological Loop deals with any auditory information. Students in a classroom are potentially listening to a variety of things: the instructor, questions from their peers, sound effects or audio from the PowerPoint presentation, and their own “inner voice.”
The Visuo-Spatial Sketchpad deals with information we see. This involves such aspects as form, color, size, space between objects, and their movement. For students this would include: the size and color of fonts, the relationship between images and text on the screen, the motion path of text animation and slide transitions, as well as any hand gestures, facial expressions, or classroom demonstrations made by the instructor.
The Episodic Buffer integrates the information across these sensory domains and communicates with long-term memory. All of these elements are being deposited into a holding tank called the “episodic buffer.” This buffer has a limited capacity and can become “overloaded” thereby, setting limits on how much information students can take in at once.
Laura Edelman and Kathleen Harring from Muhlenberg College , Allentown, Pennsylvania have developed an approach to PowerPoint design using Baddeley and Hitch’s model. During the course of their work, they conducted a survey of students at the college asking what they liked and didn’t like about their professor’s PowerPoint presentations. They discovered the following:
Characteristics students don’t like about professors’ PowerPoint slides
- Too many words on a slide
- Movement (slide transitions or word animations)
- Templates with too many colors
Characteristics students like like about professors’ PowerPoint slides
- Graphs increase understanding of content
- Bulleted lists help them organize ideas
- PowerPoint can help to structure lectures
- Verbal explanations of pictures/graphs help more than written clarifications
According to Edelman and Harring, some conclusions from the research at Muhlenberg are that students learn more when:
- material is presented in short phrases rather than full paragraphs.
- the professor talks about the information on the slide rather than having students read it on their own.
- relevant pictures are used. Irrelevant pictures decrease learning compared to PowerPoint slides with no picture
- they take notes (if the professor is not talking). But if the professor is lecturing, note-taking and listening decreased learning.
- they are given the PowerPoint slides before the class.
Advice from Edelman and Harring on leveraging the working memory with PowerPoint:
- Leverage the working memory by dividing the information between the visual and auditory modality. Doing this reduces the likelihood of one system becoming overloaded. For instance, spoken words with pictures are better than pictures with text, as integrating an image and narration takes less cognitive effort than integrating an image and text.
- Minimize the opportunity for distraction by removing any irrelevant material such as music, sound effects, animations, and background images.
- Use simple cues to direct learners to important points or content. Using text size, bolding, italics, or placing content in a highlighted or shaded text box is all that is required to convey the significance of key ideas in your presentation.
- Don’t put every word you intend to speak on your PowerPoint slide. Instead, keep information displayed in short chunks that are easily read and comprehended.
- One of the mostly widely accessed websites about PowerPoint design is Garr Reynolds’ blog, Presentation Zen . In his blog entry: “ What is Good PowerPoint Design? ” Reynolds explains how to keep the slide design simple, yet not simplistic, and includes a few slide examples that he has ‘made-over’ to demonstrate how to improve its readability and effectiveness. He also includes sample slides from his own presentation about PowerPoint slide design.
- Another presentation guru, David Paradi, author of “ The Visual Slide Revolution: Transforming Overloaded Text Slides into Persuasive Presentations ” maintains a video podcast series called “ Think Outside the Slide ” where he also demonstrates PowerPoint slide makeovers. Examples on this site are typically from the corporate perspective, but the process by which content decisions are made is still relevant for higher education. Paradi has also developed a five step method, called KWICK , that can be used as a simple guide when designing PowerPoint presentations.
- In the video clip below, Comedian Don McMillan talks about some of the common misuses of PowerPoint in his routine called “Life After Death by PowerPoint.”
- This article from The Chronicle of Higher Education highlights a blog moderated by Microsoft’s Doug Thomas that compiles practical PowerPoint advice gathered from presentation masters like Seth Godin , Guy Kawasaki , and Garr Reynolds .
Presenting to Win: The Art of Telling Your Story , by Jerry Weissman, Prentice Hall, 2006
Presentation Zen: Simple Ideas on Presentation Design and Delivery , by Garr Reynolds, New Riders Press, 2008
Solving the PowerPoint Predicament: using digital media for effective communication , by Tom Bunzel , Que, 2006
The Cognitive Style of Power Point , by Edward R. Tufte, Graphics Pr, 2003
The Visual Slide Revolution: Transforming Overloaded Text Slides into Persuasive Presentations , by Dave Paradi, Communications Skills Press, 2000
Why Most PowerPoint Presentations Suck: And How You Can Make Them Better , by Rick Altman, Harvest Books, 2007

Teaching Guides
Quick Links
- Services for Departments and Schools
- Examples of Online Instructional Modules
- Utility Menu
de5f0c5840276572324fc6e2ece1a882

- How to Use This Site
- Core Competencies
- Create and Assess Your Slides
strategies, techniques, and tools for strong slide design, and maximum presentation quality.
Prior to delivering a talk, it is important to prepare and set yourself up for success with a strong slide deck. Depending on the nature of your presentation, the type of speaking engagement, your institution, and other factors and considerations, there are different kinds of approaches and priorities when it comes to slide design. This section includes some tips that will assist you with designing your slides to prepare for your presentation.
Slides drive home the main ideas of your research and play an important role to deliver a strong presentation. After reviewing the Fundamentals of Slide Design , use these resources to create and assess your slides to ensure that you have considered and included important components that make for an effective presentation.

Qualities of Strong Slide Design
Use this self-assessment checklist to design and review your slides. Check all boxes that incorporate key qualities of strong slide design. In addition to focusing on the style, typography, and layout, consider thinking about your use of visuals and color along with other elements to enhance the design of your slides.

Checklist for
Assertion-evidence slides.
The assertion-evidence slide structure is one effective technique to designing effective slides. In conjunction with the webinar on “Better Than Bullets: Transforming Slide Design” by Melissa Marshall, this checklist was developed as a resource for assertion-evidence slides but can be applied more generally to other types of slide designs. Consider the style, typography, and layout of your slides and what it might look like to incorporate these elements with an assertion-evidence slide structure in mind.

Research Presentation Rubric
The format of research presentations can vary across and within disciplines. Use this rubric to identify and assess elements of research presentations, including delivery strategies and slide design. This resource focuses on research presentations but may be useful beyond.

Templates and Examples for
Check out tips, templates, layout suggestions, and other examples of assertion-evidence slides on Rethinking Presentations in Science and Engineering by Michael Alley, MS, MFA, from Pennsylvania State University. Download the Assertion Evidence Presention template for Microsoft PowerPoint.
Additional Resources
Create and deliver standout technical presentations, present your science.
Melissa Marshall’s website explores how speakers can transform the way they present their research.
"The Craft of Scientific Presentations: Critical Steps to Succeed and Critical Errors to Avoid" book by Michael Alley
By distinguishing what makes a presenter successful, this book aims to improve your presentation skills.
Want to learn more about how to strengthen your presentation skills?
Visit the delivery authentically page for more information.
- Data Visualization
- Fundamentals of Slide Design
- Visual Design Tools
, .
, .
, .
, .
, .
, , , , , , .
Scholar Speak
How to design & improve presentation slides.
Written by Arslan Ahmed

When it comes to presentation, the first two questions which come to mind are “What content to present” and “how to present.” Students are learning to become experts in their own domain of knowledge, but the big questions are “how” to convey that knowledge to others. Students certainly do not want their well-crafted and well-rehearsed script to be presented poorly. The slides should speak for themselves.
It is not how much a presenter gives, but how they give it that matters the most. The presenter can either make the audience go to sleep with boring slides or keep them engaged throughout the presentation.
Here are 8 key points to keep in mind when designing your slides which can also be used as a checklist:
- Template : Choosing the right template is the first key to success of your presentation. A template contains layouts, theme colors, fonts, effects, background styles and many more stylistic options. A template should be consistent throughout the presentation. A company might have a dedicated template to be used. Another source for templates is the UNT PowerPoint templates webpage, which can be used for your class presentations. Using these templates, 50% of the presenter’s work is done which allows the presenter to focus on the content for their slides. It is important to know the location of the presentation, taking into consideration a few factors such as lighting, equipment available, and if the presentation is physical or virtual, with each having a potential impact on necessary preparation.
- Style guide: The style guide outlines the most significant specifications for making PowerPoint presentations. If one is available, employees given the same template need to follow the same set of rules. As a result, the corporate design is consistent. This allows employees to save time while also improving the quality of your presentations. Let the style of the slides speak to the audience it is aimed at. If creating a PowerPoint independent rather than based on a template, keep consistency in the styling of the theme, font, font size, font color (which may differ for headings and subheadings), picture size, and size of any logos throughout the PowerPoint or simply follow the predefined recommended style guide for that template if available.
- Layout: The presentation will look much better and even more professional if the creator uses the proper layout for each slide. Ensure that the design components and content are arranged in a uniform fashion throughout the presentation. The layout of the material and visuals should be balanced and coherent.
- Consistency: Consistency is key to a good presentation. The movement from one slide to the next should feel seamless. For a beautiful presentation, the typeface, colors, layout, and style should all be consistent.
- Visuals: Images speak more than words coming from the mouth of a presenter. Use relevant and meaningful images where required. Visuals are an excellent method to communicate effectively but do not find just any image from a Google search, as it may be distracting; instead, look for the right one and do not violate the copyrights of the image. Another way to understand if the image is suitable for the topic is to try justifying how this image connects with the content of the slide, and if it conveys the message to the audience without any audio associated with it.
- Colors: Have you noticed that anything related to UNT, like the UNT website, is always printed in green? This is because most organizations use a dedicated color palette as part of their identity. Always be consistent in choosing the colors for your presentations. Colors not only enhance your slides but also help to communicate the message between the presenter and the audience more effectively. As such, if you are making an independent presentation for a classroom, add some color to the slides or use a predefined template with colors that match your purpose. Consider a dark background for the slide with a light color for the text if you are giving a presentation in a dark room. Avoid using light text on light background or clashing colors, which will distract the audience.
- Alignment: Practice proper alignment of all content in the slides. Some examples of what to look for include the margins, spacing from all sides, and images on the left, right, or middle. If the slide contains a lot of information, proper alignment will make it presentable and will keep the audience from becoming distracted. Proper alignment makes a slide look clean, well-formatted and professional.
- Typeface: Choose a good typeface or font family which are easy to read and are also suitable for printing. Keep the font consistent from the first slide to the last. There are several fonts you can use for your presentation. However, you are better off choosing standard fonts, such as Calibri, Tahoma, Gill Sans, and Garamond, or even Times New Roman and Constantia. Stay away from all-caps fonts and Avoid Scripts, Italics and Decorative Fonts.
Those are the 8 essential characteristics of well-designed PowerPoint slides, along with all the best tips for a great presentation. Please feel free to leave a comment letting us know if this helped you, and as always, contact Ask Us with your research and library questions.
References (APA format):
Mount, K. (2017). Presentation skills: Designing effective visual aids .
Reynolds, G. (2010). Presentation zen design: Simple design principles and techniques to enhance your presentations . Berkeley, Calif: New Riders
Mount, K. (2017). Presentation skills: Design, structure and content .
Leave a Reply Cancel reply
Your email address will not be published. Required fields are marked *
Written by graduate student employees, Scholar Speak hopes to bridge the gap between the library and its students through instruction on the use of library services and resources.
Recent Posts
- Vinyl Record Collection at the UNT Music Library August 15, 2024
- Have We Passed the Need for Literacy? August 8, 2024
- Zines: Symposium, Library, and Interview May 24, 2024
Additional Links
Apply now Schedule a tour Get more info
Disclaimer | AA/EOE/ADA | Privacy | Electronic Accessibility | Required Links | UNT Home

Students also studied


Create or change a presentation’s handout
You can use the Handout Master tab to edit the appearance of presentation handouts, including the layout, headers and footers, and background. Changes made to the handout master appear on all pages of the printed handout.
To see the handout options, click the View tab, and then click Handout Master in the Master Views group.

This opens the Handout Master view.

Change the layout
In the Page Setup group, you can specify the number and layout of slides to print on each page, change the orientation of handouts, and set the slide size. You can use settings on all three menus— Handout Orientation , Slide Size , and Slides Per Page —to customize your layout exactly how you want it.

Set the slides per page
Click Slides Per Page .

Choose a layout option from the thumbnail images.
Tip: The 3 Slides option includes lines that your audience can use to take notes.
Set the orientation
Click Handout Orientation , and then choose Portrait or Landscape .

Set the slide size
Click Slide Size , and then choose one of the options.

When PowerPoint is unable to automatically scale your content, it will prompt you with a message. Select Maximize to increase the size of your slide content when you are scaling to a larger slide size. (Choosing this option could result in your content not fitting on the slide. ) Select Ensure Fit to decrease the size of your content. (This could make your content appear smaller, but you’ll be able to see all content on your slide.)

To set a custom size, including width, height, slide numbering, and orientation of slides and notes, click Custom Slide Size on the Slide Size menu.
To make sure your slides will print the way you want, preview your handouts before printing.
Change headers and footers
You can adjust headers and footers in the Placeholders group. By default, the placeholders appear in the top and bottom corners of the Handout Master page.

Click in a text placeholder (Header, Footer, Date, or Page Number) to make changes to it. You can do things like:
Edit or add content in the text placeholders : In addition to text changes, you can use commands on the Insert tab to add graphics or other content types.
Format text shape and appearance : Select the text and use the options on the Format tab to make changes.
Change text placeholders : Drag a text placeholder to move it, and use the text box sizing handles to change its size.
Turn placeholders on or off : Clear the check box of the placeholder (Header, Date, Footer, or Page Number) that you want to turn off.
Change the background
You can change the background of your handouts (but not the background of your slides) in the Background group. You can also quickly change the font for all for your handout text at once, and you can apply special borders and visual effects.

Colors : Choose a color theme for your handout background. You may have to click Background Styles and choose an option to see it applied.
Background Styles : Choose a style option from the list. The colors displayed depend on your choice in the Colors list.
Tip: Click Format Background at the bottom of the Background Styles list to open the Format pane and choose from more background options, such as advanced fill settings, artistic effects, and color and image settings.
Fonts : Choose a font from the list to quickly apply it to all headers and footers.
Effects : Choose an effect from the list to apply a theme effects, with features including shadows, reflections, lines, fills, and more.
Preview your handouts
To preview the way your handout will look when printed:
Click File > Print .
Go to Settings > Full Page Slides , and then under Handouts , select the layout you want and look at the preview pane. Click the File tab again to return to your previous view.
For more information about working with PowerPoint handouts, see:
Work with handout masters
Print your handouts, notes, or slides
Create your own theme in PowerPoint

Need more help?
Want more options.
Explore subscription benefits, browse training courses, learn how to secure your device, and more.

Microsoft 365 subscription benefits

Microsoft 365 training

Microsoft security

Accessibility center
Communities help you ask and answer questions, give feedback, and hear from experts with rich knowledge.

Ask the Microsoft Community

Microsoft Tech Community

Windows Insiders
Microsoft 365 Insiders
Was this information helpful?
Thank you for your feedback.
Microsoft 365 Life Hacks > Presentations > Implementing The 10-20-30 Rule of PowerPoint
Implementing The 10-20-30 Rule of PowerPoint
If you’re not used to making a PowerPoint presentation , it can be tough to know how long to make it and how to format the slides. On the other side of the coin: you might overthink your presentation and put too much information on too many slides.

With help from the 10-20-30 rule, you can make a PowerPoint presentation that’s engaging and efficient . The guidelines for this rule are as follows:
- No more than 10 slides.
- No longer than 20 minutes.
- No larger than 30-point font.
Let’s look deeper at the 10-20-30 PowerPoint rule, why it’s a good rule to follow and things to do to follow this guideline.

Tell your story with captivating presentations
Powerpoint empowers you to develop well-designed content across all your devices
Don’t use more than 10 slides. A good presenter shouldn’t have to (or want to) lean heavily on their PowerPoint slides. The slides should be a supplement for your presentation, not the headliner. Limiting to 10 slides will ensure that you’re not going over the top with the length of your presentation and keeps it moving. Your slide count should include both your title and conclusion. A presentation that goes on any longer than 10 slides will distract from what you’re saying and starts to feel like an information overload.
Keep your presentation 20 minutes MAX. During a presentation, people start tuning out after about 10 minutes.Limiting your presentation to this length will ensure that your audience will remember much of what you’re saying. If you’re covering a more complex topic and need more time, stick to the 20-minute MAX rule—it’s much easier to schedule your presentation by timing each slide down to about two minutes. That feels like a much more manageable timeframe, doesn’t it?
Don’t use fonts smaller than size 30. A 30-point font is a great minimum size because it ensures that your text is easy to read from a distance. The recommended guideline to make your presentation accessible to those who might be visually impaired is a 24-point font. Upping the size to 30 is a significant difference, and you can be confident that your audience can see what you’ve written. In addition, choose a font that’s easy to read. For years it was recommended that you stick solely to sans-serif fonts with digital media because serifs could blur together, making certain fonts hard to read. High-resolution screens have nearly eliminated this problem, so some serif fonts can be used and are easy to read in PowerPoint presentations.

Tips for sticking to these guidelines. It’s not always easy to cut down your presentation to fit the 30-20-10 rule if you’re presenting a lot of information. Follow these tips while putting together your presentation to make the entire process easier on yourself:
- Limit text to the 6×6 rule. It can feel like there are a lot of rules for making a PowerPoint presentation, but they’re all there to help you make a well-organized and engaging presentation. The 6×6 rule suggests that you don’t use more than six lines or bullet points on each slide and limit each line or bullet point to six words. Following the 6×6 rule helps to ensure that you’re limiting the amount of information on your slides so you can continue to present it rather than have your audience read it.
- Use visuals instead. Visuals like graphics, animated gifs, and videos can help to keep your audience engaged . Including visuals with your presentation will also help you limit the amount of time and content on each slide. A graph or illustration on the right side of your slide limits the amount of space you have on the left side. This can help to minimize the amount of text you have.
- Practice makes perfect. There’s a very cool, free tool called PowerPoint Speaker Coach , which leverages AI to help you nail your presentation. Speaker coach gives you feedback on your pace, pitch, use of filler words, poor grammar, lack of originality, use of sensitive phrases, and more as you rehearse your presentation. You’ll get a Summary Report at the end—with key pieces of feedback to help you become a confident presenter .
Use the 10-20-30 PowerPoint rule and these other tips to keep your presentation simple. Whether you’re a college student presenting a class project or a teen making the case for a new car, following these guidelines will help.
Get started with Microsoft 365
It’s the Office you know, plus the tools to help you work better together, so you can get more done—anytime, anywhere.
Topics in this article
More articles like this one.

How to introduce yourself in a presentation
Gain your audience’s attention at the onset of a presentation. Craft an impressionable introduction to establish tone, presentation topic, and more.

How to add citations to your presentation
Conduct research and appropriately credit work for your presentation. Understand the importance of citing sources and how to add them to your presentation.

How to work on a group presentation
Group presentations can go smoothly with these essential tips on how to deliver a compelling one.

How to create a sales presentation
Engage your audience and get them interested in your product with this guide to creating a sales presentation.
Everything you need to achieve more in less time
Get powerful productivity and security apps with Microsoft 365

Explore Other Categories
IMAGES
VIDEO
COMMENTS
Study with Quizlet and memorize flashcards containing terms like One page of content in a PowerPoint presentation is referred to as a _____., When developing a presentation, you should consider the venue in which you will be presenting, but you must also consider the _____ before designing the presentation., When you first open the PowerPoint application, what is the default view? and more.
templates can only be used when a new presentation is first created - themes can be added or changed at any time. Describe how you would display templates related to creating a greeting card: use the search bar and search "greeting card". Study with Quizlet and memorize flashcards containing terms like What does a template allow you to do in ...
A template allows you to use pre-defined slides to maintain a standard layout, look and feel for a presentation. Why would you use slide Notes? Notes remind you of what you want to say in the presentation.
Rule 1: Keep It Simple. One of the cardinal sins in PowerPoint presentations is overcrowding your slides with text, bullet points, and too many visuals. The first rule is to keep it simple. Each slide should have a single, clear message. Use concise language, bullet points, and minimal text to convey your points.
What is a PowerPoint template? A template is a theme plus some content for a specific purpose—such as a sales presentation, a business plan, or a classroom lesson. So a template has design elements that work together (colors, fonts, backgrounds, effects) along with sample slides and boilerplate content that you augment to tell your story.
PowerPoint templates are a shortcut to more engaging, colorful, and creative presentations. They are the very bedrock of your presentations - whether you use a custom one or generic one - and they influence absolutely EVERYTHING: How your fonts, colors, and branding displays…. Whether the slides you copy and paste into your presentation ...
Themes: Elements for Success. To access PowerPoint's themes, switch to the Design tab. You'll see thumbnails in the upper left that allow you to choose a look and feel for the presentation: Go to the Design tab and choose a thumbnail from the Themes section to change the presentation style.
Be mindful of colors and fonts. 4. Use animation sparingly. See more. Wondering how to design the perfect PowerPoint presentation? It's easier than you think-just follow five simple rules to get started: 1. Consider using templates. When building a slide deck, it's important to maintain consistency throughout.
Choose an appealing, consistent template or theme that is not too eye-catching. You don't want the background or design to detract from your message. See Combining colors in PowerPoint - Mistakes to avoid. For information about using themes, see Add color and design to my slides with themes. Use high contrast between background color and text ...
First, let's duplicate the theme. You can achieve this by right-clicking on the .pptx file and clicking Copy in the menu. You can copy and paste the file and rename the new document. Instead of directly editing the template, we'll be copying slides that we'll use in our new document from the original theme file.
Study with Quizlet and memorize flashcards containing terms like When creating a PowerPoint presentation and trying to get all the slides to have a uniform look. The first thing one should do is select the 1. _____ Next, use the command groups to edit the 2. _____ Finally, save the file as a new Office theme 3.
Advice from Edelman and Harring on leveraging the working memory with PowerPoint: Leverage the working memory by dividing the information between the visual and auditory modality. Doing this reduces the likelihood of one system becoming overloaded. For instance, spoken words with pictures are better than pictures with text, as integrating an ...
Here are five reasons to take advantage of presentation templates right now. 1. Create professional presentations quicker than ever. Sitting down to create a new presentation might feel daunting and even stressful when you're confronted by that blank slide. You have ideas. You have things you want to say.
The master slide is the top slide in the thumbnail pane on the left side of the window. The related layout masters appear just below the slide master (as in this picture from PowerPoint for macOS): 1 Slide master. 2 Layout masters. When you edit the slide master, all slides that are based on that master will contain those changes.
Templates and Examples for Assertion-Evidence Slides. Check out tips, templates, layout suggestions, and other examples of assertion-evidence slides on Rethinking Presentations in Science and Engineering by Michael Alley, MS, MFA, from Pennsylvania State University. Download the Assertion Evidence Presention template for Microsoft PowerPoint.
Text boxes allow you to place text anywhere on a slide (t/f) Text and graphics. WordArt is a combination of _____. False. Shapes CANNOT be added to a photo album (t/f) Yes. In PowerPoint, if you have a photo album with two pictures on a page can you change it so that 4 pictures can be on a page? Insert. What ribbon would you select to create a ...
Or maybe you want to shift the mood or tempo of the presentation." The blank slide is the visual equivalent of a pause, and most stories could use at least one. And with blank slides, Jurczynski has one main "don't": "You cannot use white blank slides, because if you do, people will see it and think something is broken." 6.
The layout of the material and visuals should be balanced and coherent. Consistency: Consistency is key to a good presentation. The movement from one slide to the next should feel seamless. For a beautiful presentation, the typeface, colors, layout, and style should all be consistent. Visuals: Images speak more than words coming from the mouth ...
Study with Quizlet and memorize flashcards containing terms like A template is a format that can be modified and incorporates all of the following except:, To create a presentation based on a template, click the:, What is the advantage to collapsing the outline so only the slide titles are visible? and more.
Look terrific. Move from behind the podium. Punctuate your words. Vary your tone, volume, pitch, and pace. Use pauses before and after important points so that your audience has time to take in your ideas. Well-planned visual aids can ______________ and make the presenter appear more professional. decrease interruptions.
Set the slides per page. Click Slides Per Page. Choose a layout option from the thumbnail images. Tip: The 3 Slides option includes lines that your audience can use to take notes. Set the orientation. Click Handout Orientation, and then choose Portrait or Landscape. Set the slide size. Click Slide Size, and then choose one of the options.
On the other side of the coin: you might overthink your presentation and put too much information on too many slides. With help from the 10-20-30 rule, you can make a PowerPoint presentation that's engaging and efficient. The guidelines for this rule are as follows: No more than 10 slides. No longer than 20 minutes. No larger than 30-point font.