
Meaning of Speech Bubbles in Comics
Last Updated on July 1, 2024 by Ilka Perea Hernández
The visual tool used to represent the characters’ speech, dialogue, or conversation in the comics is known as a “bubble”. The meaning of speech bubbles in comics will be addressed, emphasizing their proper use and comic grammar.
Table of Contents
Speech Bubbles
What are speech bubbles, different kinds of speech bubble, normal speech, electronic devices, extended speech, some insights, what do you think, cite this post.

One of the most important parts of comics is the character dialogue. It is one of the features of comics and it is as valuable as the images themselves. They are a great support for the narrative within the comics.
As part of the visual language of comics, bubbles are small expressions in themselves, with their own meaning. They can communicate in a situation or context. Therefore, it is important to know the meaning of speech bubbles in comics to know how to express emotions in a dialogue, nature, the source of the speech, and sounds, for instance.

Certainly, speech bubbles are usually added after the editing and photography of the images. However, at this point in the process of making a comic , you must have the text included inside the bubbles. The extension of the text must be set during the scriptwriting process, as well as the type of bubble to be used. Therefore, knowing the meaning of speech bubbles in comics ensures a better choice of each one to correctly communicate the message you want to convey.
Creative Process of Making Comics
There are different kinds of speech bubbles because there are different ways that a character could dialogue or communicate a message in a comic. There are some examples:

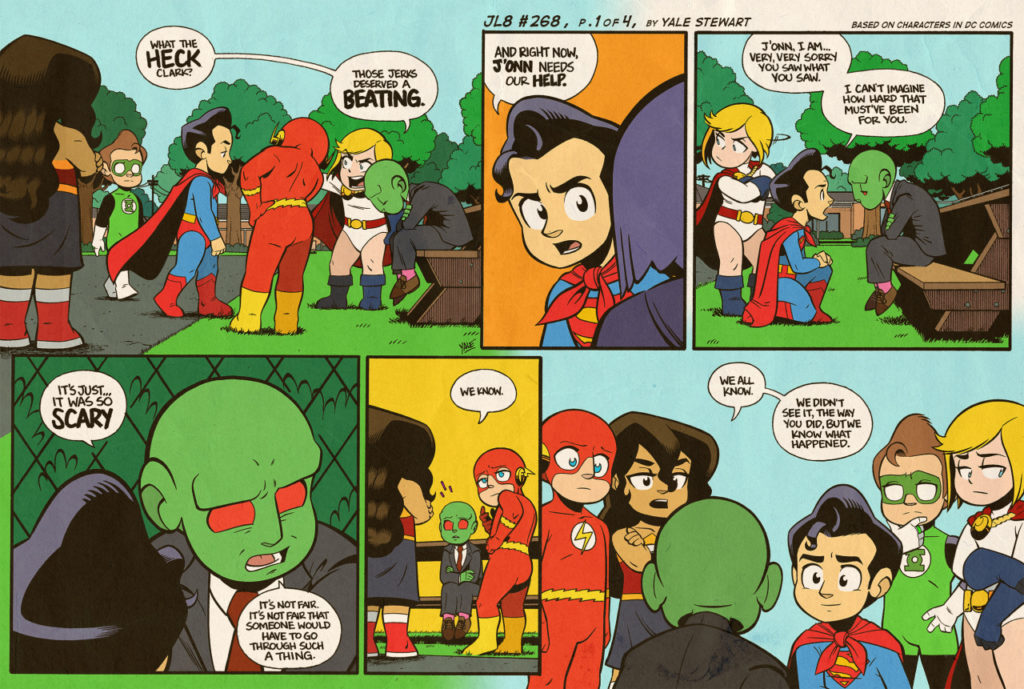
The “basic” bubble — which often has an oval shape — is used for normal character speech. The “tail” of the bubble should generally point towards the speaker, particularly towards his mouth or the area that produces the sound.

Vertical bubbles can be used when there is not enough horizontal space. Therefore, this provides flexibility in distributing the bubbles within the panel.
Most of the time, this kind of bubble has an oval shape. However, it can have different shapes.

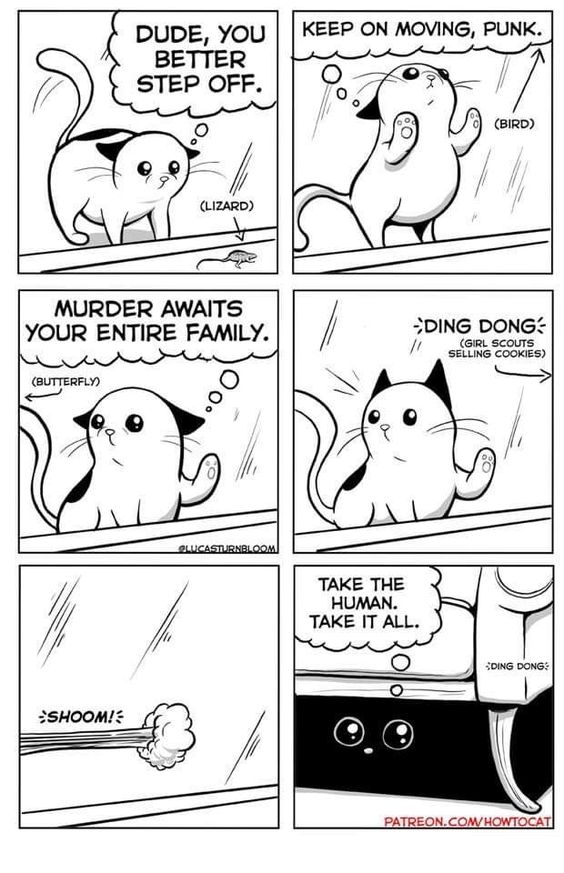
To express a thought, an idea, or that one is daydreaming, the bubble with a cloud shape is the right one. Besides, the shape can also be oval, like the basic one. But its tail is formed by a group of circles, or ellipses. For example, there are 2 or 3 circles.

Besides, this bubble serves to communicate what animals, plants, or things cannot say, as they “do not talk”. For example, the meow of a cat or the bark of a dog could be represented by onomatopoeias. However, to express their internal dialogue, you can use the cloud bubble.
Rectangular bubbles without a tail are known as captions. They express what the narrator says in such a way that they support the course of the story. In other words, this space describes, in words, a given situation that would not be attributed to a character. Sometimes they are appreciated as voice-overs. Likewise, they are used for subtitles.

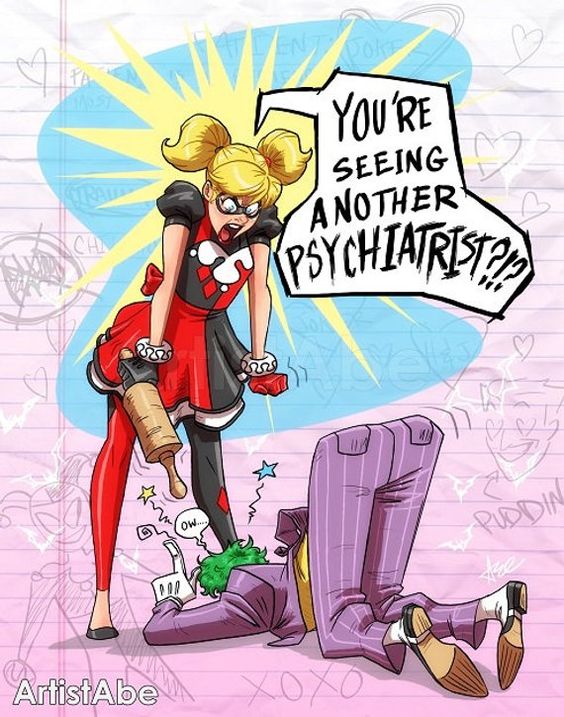
Multi-edged bubbles usually represent screaming or a message out loud, but the screams may have a positive or negative connotation. For example, the character is urging his team to try harder. However, the same bubble can be used to insult or express abuse.

Depending on the connotation of the message, either negative or positive, the text in its content may have variations in style: bold, larger, or different colors, for instance.

On the other hand, this bubble can also vary in shape, depending on the intensity of the emotion to be expressed and the style of the comics.
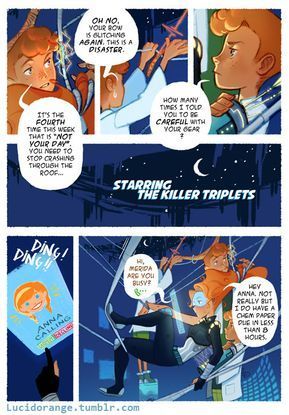
This is used to represent words or sounds coming from an electronic device such as a television, telephone, radio, or microphone. The tail of the bubble points towards the device, and it looks like lightning. In addition, it can be used for robot and hologram dialogs.

Whispers are presented with a dashed-lined bubble. However, it also represents saying a secret or speaking in a very low voice. Certainly, the shapes can also vary for greater flexibility.

The wavy bubble indicates that the speaker is suffering from physical weakness. Likewise, it indicates that a character is exhausted, semi-unconscious, or about to faint. So, its wavy shape reflects the weakness of the character’s voice.

- If the speech or dialogue is too long or a pause is required, the text is distributed into extended speech bubbles.
Moreover, the extended speech bubble has variations. Dialogues can be interleaving but use a bridge that links the speech bubbles of the same character.

- Speech bubbles represent the characters’ dialogue or thoughts.
- Normal speech is often represented by an oval-shaped bubble.
- To express a thought or an idea, the bubble with a cloud shape is the right one.
- Rectangular bubbles without a tail are known as captions.
- Multi-edged bubbles usually represent screaming or sending a message out loud.
- The bubble, whose tail looks like a flash of lightning, is used to represent words or sounds coming from an electronic device.
- Whispers are presented with a dashed-lined bubble.
- The wavy bubble indicates that the speaker is suffering from physical weakness.
Comics are not just a piece of entertainment for children and teenagers. This massive medium is appreciated and understood by adults as well. Marketing agencies and advertising companies have understood this and have started to use it to attract potential customers.
In conclusion, the narrative power of comics can be exploited in graphic design to communicate ideas interestingly and differently. Learning the meaning of speech bubbles in comics is one of the first steps. If graphic designers want to take advantage of the full potential of comics, it is necessary to understand the concepts and features of comics and their different genres. It is also necessary to follow the process of creating a comic in order to develop a story through this format.
In the comments section, tell me if you already knew these bubbles and their meanings. Do you know other bubbles?
- APA Style: Perea Hernandez, I. (2019, August 15). Meaning of speech bubbles in comics. Retrieved from https://ilkaperea.com/2019/08/15/meaning-of-speech-bubbles-in-comics/
- Chicago Style: Perea Hernandez, Ilka. “Meaning of Speech Bubbles in Comics.” Ilka Perea, August 15, 2019. https://ilkaperea.com/2019/08/15/meaning-of-speech-bubbles-in-comics/ .
- MLA Style: Perea Hernandez, Ilka. “Meaning of Speech Bubbles in Comics.” Ilka Perea, 15 Aug. 2019. Web. https://ilkaperea.com/2019/08/15/meaning-of-speech-bubbles-in-comics/ . Accessed [insert current date].
- Harvard Style: Perea Hernandez, I. 2019. Meaning of Speech Bubbles in Comics. [ONLINE] Available at: https://ilkaperea.com/2019/08/15/meaning-of-speech-bubbles-in-comics/ (Accessed [insert current date]).
Spread the love… and this post!
If you liked it, share this post on your social networks. Smart designers share good things with others.

Bibliography
- Acevedo Fernández, J. (2019). Para hacer historietas. Instituto de Estudios Peruanos.
- Labarre, N. (2020). Understanding Genres in Comics (Palgrave Studies in Comics and Graphic Novels). Editorial Palgrave Pivot.
- McCloud, S. (2006). Making Comics: Storytelling Secrets of Comics, Manga and Graphic Novels. William Morrow Paperbacks.
- Stevenson, J. (2020). How to Draw Manga (Includes Anime, Manga and Chibi) Part 2 Drawing Manga Figures. Editorial Golden Valley Press.
Share your thoughts Cancel reply
Save my name, email, and website in this browser for the next time I comment.
Stack Exchange Network
Stack Exchange network consists of 183 Q&A communities including Stack Overflow , the largest, most trusted online community for developers to learn, share their knowledge, and build their careers.
Q&A for work
Connect and share knowledge within a single location that is structured and easy to search.
speech balloon vs speech bubble usage and meaning
I am from the UK, and am not familiar with the term "speech balloon". I have always used and heard "speech bubble" instead.
Are the 2 meanings the same? Is there some kind of difference in British/American English usage? (I don't really use speech bubbles so could be due to lack of knowledge.)
- american-english
- british-english
- 1 Both terms are in use and mean the same thing - the white area that speech is written into in comics with an arrow pointing to the speaker. – Oldcat Commented Nov 7, 2014 at 0:34
- I seem to have seen them described as 'call outs'. Or am I thinking of something else? – WS2 Commented Nov 7, 2014 at 1:02
- @WS2- it depends on what they're used for. IF they are on a diagram and are calling out or making specific note of a feature then they're a call out if they are in a comic containing spoken dialog then they are not a call out but rather a "speech balloon" or "speech bubble". I might make a distinction between bubble and balloon based on the type of connector between the person and the speech. if the connector is a series of small (or progressively larger bubbles) then I'd call it a bubble. If it's a thin line like the string of a balloon, then I'd call it a balloon. – Jim Commented Nov 7, 2014 at 1:35
- I'm partial to speech dirigible , but only if the speaker is running. – Drew Commented Nov 7, 2014 at 5:07
- @Jim the series of bubbles of increasing size is usually used for thoughts, not speech. I think they usually lead to a cloud rather than an oval or rectangle. – Barmar Commented Nov 9, 2014 at 23:19
The meanings are the same. You can also use dialogue balloons or word balloons . Just make sure you're not mixing up speech bubbles with thought bubbles.
Your Answer
Sign up or log in, post as a guest.
Required, but never shown
By clicking “Post Your Answer”, you agree to our terms of service and acknowledge you have read our privacy policy .
Not the answer you're looking for? Browse other questions tagged word-usage american-english british-english or ask your own question .
- Featured on Meta
- Bringing clarity to status tag usage on meta sites
- Announcing a change to the data-dump process
Hot Network Questions
- Can the planet Neptune be seen from Earth with binoculars?
- Investigate why packages are held back, and stop release upgrade
- Why isn't a confidence level of anything >50% "good enough"?
- Do Ethernet Switches have MAC Addresses?
- Can reinforcement learning rewards be a combination of current and new state?
- Best approach to make lasagna fill pan
- Is reading sheet music difficult?
- When has the SR-71 been used for civilian purposes?
- What was IBM VS/PC?
- Why does Jeff think that having a story at all seems gross?
- How to truncate text in latex?
- Is there a non-semistable simple sheaf?
- What prevents random software installation popups from mis-interpreting our consents
- Nausea during high altitude cycling climbs
- Do US universities invite faculty applicants from outside the US for an interview?
- Is it helpful to use a thicker gauge wire for only part of a long circuit run that could have higher loads?
- The question about the existence of an infinite non-trivial controversy
- PCA to help select variables?
- Fusion September 2024: Where are we with respect to "engineering break even"?
- Why didn't Air Force Ones have camouflage?
- How can I play MechWarrior 2?
- How can we know how good a TRNG is?
- I'm not quite sure I understand this daily puzzle on Lichess (9/6/24)
- Simulate Minecraft Redstone | Where to start?
Find out why teachers and school leaders love PlanBee
- 📚 Cross-Curricular Topics
- ✂️ Design & Technology
- ♻️ Education for Social Responsibility
- 🌍 Geography
- ⛪️ Religious Education
- 🎉 Special Days
- 🦸♀️ Special People
- School Curriculum
- FREE teaching resources
- Objective Checker
- How does it work?
Speech Bubble
What is a speech bubble.
A speech bubble is a shape, like a cloud, balloon or bubble, which contains text representing a character's speech. It can also be called a speech balloon, a word balloon or a dialogue balloon.
What do you write inside a speech bubble?
Inside the bubble, the words that the character says are written.
'He said', 'she said', or 'they said' are not needed, as the tail points to who is speaking.
The text should include punctuation, but inverted commas are not necessary, as the bubble itself shows that the words are speech.
Speech bubble activity ideas
1. Character conversations
Choose two characters from a book you are reading, and encourage children to create a conversation between them, using speech bubbles to record what they say to each other. This could be used to further explore an event that has already happened in the story, or, you could suggest a situation that the characters might face in the future. This activity could be done in pairs, where each child takes on the role of a different character. For older children, it might be more challenging to take on the role of both characters (and perspectives) themselves.
2. Talk to a character!
Give children the opportunity to 'interact' with a character at a specific point in the text. Enourage them to ask questions or offer advice - what would they do in the character's situation, and why? You could give children speech bubbles on post-it notes, which can then be stuck in the appropriate place on the page.
3. Give words to a non-speaking character/animal
Sometimes, there are characters in a story who do not speak. Ask children to infer what they might say if they did speak. Again, children could use speech bubbles on post-it notes, and stick them on the page next to the non-speaking character.
For all of the above suggested activities, you might find this FREE Speech Bubble Template pack useful.
4. Use within cartoon strips
This can be a fun way to get your children to summarise or retell part, or all, of a story. This FREE Cartoon Strips Template is a perfect resource for this activity.
Speech bubbles can also be an effective way of developing children's social communication skills . They could be used to explore how children would, and should, respond in a variety of different social situations, e.g. if a person said this to you, what would you say back?
Our FREE Text Message Template could be used for this type of activity with KS2 children.
Other types of bubble...
Whisper bubble
Used to indicate that a character is talking quietly
Thought bubble
Used to convey what a character is thinking instead of saying
Scream bubble
Used to indicate that a character is shouting or screaming
FREE Speech Bubble Template
FREE Cartoon Strips Template
FREE Text Message Template
Added to your cart:
What's Your Email?
Let customers speak for us
Clear and colourful 📚
Thank you for taking the time to leave us a review Karen. :)
I seem to be unable to open these documents and slides in our google drive, I am a bit disappointed
I'm sorry to hear that you're having trouble with the files. I've sent you an email to see if we can get them working for you.
A good power point full of information and photos.
Thanks Kate - we hope you enjoy using the resources!
I have been using Plan Bee for years,however this monthly subscription is great! Access to everything and loving just looking at the amazing activities and planning. Saves me so much time
We are so pleased to hear that you are finding your subscription helpful and time-saving, Michelle! Thank you for taking the time to leave us a review :-)
Ray's Review.
Thanks, Ray!
Creating Speech Balloons with Tools and Materials

Hello! My name is Liz Staley and I’m a long-time user of Clip Studio Paint (I started using the program back when it was known as Manga Studio 4!). I was a beta-tester on the Manga Studio 5 program and for Clip Studio Paint, and I have written three books and several video courses about the program. Many of you probably know my name from those books, in fact. I write weekly posts on Graphixly.com and on CSP Tips, so be sure to come back every week to learn more Clip Studio Tips and Tricks from me!
Having tools to make comic speech balloons was one of the features that sold me on Clip Studio Paint back when I first started using it. I still believe these are great time-saving tools for comic and manga artists, but also know that some artists have a hard time with using them. In this tutorial, I’ll cover a few different types of speech balloons and balloon tails you can easily make, including how to modify balloons to personalize them.
In this article we will cover the following topics:
Creating a Basic Speech Balloon
Modifying balloons using control points, using the balloon pen, balloon materials.
Let’s get started!
Let’s start off with a basic elliptical speech balloon. First, take the text tool and type out some text to put a balloon around. Then, select the Balloon tool (default keyboard shortcut - T) and from there select the “Ellipse Balloon” subtool.
In the Tool Property window, make sure that the circle is selected under the Figure option. We’ll talk more about some of the other options for this subtool in the next heading, for now we just want to make a simple oval speech balloon.
Use the Ellipse Balloon tool to draw around your text, as shown below. You don’t have to get it perfect on the first try, you can always resize and modify your balloon after this step!
Once you’ve drawn out your initial ellipse, Clip Studio Paint will use the current settings to fill in and outline the ellipse. The most common fill color for comics is white, with a black outline. But these options can be changed in the Tool Property window.
Now that we have our text circled in a balloon, let’s add a tail to show who’s talking! Select the Balloon Tail subtool in the Balloon window. Let’s take a quick look at the options for this tool, shown in the following screenshot.
The How To Bend dropdown contains three options for what kind of tail will be created. Straight line does exactly what it sounds like - creates a straight tail. The Spline option allows you to create curved tails (either one curve or, as we’ll see in a few sections, a tail with multiple curves!). The Polyline option allows you to create a straight tail that has sharp angles in it. We’ll be using that type of tail in the next section, so stay tuned.
The Width of Tail option controls the thickness of the tail at the start of it. Your tails will taper off to a point along the length of it, but the Width of Tail can make your tails look very different from each other! You may need to adjust this option a few times to find a setting you like for normal use.
Now that we’ve decided on a straight tail, let’s click and hold inside our speech balloon to start the tail. Drag without releasing the mouse button to pull out a preview outline of the balloon tail, shown below.
Once you position your tail the way you want it, release your mouse button to create the tail.
If you don’t get the balloon or tail perfect on the first shot, don’t worry. You can always resize the balloon using the control box around it (if you don’t see the control box, use the Object tool to click on the speech balloon to select it). Since speech balloons and tails are vector objects in CSP, you can also use the vector control point tools to modify them too, which is what we’re going to do in the next section!
Let’s go back to the Ellipse Balloon tool and take another look at the Tool Property window.
Line Color: Sets the color of the outline of the balloon. Choose from Main color, Sub color, or User color.
Fill Color: Sets the color of the inside of the balloon. Same options as above.
How to add: Controls how to add the balloon to the image. Add to Selected Layer will add the balloon to the current text layer and “attach” the balloon to the text. You can also set it to Create new layer, where the balloon is always created on a new layer.
Toning: Enabling this option creates the balloon with a dotted tone pattern.
Figure: Controls the shape of the balloon.
Brush size: Sets the width of the outline.
Anti-aliasing: Controls the amount of anti-aliasing for the balloon outline.
Brush shape: Sets the shape of the outline brush. You can create fun effects using the Brush Shape, like dashed outlines, heart outlines, lace, and more. Click the downward arrow to the right of this option to change the brush shape.
For the balloon we’re about to create, set the Figure option to the square. Then draw out a square around some text, like shown in the following image.
I want this balloon to look like a radio broadcast or like a robot voice, so that’s why I’m choosing a more angular font and a balloon with straight lines. I also want to add some spikes to the corners of this balloon for a more “broadcast” look. We can do this easily by adding some control points to the balloon!
To start, select the Correct Line tool and then the Control Point subtool. Then make sure the “Add Control Point” option from the Tool Property window. When you move this tool over the outline of the speech balloon, you should see a small red line appear in the middle of the outline and also see the existing control points light up.
For the look I want to achieve, I clicked three times on the line on each side of an existing corner to add six control points total. Then change the option in the Tool Property from Add control point to “Move control point” in order to grab and move points. Using this, I took every other point and moved them out to make three spikes on the corner of the rectangle.
Next I repeated this process of adding and moving control points for each corner of the balloon, as shown below.
Now we just need a balloon tail to show where our dialog is coming from! Select the Balloon Tail subtool and set the “How to bend” option to “Polyline”. Using this tool, click inside the balloon to start the tail, then go to another point and click again. Go to another point and click again to continue the line like you’re drawing a lightning bolt. When you get to the spot where you want your tail to end, double-click to end the tail.
Now we have a balloon that looks robotic! But what about a spooky or organic balloon? Read on to find out how to create those with the Balloon Pen!
The Balloon Pen allows us to create organic, hand drawn balloons. For the example in this article I’m going to be creating a “spooky” balloon, with a black fill color and white and red text over top.
Type out your text, then select the Balloon Pen subtool (under where you’d select the Ellipse balloon subtool!). Draw around the text and make sure to connect back to where you started. Again, don’t worry about making this perfect because we can clean it up using the control points.
Once you have your balloon drawn out, if you take a look at the control points you’ll see that there are a LOT of points. There’s far too many for us to even modify them easily!
That’s okay, because CSP has a handy tool that we can use to clean up these hand drawn vector lines. Select the Correct Line tool from the toolbar, then select the Simplify Vector Line subtool, shown in the following screenshot.
Now, take this tool and draw over the line that you drew with the Balloon Pen, making sure to get over all the control points. The tool will leave a green highlight, like shown below.
When you release the tool, the highlighted areas will be simplified. This means that CSP will remove the extraneous control points, making it easier to use the Control Point tool to add, delete, and move points around like we did in the previous example to perfect the shape of the balloon.
With the shape of the hand drawn balloon smoothed out, let’s add a balloon tail again. We’ve used the straight line and the polyline, so this time let’s use a Spline tail! I often use the Spline for simple balloons that just have one curve, but I think adding multiple bends adds a “creepy” or “whisper” look to the balloon.
To use the spline tail, click inside the balloon to start the tail. Go to the point where you want your tail to bend and click again to create a control point. Now go to another bend point and click again. In the screenshot below, each circle in the middle of my balloon tail is another point where I clicked to create a bend in the line.
When you get to the spot where you want your tail to end, double-click to create the tail. The fill and outline of the tail will automatically match the balloon it’s attached to.
In addition to the balloon creation tools, there are also special balloons that come loaded in the Materials library in CSP. You can find these balloons in the Materials library under Manga Material - Balloon. The screenshot below shows some of the balloons available in the Dialog folder of the Balloon materials.
There are lots of different shapes and effects of Balloon materials, including shouting, horror, whispering, and even balloons with colored decorative outlines that would look beautiful in shoujo manga!
Using these material balloons is very easy. Type out your text, then select the balloon you want to use. I’m going to use Jaggy_curve_03 for this example. Select the material to use to highlight it, then click on the “Paste selected material” icon at the bottom of the Material window to paste it or drag-and-drop the material to the canvas.
Material balloons don’t automatically attach to the text layers, so they may appear above your text at first, as shown above. Select the balloon layer in the Layer window and drag it below the text layer to reposition it so the words can be read.
Balloon materials are vectors, so they can be adjusted via control points just like the previous balloons we made! The image below shows the control points for the Jaggy Curve 03 balloon.
Use the Control Point tool to adjust the points and curves so that the balloon fits your text nicely. In the image below, I moved a few of the points slightly and adjusted a few curves so that the outline wasn’t so close to the text in a few spots, giving the text more “room to breathe”.
You can also add balloon tails to material balloons too using the Balloon tail tool that we explored earlier in this tutorial!
There are tons of options for speech balloons for your comic, and finding the one that matches the style and tone of your story is very important. It’s also important to know how the tools that help comic artists save time work so you can use them in your workflow!
For more information on CLIP Studio Paint, please visit https://www.clipstudio.net/en or https://graphixly.com
Users who liked this post
Composition with consideration for skill and weakness (how to create a composition with two or more characters)
Convert hand drawings to digital drawings
Monthly tips for CSP competition. #2
Drawing food in clip studio paint simple mode
Designing a picture
New Official Articles
New features of Clip Studio Paint #1
Enhance 3D visuals by adjusting the shadow and light source settings
New features of Clip Studio Paint #2
Using Watermarks to Protect Public Artworks
Hurray! Interview | "A few minutes of cheer"
New features of Clip Studio Paint #4
Experience stunning color variations with Color Match -Ver.3.0-
- Alrededor de Hombres webcomic
Drawing comics: Best ways to use speech balloons in your webtoon
- tips for beginners
- Drawing comics: Best ways to…

wanna learn how to make comics?
drawing comics
How can you use a speech balloon correctly when you’re drawing comics?
If you have experience reading comics as I do, you have noticed that comics use to utilize many different colors, sizes, and shapes in balloon speeches, but do you know what means each one is and how they can help you to tell your story? why is better for your comic to use X shape or in Y shape? how this will help to improve your reading experience?
In this post, I will give you the best practices that I do about using speech balloons that will help you to improve the reading experience for your readers. If you keep your text clean and readable will be easier for your audience to get hooked by your story.
Speech balloons are the most common flaw in most beginners work that immediately identifies them as novices in the eyes of their readers. And, amazingly, the problems are ridiculously easy to solve. Address these problems, and your work will take on an air of professionalism that is bound to be noticed by your readers.
So let’s dive into some balloon basics:
1. Basic balloon rules that you must have to get a clear reading experience
Sometimes these rules are like “duh” everyone knows it. This is too obvious, but It’s amazing how I see many times indie comics failing in these simple rules and this makes it boring, frustrating, and hard to read a story.
If you follow these rules you will make easier for your readers to follow your story:
Don’t add too many texts in one speech bubble
If you have too much text in your script try to break it down into different bubble speeches or drawing panels. Remember, this is a comic, not a novel. So don’t make it hard for your readers. I recommend you to use 35 words per balloon as maximum. if your script has more words in one image try to break your dialogue into compound balloons.

Get my newest tutorial every time I upload my blog!!
Subscribe to my newsletter
Meet my webcomic Among Men
If you found this interesting, don't forget to thare it with someone else, leave a reply.
- Default Comments
- Facebook Comments
Deja un comentario Cancelar respuesta
Your email address will not be published.
Save my name, email, and website in this browser for the next time I comment.
Post comment
- Word Balloons, Part One
This Photoshop tutorial not only has the dubious distinction of being my first ever, it’s also the first part in a series! My goal in these tutorials are to show you how to make professional-looking word balloons that you can reuse or even modify later on. Word balloons, also called “speech bubbles,” are a must for any print or web comic, unless you prefer text directly on the page.
Step 1: Create the text
Step 2: drawing a balloon, step 3: drawing the tail, step 4: add a stroke.
I’m going to teach the vector method, as it becomes far more flexible, as you will see in later tutorials.
I found this image of Cookie Monster talking about the benefits of eating fruits and vegetables, and learning the “Cookies Are a Sometimes Food” song. I’d like to make sure the world knows what Cookie Monster thinks.

C IS NOT FOR CARROT
We’ll want to create the text in-place, so we can fit it to our panel without having to draw the balloon twice or adjust it too much afterward.
I’m going to use my favorite free comic font, DigitalStrip (just say no to Comic Sans ). Also, I highly recommend all other fonts by Blambot .

Good comic font.
We’re not going to be using the elliptical marquee tool at all. Why, you may ask? Well, the short answer is that they don’t lend themselves well to mistakes or changes. If you fill a marquee with color, and realize you need to add a line of dialog, you’ll have to erase and re-create your word balloon. Using vectors, we can directly edit the shape and save ourselves time and effort.
I like saving effort, mostly.
The long answer can be found in this page: Bitmap Graphics vs. Vector Graphics (not yet written).
Once you have the ellipse tool selected (if you don’t know where it is, consult Photoshop help files about the toolbox, and please learn the basic tools first), make sure it’s in “vector shape” mode by checking in the top toolbar just below the “File Edit View…” menu.

Vector instead of 'fill'
Drag out an ellipse in the shape you want your balloon. Don’t mind the weird-looking outline that also appears, because it’s a visual guide to your circle, and won’t be visible any time you have a different layer selected, or export the image.

Yay, circle!
You should now have a layer that contains a vector shape (probably named ‘Shape 1’ or something equally creative). The white box (in my image, yours may vary) is the color of the shape layer. If yours is not white, double-click that box to open a color selection box, and pick white.

Above the background layer
No word balloon is no good without a tail (unless that’s our intention, but I don’t think you’re reading this to learn how to make ellipses), so we need to add some points to change the ellipse’s shape.
We need the “Add anchor point” tool, which is buried under one of the options you see in the image to the right. What you will most likely see, especially if you’ve never opened this menu before, is the Convert Point tool, which looks like a crooked greater-than symbol. Hold your left mouse button down on a menu button to see its flyout menu.

Under the Pen tool
Here we want to add three points to the circle. These points will form the two corners where the arrow meets the balloon, and the point of the arrow:

Pick an edge for the tail
Here are my three new anchor points. Notice how they are all spaced fairly close together, and are spaced equally. As you can see, when adding the anchor points, Photoshop has tried to match the existing curve as closely as possible. Thanks, Adobe!

Now, take the Direct Selection A tool, and what we want to do is pull the middle anchor point where you want your word balloon pointing.

Pull it away from the balloon
Optional Step – Sharpen tail: This step is entirely optional, as this would make a perfectly acceptable word balloon as-is, but I like my balloon to have a super-sharp tail. Plus, you get to use another vector tool. I’m giddy like a schoolgirl already!
Here is the Convert Anchor Point tool, which we totally bypassed earlier to use his friend, Add Anchor Point tool. Well, this time we’re using it.

Click the end of the tail with the Convert Point tool. That’s it, this step is done. What we’ve actually done here is converted the point from a curvy-type point to a corner point, which allows us to have an ultra-sharp point.

Sharpened tail
What good is a word balloon without an outline? No good, I tells ya.
Right-click the layer in the layers pallete containing our balloon, and click “Blending options” from the pop-up menu:

A layer's best friend
Now look along the left side, and you should see a stack of empty checkboxes with a list. Click the word ‘Stroke’ (do not click the checkbox, as that will not select the option correctly). Once you click it, it should be both highlighted and checked, as shown in the picture:

Make sure it's checked
If you’re also viewing your document at the same time you’re adding the stroke, you’ll see that Photoshop has provided you with the ugliest stroke in existence. I guess they do this to increase its visibility? I know I have never, not once, ever needed to use a bright red stroke like that.
Note: In (I think) Photoshop CS4 and above, the default stroke color is black.

You should see this part in the middle of the Blending Options window, which is the stroke settings. I used the settings shown: decreased stroke width to 2px, set it to “Center, and made it black. I use “Center” on word balloons because it gives the stroke a sharper appearance overall. Feel free to play around with it to suit your tastes.

Yeah, stroke it.
If you used my settings, your balloon will end up looking something like what is shown below. You can’t see the sharpness of the tail because of Cookie Monster’s gaping maw, but trust that it’s sharp enough to cut a thousand emo children.

COOKIE, NOT CARROT!
- Quick Tip: Editing Modes
- Quick Tip: Selecting Things
- Chapter 1: Introduction
- Chapter 2: Basic Pixel Art
- Chapter 3: Colors, Outlines, and Lighting
- Expressions: The Basics
- Perspective Distortion
My Other Stuff
- Homebrew Wiki
- Source – git.pixelbath
- Source – GitHub
Do You Speak Comics? Part 2: Balloons and Bubbles

Last time, we talked about the basic building blocks of comics. Now we’re back to delve in a little further on the language of cartooning. While there are many wordless comics out there, the magic of comics so often comes from the juxtaposition of text and image.
You may remember from our last “Do You Speak Comics?” post (or perhaps you already knew) that the shapes that house dialogue in comics are called word balloons (or sometimes speech bubbles ).

Word balloons can come in a variety of shapes, from round to square and everything in between. We’ll talk about some of those shapes a little later.
To save space and to create more attractive composition, cartoonists often “ anchor ” the word balloons to the border of the comic panel, like this:

If you’re interested in learning to make comics, it’s important that an anchored balloon fully overlap the border of the panel. If the balloon just brushes up against the panel border, we call this a tangent , which can be distracting to the reader:

When a character is thinking, but their words aren’t spoken aloud, cartoonists communicate that by using a thought bubble which is most frequently a “cloud” shape pointing to the thinker by a series of disconnected dots.

The cloud shape can vary, and some cartoonists prefer to use a more regular shape, but the disconnected dots always signify that the character is thinking, not speaking.
Those disconnected dots– or any shape that points to the thinker or speaker in a comic– is called a tail :

It’s very important for tails to point toward the character who is speaking or thinking, with as clear a connection as possible. Tails on word balloons should point toward the speaker’s mouth; tails on thought bubbles can point toward the thinker’s head.

The shape of the tail can also add context to a word balloon. Like we already saw, the tail of a thought bubble is disconnected, while the tail of a speech bubble is connected. Many cartoonists use a “bent” shape tail to communicate that the speech is coming from an electronic device, such as a phone, television, or radio:

Notice that the above word balloon is rectangular. An angular-shaped balloon can give the text inside it an “electronic” feel. Some cartoonists like to add to that by changing their lettering style to a more boxy style to enhance the “electronic” look. Other shapes or treatments can help communicate differences in how the characters are speaking. For example, a spiky balloon can be used to communicate shouting or yelling, while a broken- or dotted- line balloon can indicate a whisper:

Some cartoonists choose to keep their balloons a more consistent shape and depict a change in volume through the size of the lettering inside the balloon instead. It’s typically important that all speech in a comic be the same size, as frequent changes in size can confuse or distract readers, but a shout or whisper can be shown by enlarging or shrinking the text, respectively:

There are so many ways to vary word balloons and the text inside them to communicate different things to readers. Pay attention to the different shapes and sizes of the word balloons your favorite cartoonists use, as well as the ways they vary lettering to communicate meaning in their characters’ words!
- Shopping for TVs: 4K vs. 8K
- The Best Mechanical Keyboards to Buy
How to Add Comic Book Speech Balloons and Text Bubbles to Your Photos
Common apps simplify the meme-ification of your favorite images
:max_bytes(150000):strip_icc():format(webp)/SueChastain-5b113cd4c8a24ce78ba49a38f78fc9a2.jpg "speech bubbles and word balloons")
- St. Petersburg College
Use a Meme Generator
Use microsoft paint, use photoshop, use libreoffice draw.
Perk up your photos by adding cartoon-style speech balloons. Common apps and online services simplify the process of adding a message to your favorite images.
Many online meme generators support speech or thought bubbles that overlay an uploaded or stock image. Services like SuperLame , for example, include more than one option for these bubbles.
Microsoft Paint on Windows 10 remains a free, reliable standby. The modern version of Paint includes built-in callouts for speech and thought bubbles. Just open your favorite image and drag a call-out on top of it, then add a text box overlaying the callout.
Adobe Photoshop isn't cheap — subscriptions to Creative Cloud can cost between $15 and $50 depending on your student status and what you elect to acquire — but this program is the gold standard for image editing.
Hover over the Rectangle tool to expose a callout, then from that submenu, select Custom Shape. Photoshop, in its default configuration, will open a menu above the image to support the Custom Shape tool.
Freehand-draw the shape or click the Shape drop-down to pick from nearly two dozen preinstalled shapes. Use the Custom Shape menu to add fill and stroke to the callout bubble and use the Text tool to add text and format text.
A part of the LibreOffice family, which is a competitor to Microsoft 365, LibreOffice Draw includes an easy-to-use drawing menu that supports dynamic resizing of callout boxes.
Open an image in LibreOffice Draw; then click View > Toolbars > Drawing . The callout menu in the Drawing toolbar reveals seven different callout templates. Click one then draw the callout over your image.
Click anchor points to adjust the callout. Use the yellow anchor to position the bubble near the relevant character's mouth. Type your message inside the thought bubble. No need to insert a special textbox overlay. Use the Properties menu on the right sidebar of the application window to modify the callout's character, paragraph, fill, transparency, shadow, and stroke.
Get the Latest Tech News Delivered Every Day
- Add a Text Watermark to a Photo in GIMP
- Our Favorite Free Desktop Publishing Software for Mac
- How to Use Apple's Clips App
- How to Add a Watermark to a Photo in Corel Photo-Paint
- How to Add Stickers to Photos
- How to Watermark Your Photos
- 9 Best Free Photo Collage Makers
- How to Apply a Watermark to Your Graphics in Inkscape
- Canva: What It Is and How To Use It
- Key Moments in Graphic Design History
- How to Photoshop a Sepia Tone Into a Photo
- Free Desktop Publishing Software for Windows
- How to Create a Custom Greeting Card in Inkscape
- How to Outline Text in Photoshop
- The Elements of Graphic Design
- How to Create Editable Text in Paint.NET
Online Speech Bubble Maker
To get started, choose one of the two options below. You can create a speech bubble image with your own photo or choose a random stock photo.
The Awkward Squad
Check my sidebar for that comic with the old people! A collections of musings, ramblings, pictures et cetera, and so forth.
Feb 08 2019
Speech bubble/word balloon tips.
Before I begin, remember: you are writing a comic! The emphasis is on visual storytelling, not literary storytelling. If you are trying to use your speech bubbles to carry your story, that is going to somewhat defeat the purpose of the comic. As a general rule , you want to keep the amount of text and dialogue on a page to a minimum. Lettering and artwork should complement each other!
Number of words
Standard DC comics typically have a guideline of about 35 words per page. That is:
Thirty five words is going to look like this, plus or minus a few. It doesn’t feel like a lot, but it’s typically enough to get a back-and-forth between two or three characters.
Word balloons with 20-25 words are gonna be a li’l big. For webcomics, honestly, I’d keep the words per page to about what you can get away with in a tweet (280 characters). Exposition can get a little lengthier, but again, emphasis on visual storytelling! Try to incorporate lengthy expositions into the visuals of the comic. Or find other ways to explain whatever you’re trying to explain. Get creative!
Word balloons can come in a lot of different forms and you can make them unique to your story! Jagged edges, no edges, airbrushed, hard edges, you name it. But if you’re just starting out and haven’t gotten a feel for word balloons yet, here are some easy guidelines.
Whether working digitally or traditionally, getting your words down first is going to be tremendously helpful. It is much easier to configure the word balloon around the text than the text around the word balloon!
Remember that, for western readers, we read left to right, then up to down. Arrange your bubbles accordingly! The first one to be read should be left and above the others, then so on and so forth.
Keep bubbles to about two sentences max.
Your character can only emote once per panel; word bubbles should reflect that! Don’t try to smush two different emotions into one speech bubble.
Format text typically into a diamond shape. (Don’t extend middles too far out!)

But…

Sometimes this really is unavoidable though, so don’t worry if you break the rule. Just do your best!
Ideally, you want about a letter’s width of space between the edge of the font and the edge of the speech bubble (whether you use ellipsoids or squircles, like me).

But wide spaces can convey some neat emotions, like loneliness or sadness or forlorn or characters talking to themselves.

Should the tail go in the “corner” or center of the bubble? Good question! This is debated pretty frequently in webcomics, but typically, so long as you use the center or corner closest to the character and the tail is pointing to their mouth, you should be fine.

But hey, speaking of that tail, how long to make it? About halfway between the bubble and the character’s mouth!

Try not to overlap tails, it usually confuses the readers–but that can be used to effect! Such as say, confusing conversations.
Curved or straight tails? Up to you! It can be a stylistic choice, though if you use both, readers will typically feel straight tails are more direct while curved tails are more casual.
DON’T COVER CHARACTERS WITH WORD BUBBLES OR TAILS. Unless being used to effect, such as say, a word bubble overlapping a character that is being spoken over (probably rudely). Usually overlapping word balloons will get the same effect though.
Thumbnails will help you figure out word balloon placement! Use the two-thirds rule, you will almost always have the space to put word balloons in a pleasing composition.

There is still so much to formatting word balloons. Fuck. But this will help you get started. Try to think of word balloons like musical notation! Big balloons for big beats, small balloons for small beats, little interruptions with interludes, pauses, etc.
TEXT. What fonts do you pick? How large? Italicized? Bold? Holy shit.
Number one, pick a font that is either free-to-use-commercially or that you have bought the license to. If it came pre-installed on your computer, you’re typically fine, as you bought the rights when you bought the OS. But check to make sure! AND DON’T ASSUME IT’S FREE-TO-USE-COMMERCIALLY IF YOU GOT THE FONT FROM DAFONT.COM. This website has been stealing fonts from creators and saying they’re free-to-use for years.
But moreso, what kinds of fonts to use. This will depend on your comic, of course, but typically, whether hand-lettering or using digital font, you want the most basic shit possible. Don’t go for Old English fonts, don’t go for cursive (barely anyone can read it anyway now), try to avoid Fancy fonts even if your character IS fancy (this can be ignored if the character is a one-off and you REALLY WANT TO EMPHASIZE HOW FANCY).
What sorts of fonts to use? Most often for comics, you want a sans-serif font. That is, fonts without serifs. What are serifs?

The little calligraphic strokes sometimes put at the ends. Sans-serif fonts typically have very uniform line widths that are easy to read.
If you want to make your comics easier for those who have a hard time reading, such as the visually-impaired or dyslexic, choose fonts similar to those that have been found easier to read, such as Dyslexie, Open Dyslexic, and Comic Sans! Yes, that comic sans. Other fonts that have been found easier to read are Arial, Verdana, Tahoma, Century Gothic, and Trebuchet. If you hand-draw your own font, try to emulate those.
For your comic, once you pick a font, try to keep it the same size throughout the comic.
As tempting as it is to choose different fonts for each character, many readers can find this distracting. Try to avoid this, but if you are dead-set on it, pick different fonts that feel similar to each other or won’t interrupt the flow of reading.
Phew, that’s a lot of shit..
All that said, if you have any questions or want further clarification, please feel free to drop an ask in my inbox! And always, remember that all rules have exceptions! But you gotta learn the rules to know how to break them, first.
- # word balloons
- # speech bubbles
- # word bubbles
- # comics help

My old word bubbling tutorial I found!

- ')[1].split(' ')[0]; if(window.tumblrNotesLoaded)if(tumblrNotesLoaded(notes_html)==false)return;var more_notes_link=document.getElementById('more_notes_182656654445');var notes=more_notes_link.parentNode;notes.removeChild(more_notes_link);notes.innerHTML+=notes_html;if(window.tumblrNotesInserted)tumblrNotesInserted(notes_html);}};tumblrReq.open('GET','/notes/182656654445/dRhiTtWt2?from_c=1549661187',true);tumblrReq.send();return false;">Show more notes Loading...
7 Best Speech Bubble Makers to Try in 2024
By Eva Williams 19 days ago, Software Reviews

To show your character’s thoughts or make it speak in an image or a video, you should try one of these speech bubble makers. You can add such word balloons to any subject including a person, an animal, a cartoon character, and even an inanimate object. The programs reviewed in this guide are available online, and some of them are great for enhancing photos, while others are designed with clip editing in mind.
Top 7 Speech Bubble Makers
- Adobe Express - Numerous templates
- Canva - Colors are easy to adjust
- Phrase.it - Offers various filters
- PiZap - A myriad of fonts and text effects
- VistaCreate - Excellent customization options
- FlexClip - The best program for video
- Kapwing - Instant sharing with friends
When selecting the programs for this review, I considered such aspects as interface convenience and availability of templates for a streamlined workflow. Besides, some options also offer additional features for enhancing images, resizing and cropping them.
How Quickly Turn Photo into Comics?
FixThePhoto retouchers can help you with the task. They can add speech bubbles to an image, make colors brighter, change the background and make a model look like a character from a comic book or cartoon.
1. Adobe Express — Our Choice
- Many free and premium templates
- Tools for customizing speech bubbles based on your design
- Great selection of text shapes
- Excellent tool for novices
Verdict : Adobe Express allows creating a dynamic composition of pictures, icons, and text by including speech balloons in your design. Users can take advantage of various templates to create bubbles according to specific demands. Select the desired template, customize it to your preferences, and save your design.
This Adobe software has a convenient search function, which you can use to find a speech balloon and icon in an instant. To achieve the desired result, change the size, color, and orientation of a shape. Users who’ve purchased the premium subscription of this free photo collage maker , get access to more advanced templates, pictures, and fonts.
- Many text bubble layouts
- Optimized for mobile platforms
- Allows for direct sharing on social networks
- Accurate color correction
- Limited functionality in a free version
Verdict : Using Canva , you can add dialogues to an image or turn a set of pictures into comics with the help of speech balloons. To include a speech balloon in your design, find the desired shape in the image collection and click on it. The style and form of a balloon help express the emotions hidden behind the text. Additionally, this graphic design software allows customizing the color of a balloon, text, change the size, and font.
Except for text, you can include some images in a speech balloon. Browse the picture library in search of the “speech bubble frame” and choose a proper shape. Drag a picture and put it into a frame. It is great that the program crops a picture automatically, and if you want to adjust an image, simply choose the speech balloon and click “crop”.
3. Phrase.it
- Access to stock images
- Filters to spice up photos
- Works lag-free in different browsers
- Collection of ready-made speech bubbles
- No way to choose your favorite stock image
Verdict : Phrase.it is an online speech bubble generator. You can either upload media files from your PC or use random stock images. Thanks to the drag-and-drop functionality, you can easily add a speech balloon clipart to a picture. Afterward, you can insert the text into a bubble.
Besides, Phrase.it allows combining several images into a single cartoon strip and sprucing them up with filters. A considerable drawback of this program is the impossibility to choose a stock photo that you like, as an image is uploaded to your workspace automatically.
- Customizable speech balloons
- Numerous fonts and text effects
- Can be used by smartphone owners
- Allows saving finished projects to the cloud
- Registration is obligatory
Verdict : PiZap is probably the best speech bubble maker if you want to complement images with text bubbles in a quick way. Click on the speech bubble and relocate it to the desired part of your picture. You can also experiment with various fonts and text effects. Using this software for photo borders , resizing a speech balloon is a breeze.
For more creative tweaks, you can add stickers, clip art, custom emojis, and other elements to your composition. The program is optimized for computer and smartphone usage. Once you’ve created an image with a text bubble, you can send your design to friends and relatives. Sharing photos on social networks is possible right from the program. If needed, you can save your designs to free storage.
5. VistaCreate
- Easy-to-manage shapes and templates for creating speech bubbles
- Multiple fonts
- Tools for editing clips
- Stylish text effects
- Only suitable for videos
Verdict : VistaCreate is a user-friendly comic speech bubble generator, which is a perfect option for beginners. It allows adding text bubbles to an image in just a few steps. Make your pictures alive with this online platform by showing what your character is pondering over by using speech balloons. Besides, you can experiment with colors and styles for a more personalized result.
VistaCreate allows changing a speech bubble outline. To do this, click on the outline and select the appropriate color. You can also use animated elements to add movement to your photo.
6. FlexClip
- Automatic backups
- It is available for business and personal
- Notifications if backups fail
- Easy restore process
- Weak functionality
- Expensive subscription
Verdict : FlexClip is a great speech bubble creator if you are mainly involved in video improving. You can create a balloon with default shapes or choose one of the animated bubble templates and make customizations. To add a text balloon, head to the Elements tab to select the desired template. Next, choose the “Text” option and scan through the variety of text effects to find a perfect one.
You can customize your text with original fonts to make your design more stylish. Another considerable advantage is that the program is absolutely free and doesn’t add a watermark to the finished project.
- Many ways to add a speech balloon
- Text editing options
- A mobile version available
- Easy sharing on social media platforms
- Not for total newbies
Verdict : To insert a text balloon using Kapwing, look for the necessary clip art on the main toolbar. Another way is to choose “Images” and then an “Emoji” tab. The program has an extensive collection of built-in bubbles for Apple iOS. Besides, you can find a speech bubble PNG in Google or use the shape from the “Shapes” tab. The fill and outline color of the bubble can be easily changed.
Once you’ve created and added a bubble, click on your picture overlay to change the size or position of your design. If you like an emoji, select the “Add Text” tab to insert some phrases. You can also resize the text to make it look perfect inside the speech balloon.
- Top speech bubble makers

- Video Editing Services
- Virtual Staging Services
- Outsource Photo Editing
- Retouching Tips
- Photo Editing Freebies
- Free Raw Images for Retouching
- Free Photoshop Actions
- Free Lightroom Presets
- Affiliate Program
- Privacy Policy
- Cookie Policy

Other Free Design Resources
550+ speech bubbles free vectors & clipart to download now, by iveta pavlova.
2 years ago
You may also like Show related articles Hide

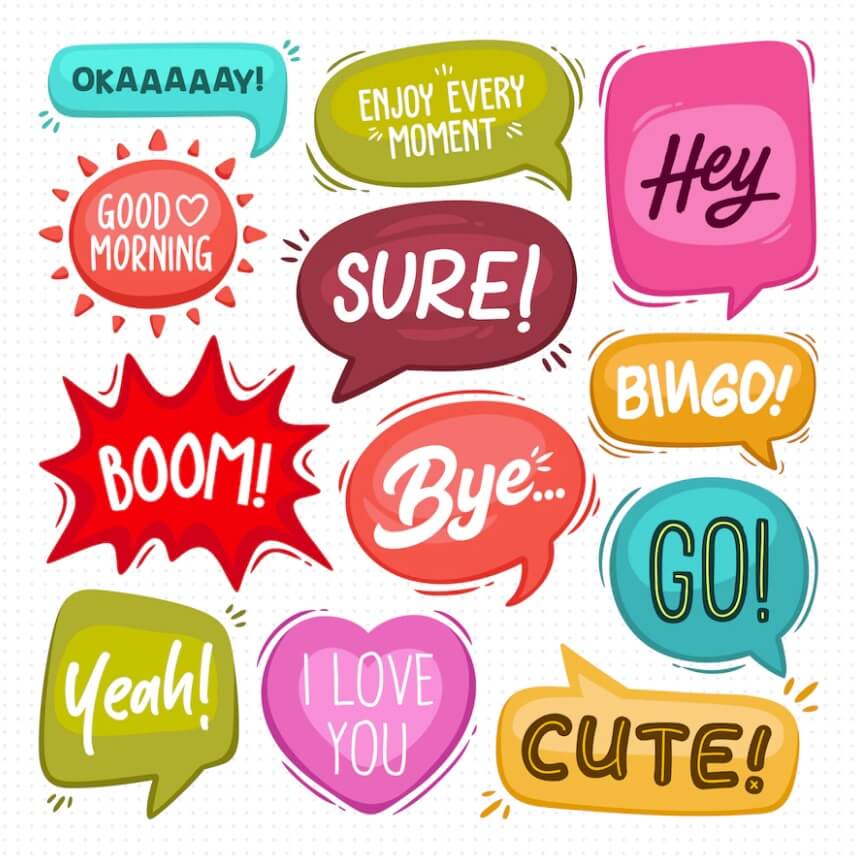
Looking for some cool speech bubbles to add to your next comic book or poster design? Here is a huge collection containing hundreds of speech bubbles and balloons , thought bubbles, spiky bubbles, dashed line bubbles, chat text boxes, and more.
Why are there different types of speech bubbles, anyways? Well, let’s see. A speech balloon with a tail pointing toward the person indicates talking. A cloud-shaped thought bubble with smaller bubbles for a tail indicates a person thinking. Spiky speech bubbles represent screaming, excitement, or even a loud sound like an explosion. And when the speech bubble line is dashed, it means the person is talking quietly.
Alright, let’s move on to the real thing. Enjoy and download now 500+ free speech bubble templates for your designs!
Manga & Comic Speech Bubbles
For sure, one of the most popular applications of speech bubbles is comic book designs. No matter if you need classic comic speech bubbles for free download or anime and manga speech bubbles, these sets will get you covered with awesome designs.
10 Comic Speech Bubble Templates

- File Format: AI, EPS, JPG
- Software: Adobe Illustrator
- License: Free for Personal and Commercial Use │ Requires Attribution
10 Cool Speech Bubbles for Comics

- File Format: EPS, JPG
100+ Free Speech Bubble Mega Collection

- File Format: SVG, PNG
- License: Free for Personal and Commercial Use │ No Attribution Required
19 Editable Vector Image of Comic Speech Bubbles

- File Format: EPS, PDF, JPG
- Software: Adobe Illustrator, Adobe Photoshop
7 Comic Speech Bubble Examples Vector Collection

15 Hand Drawn White Speech Bubble Templates for Anime and Manga

6 Manga Text Bubble Templates for Free Download

6 Hand Drawn Speech Bubbles with Quotes for Anime Comics

11 Empty Text Bubbles for Comic Books and Magna

6 Message Bubble Templates with 3D Effect for Comics

16 Marker Effect Speech Bubbles with Transparent Background

10 Free Comic Book Speech Bubbles with Shadow Effect

27 Anime Speech Bubbles in a Hand-Drawn Style

7 Free Speech Bubbles in Comics Style

Cool Comic Speech Bubble Png

- File Format: PNG
- Resolution: 800x800px
- Software: Adobe Photoshop
Heart Shaped Speech Bubble Clipart

- Resolution: 1192 x 1126
Free Thought Bubble Png Clipart

- Resolution: 600x510px
Free Empty Comic Bubble Png

Colorful & Cartoon Speech Bubbles
A collection of cartoon speech bubbles for free download with ready-made words or just empty designs for you to fill out with your own text. Here, you will find free speech bubbles in a flat style, watercolors, pastels, gradients, and a classic cartoon style.
12 Colorful Speech Bubbles with Text Vector
6 Flat Speech Bubbles with Words Vector

14 Freehand Colorful Cartoon Text Bubbles

7 Cute Flat Vector Cartoon Speech Bubbles

10 Colorful Speaking Bubble Vector Templates

11 Light Blue Vector Speech Bubbles With Text

12 Colorful Chat Bubble Free Vector Templates

6 Empty Chat Message Bubbles Vector Templates

9 Gradient Speech Bubbles Template Free Vector

12 Comic Cartoon Bubbles Free Vector Templates

22 Multi Color Watercolor Speech Balloons

22 Blue Watercolor Speech Bubbles Free Vector

8 Comic Dots Cartoon Speech Bubbles Free Vector Download

10 Free Vector Editable Speech Bubbles in Comics Style

Dashed Line Speech Bubbles
Dashed or dotted outlining around speech bubbles indicates that the character is whispering or speaking quietly. Here are a few examples of this text bubble design, ready to download completely for free.
16 Dashed Line Speech Bubble Vector Templates

- File Format : EPS, PDF, JPG
6 Dashed Line Flat Cartoon Speech Bubble Vectors

8 Dashed Line Talking Bubble Templates

8 Free Vector Flat Speech Bubbles for Whispering

Empty Speech Dashed Line Bubble Clipart

- Resolution: 800x693px
Empty Quiet Talking Speech Bubble PNG Clipart

- Resolution: 800x677px
Double & Multiple Speech Bubbles for Conversations
A collection of speech bubbles indicating discussion, a dialogue between two people, chats, and more. These multiple and double speech bubbles for free download will make sure you have handy and good-looking text boxes to depict conversation.
20 Matching Conversation Bubbles Clip Art Set

- File Format: PNG on transparent backgrounds
- Resolution: High (not specified)
- License: Free for Personal and Commercial Use
Double Conversation Bubble Free Clipart

- File Format: JPG
- Resolution: 1920x1200px
Double Talk Bubble Conversation Concept Vector

Free Vector Dialogue Bubble With Two People

8 Free Chat Bubbles for Messenger Conversation

- File Format : AI, EPS, JPG
18 Single & Multiple Speech Bubbles Pop Art Templates

11 Single and Double Speech Bubble Comic Templates

- File Format : EPS, JPG
8 Single & Multiple Speech Bubbles Pop Art Templates

Multiple Speech Bubbles Discussion Concept Free Vector – 7 Bubbles

Speech Bubbles on Pictures & Backgrounds
Looking for ready-made pictures and designs with editable speech bubbles? Well, here are several examples of speech bubbles on pictures, background, and pop art illustrations, featuring cartoon characters or not. All ready to be downloade for free and filled with your own custom text.
Editable Speech Bubbles on Pop Art Background Free Vector

Editable Comic Book Speech Bubbles Free Vector

Empty Speech Bubble With Cartoon Girl Waving Free Vector

Empty Talking Bubble With Cartoon Girl Pop Art Free Vector

Empty Cloud Thought Bubble on Pop Art Background Free Vector

Comic Strip Template With 5 Text Bubbles Free Vector

12 Empty iPhone Chat Bubbles Messages Free Template

- File Format: Word Doc File
- Software: Microsoft Word
Comic Strip Template With 5 Speech Bubbles Free Vector

4 School Kids Students with Empty Text Bubbles Free Vector

Printable Speech Bubbles
A collection of free printable speech bubbles prepared in scalable PDF file formats or high-resolution PNG images. These speech bubbles are ready for printing and using in personal or commercial projects, according to your needs.
5 Types of Speech Bubbles – Printable Paper Template for Free Download

- File Format: PDF
- Software: Any PDF reader
24 Printable Speech Bubbles Pdf Free Download

Printable Speech Bubble PNG Template

- Image Size: 1512x1355px
Printable Text Bubble PNG Template

- Image Size: 1000x705px
Printable Spiky Word Bubble PNG Template

- Image Size: 1496x1346px
More Cool Empty Speech & Thought Bubbles
Here, we’ve gathered even more cool empty speech bubbles made in various attractive styles. You will find chalkboard speech bubbles, 3D speech and thinking bubbles, glass effect, or sticker speech bubbles that will help you create even more attractive designs.
7 Sticker Speech Bubbles and Text Boxes Free Vectors

7 Empty Glass Semi-Transparent Speech Bubbles

4 3D Text Bubble Free Vector Templates

4 3D Thought Bubble Free Vector Templates

12 3D Speech Bubbles Free Vectors

3 Colorful Text Boxes 3D Effect Free Vectors

9 Hand Drawn Chalkboard Speech Bubbles Free Vector

7 Comic Style Chalkboard Bubbles Free Vector

14 Chalkboard White Speech Bubble Vector Templates

Well, that’s it! Fingers crossed you’ve found this collection of speech bubble templates useful and managed to get the best downloadable resources for your design needs.
If you are looking to enrich your personal collection with even more freebies and goodies for designers, why don’t you check out a few more freebie posts, as well?
- 100+ Free Comic Strip Templates for Your Visual Stories
- 70 Free Arrow PNG Objects, Illustrations and Vectors to Download Now
- 2000+ Masterfully Crafted Free Icons in Various Styles and Themes
Share this article

Iveta is a passionate writer at GraphicMama who has been writing for the brand ever since the blog was launched. She keeps her focus on inspiring people and giving insight on topics like graphic design, illustrations, education, business, marketing, and more.
You may also like ...
Free Social Media Icons In Different Graphic Styles Free Social Media Icons In Different Graphic Styles
By Sandra Boicheva

90+ Free Cartoon Landscape Graphics to Give Life to Your Designs and Presentations 90+ Free Cartoon Landscape Graphics to Give Life to Your Designs and Presentations

70 Free Arrow PNG Objects, Illustrations and Vectors to Download Now 70 Free Arrow PNG Objects, Illustrations and Vectors to Download Now
Add Speech Bubble to Photo
Add a speech bubble to a photo for free. With Pixelied, you can add speech stickers and icons to any image with a few clicks.

Upload image to get started
How to add a speech bubble to a photo in 4 steps.
You don’t have to download an app to add a thought bubble to a photo. Pixelied’s speech bubbles generator helps you achieve your goal directly in your browser.

Upload ypur photo in JPG or PNG format
Upload a photo or drag-n-drop it to the editor in JPG or PNG format.

Click on the “Elements” button
Click on the “Elements” button in the left menu and select “Speech Bubbles” from the dropdown submenu.

Choose your favorite speech bubble object
Choose your favorite speech bubble object, insert it into the photo, and add a caption in the bubble.

Download your image
Click on the “Download” button when you’re done to save your image in multiple file formats.
Add Speech Bubble To Photo Tutorial
The free toolkit for easy, beautiful images
Pixelied is a fast and straightforward solution to add a text bubble to a photo. If you wish to amuse your friends on social media, or you want to create a catchy digital project, you can do so in an instant with our free image editor.
Easily Add Thought Bubble to Photos
Putting speech bubbles on photos doesn’t have to be complicated. You can do it easily with Pixelied.
Our image editor can help you add speech bubbles to images, customize your photos and create share-worthy pictures for social media in minutes.

Instantly Add Text Bubble to Photos
Spark some laughs on social media. Make a lovely photo even more remarkable with a text bubble.
Amuse your friends with your captions. Browse our extensive library of speech bubbles to find one that perfectly matches your photo and emotions.

Easy-to-Use Speech Bubble Generator
Create a narrative around your photo. Use thought bubbles to convey a clear message to your audience.
Our speech bubble generator helps you express your thoughts with ease. Choose a bubble icon that fits your style and let the world know what you think.

Export Image in Multiple High-Res Formats
Produce images that look great and communicate your convictions. Make shareable designs that are perfect for social media.
After customizing your photo and adding text bubbles, you can download it in multiple high-resolution formats, such as JPG, PNG, SVG, and more.

Add Speech Bubble to Photo with More Customizations
Help your audience focus on your image’s message. Crop the image to eliminate distractions.
Direct the viewer’s sight to the text bubble. Use borders to highlight the text.
Drop Shadow
Make your photos look more realistic. Add shadows to enhance their appearance.
Share your image on social media. Resize it so it will match the platform’s size specifications.
Amuse your audience with an inverted perspective. Flip the image to make it funnier.
Adjust the text bubble to avoid blocking the viewer’s sight. Rotate it so it will fit perfectly.
More Than Just a Speech Bubbles Generator Tool
Use Pixelied to add speech bubbles to a photo and more. Our online image editor helps online professionals and business owners create amusing designs starting from scratch or with the help of ready-made templates. Adding a speech bubble on pictures is only one of the multiple free features at your disposal. With Pixelied, you can add captions, borders, icons or use special effects and filters to customize your image to perfection.
Frequently Asked Questions
To add a speech bubble on pictures, upload your photo or drag n drop it to the editor. Next, click on the ‘Elements’ tab at the left sidebar and select “Speech Bubbles” from the dropdown submenu. Select any speech bubble object and add it to your image along with your caption. After you’re done, download the image in multiple file formats.
First, upload your image using the button above. Next, locate the elements section on the left side of the editor and select “Speech Bubbles” from the dropdown menu. Add the thought bubble to your image, along with a catchy caption. Once done editing, download the image in multiple high-res formats.
Pixelied is the best online app to add a thought bubble to a photo without Photoshop or specialized software. This application can help add catchy speech bubbles to your images.
Pixelied is an online photo editing tool that’s easy to use and requires no technical skills of complicated software like Photoshop or Gimp.
Yes, you can fully customize an image by adding text, icons, photos, elements, illustrations, mockups, and much more.
Yes, the downloaded images can be used for personal and commercial purposes without attribution.
COMMENTS
Speech balloon - Wikipedia ... Speech balloon
Summary. Speech bubbles represent the characters' dialogue or thoughts. Normal speech is often represented by an oval-shaped bubble. To express a thought or an idea, the bubble with a cloud shape is the right one. Rectangular bubbles without a tail are known as captions.
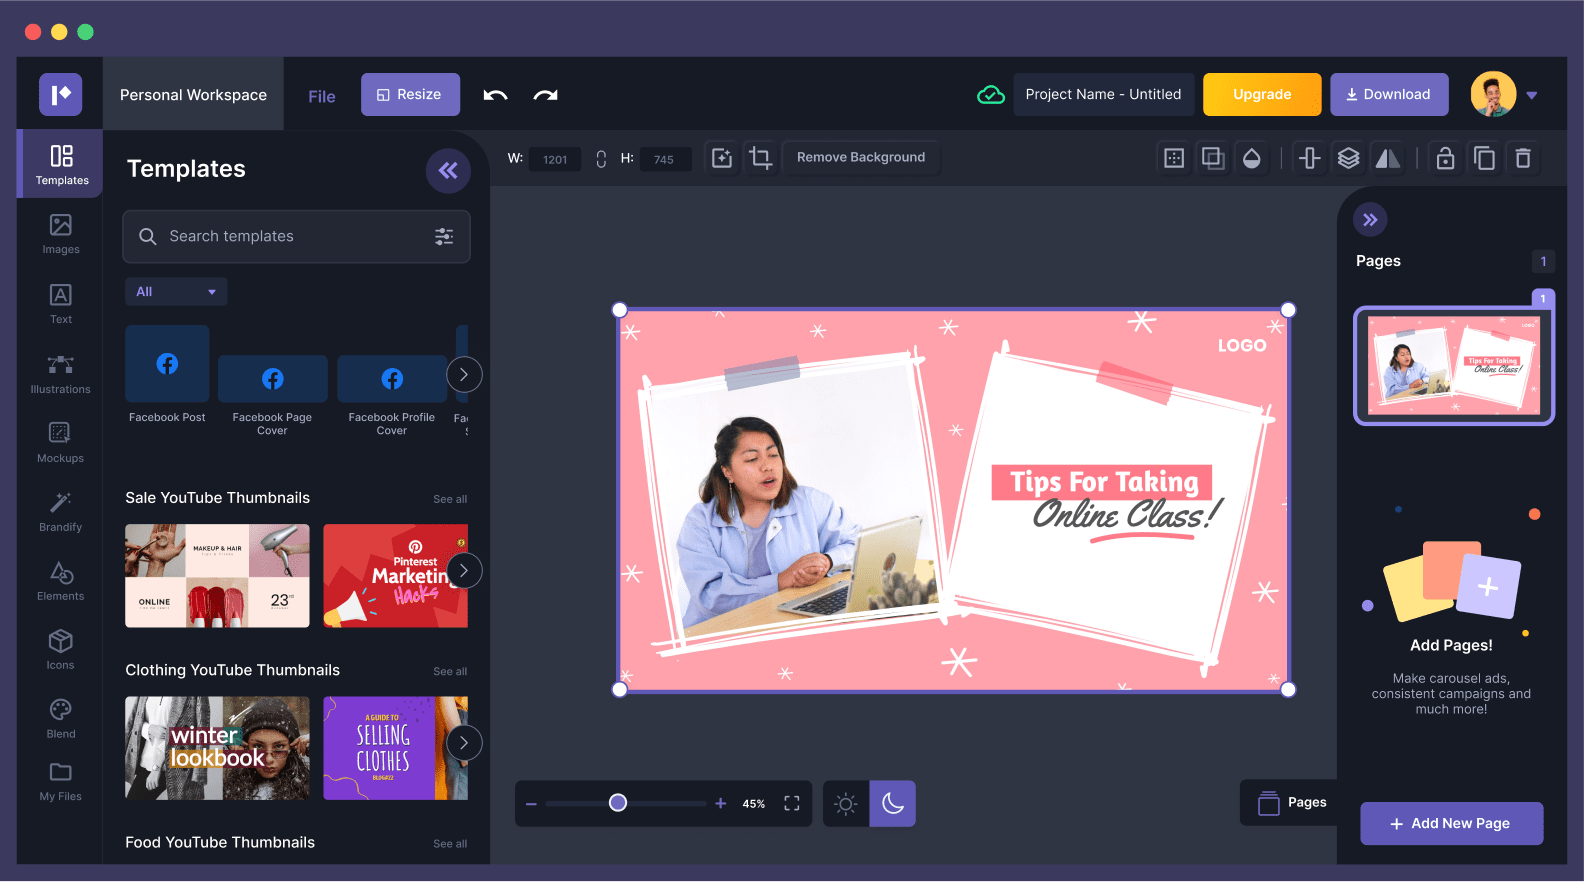
There are roughly 3 different ways to create speech balloon in CLIP STUDIO PAINT: [ 1. Balloon (Creating with a tool)], [ 2. Balloon (Material)], and [ 3. Flash]. 1. How to make a speech balloon using the balloon tools. The following will explain how to make a speech balloon using the [Ellipse balloon] sub tool.
I might make a distinction between bubble and balloon based on the type of connector between the person and the speech. if the connector is a series of small (or progressively larger bubbles) then I'd call it a bubble. If it's a thin line like the string of a balloon, then I'd call it a balloon. -
https://www.youtube.com/channel/UCmV5uZQcAXUW7s4j7rM0POg?sub_confirmation=1How to create callout or speech balloon in word: How to Insert Word Bubbles in Word
In today's video, we are going to discuss speech bubbles and dialogue balloons. We will explore ALL of the different types of text containment devices so YOU...
Whisper bubble. Used to indicate that a character is talking quietly. Thought bubble. Used to convey what a character is thinking instead of saying. Scream bubble. Used to indicate that a character is shouting or screaming. Read PlanBee's explainer wiki to find out what a speech bubble is, and discover fun speech bubble activities you can try ...
Speech balloons (also speech bubbles, dialogue balloons, or word balloons) are a graphic convention used most commonly in comic books, comics, and cartoons to allow words (and much less often, pictures) to be understood as representing a character's speech or thoughts. A formal distinction is often made between the balloon that indicates speech and the one that indicates thoughts; the balloon ...
Creating a Basic Speech Balloon. Let's start off with a basic elliptical speech balloon. First, take the text tool and type out some text to put a balloon around. Then, select the Balloon tool (default keyboard shortcut - T) and from there select the "Ellipse Balloon" subtool.
If you have too much text in your script try to break it down into different bubble speeches or drawing panels. Remember, this is a comic, not a novel. So don't make it hard for your readers. I recommend you to use 35 words per balloon as maximum. if your script has more words in one image try to break your dialogue into compound balloons.
Word balloons, also called "speech bubbles," are a must for any print or web comic, unless you prefer text directly on the page. Step 1: Create the text. Step 2: Drawing a balloon. Step 3: Drawing the tail. Step 4: Add a stroke.
Tails on word balloons should point toward the speaker's mouth; tails on thought bubbles can point toward the thinker's head. The shape of the tail can also add context to a word balloon. Like we already saw, the tail of a thought bubble is disconnected, while the tail of a speech bubble is connected. Many cartoonists use a "bent" shape ...
Colors. Most commonly, the speech balloon has black text is displayed against a solid white background. The contrasting colors help a reader clearly see the words being spoken. A variation method ...
Click one then draw the callout over your image. Click anchor points to adjust the callout. Use the yellow anchor to position the bubble near the relevant character's mouth. Type your message inside the thought bubble. No need to insert a special textbox overlay. Use the Properties menu on the right sidebar of the application window to modify ...
Free Printable Speech Bubble Templates - PDF ...
You can print these word balloons, or use them right on the computer. If you plan on printing the balloons so that the kids write in them, there are 21 png files that you can print out. Enjoy! Included in the Speech Bubble Pack: 1 Abode Illustrator file containing all the speech bubbles (Illustrator 10 and above) 1 EPS file containing all the ...
💬 Make comics in 4 minutes per week:https://brinkleycomics.ck.page/708341f276🎼 Music from Epidemic Sound (EXCLUSIVE OFFER):https://www.epidemicsound.com/re...
Phrase.It is a simple and free speech bubble photo generator. Add speech bubbles to photos and create your own comic strips online within seconds. Great looking results guaranteed, completely free, no sign-up required. To get started, choose one of the two options below. You can create a speech bubble image with your own photo or choose a ...
Arrange your bubbles accordingly! The first one to be read should be left and above the others, then so on and so forth. Keep bubbles to about two sentences max. Your character can only emote once per panel; word bubbles should reflect that! Don't try to smush two different emotions into one speech bubble.
They can add speech bubbles to an image, make colors brighter, change the background and make a model look like a character from a comic book or cartoon. 1. Adobe Express — Our Choice. Verdict: Adobe Express allows creating a dynamic composition of pictures, icons, and text by including speech balloons in your design.
Spiky speech bubbles represent screaming, excitement, or even a loud sound like an explosion. And when the speech bubble line is dashed, it means the person is talking quietly. Alright, let's move on to the real thing. Enjoy and download now 500+ free speech bubble templates for your designs!
Free speech bubble pack for cartoonists and artists. If you're in need of speech bubbles for your comic strip, comic book, or art project, look no further because you've come to the right place. Here's a free speech bubble pack for you to download, containing 21 unique word balloons and thought balloons.
Add Speech Bubble to Photo Online (Free Stickers & Icons)