How-To Geek
How to loop a powerpoint presentation.

Your changes have been saved
Email is sent
Email has already been sent
Please verify your email address.
You’ve reached your account maximum for followed topics.

Quick Links
Set up your slideshow to be looped, apply automatic slide transitions.
Slideshows are sometimes used to display images at events, such as weddings or trade shows. Whatever the occasion might be, you’ll want to loop your PowerPoint presentation so your guests aren’t staring at a blank screen. Here’s how it’s done.
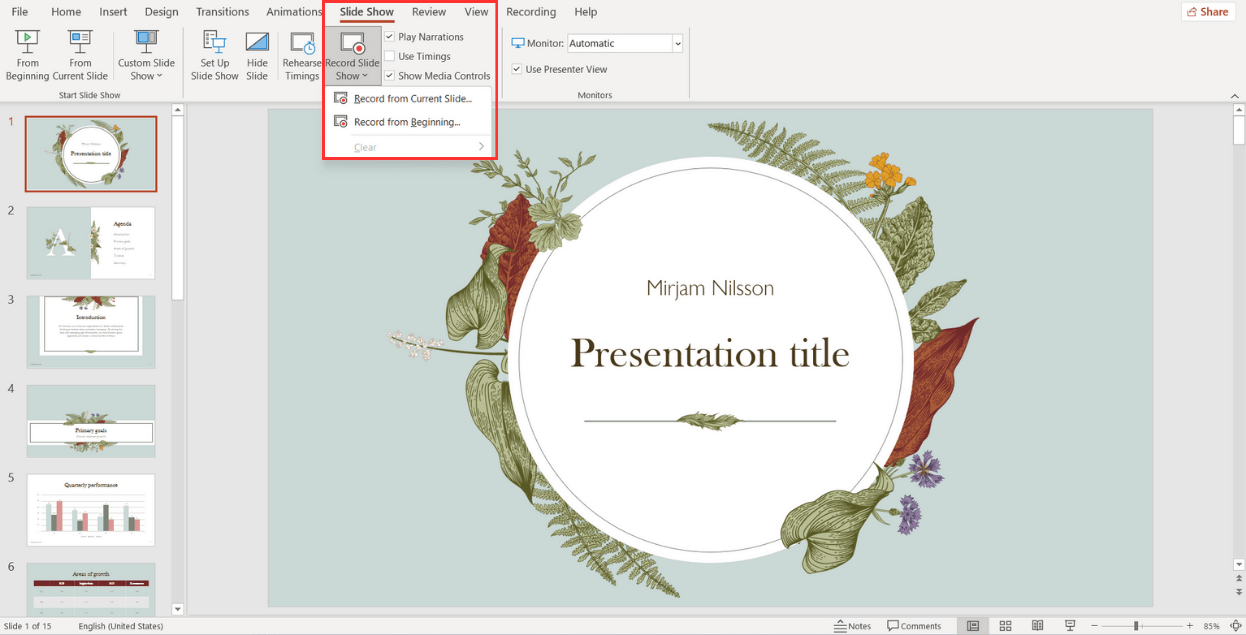
First, open your PowerPoint presentation in which you would like to loop. Once open, navigate to the “Set Up” group of the “Slide Show” tab and then select the “Set Up Slide Show” button.

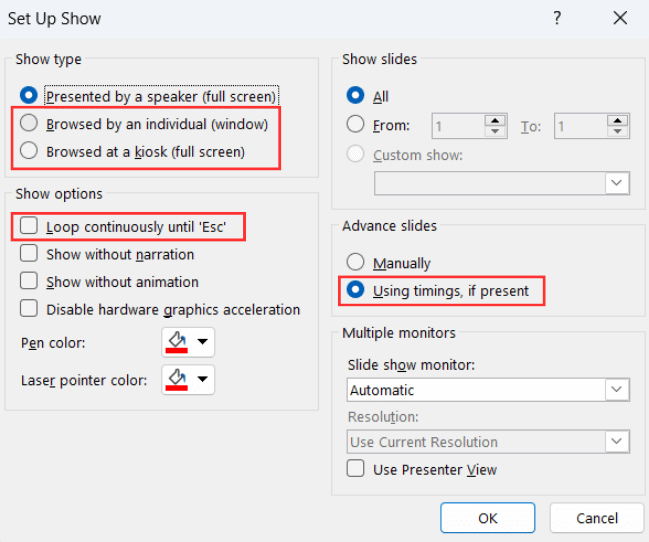
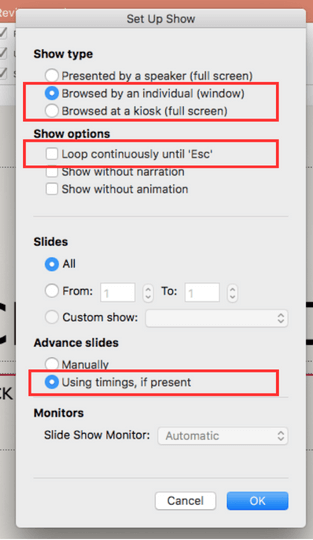
The “Set Up Show” window will appear. In the “Show options” group, check the box next to “Loop Continuously until Esc.” Once selected, click “OK” in the bottom-right corner of the window.

Now, when you play your slideshow, it will end only when you press the “Esc” key instead of when you've finished the last slide.
Related: How to Make YouTube Videos Loop Continuously
One caveat: With the way we currently have it set up, the slideshow will proceed only when someone clicks the mouse button. That’s fine if there will be a speaker present at all times. Otherwise, you’ll need to set up automatic slide transitions.
Head back to the “Set Up Show” window by selecting “Set Up Slide Show” in the “Set Up” group of the “Slide Show” tab.
There are a couple of options you need to select, but one important note is that you must first select “Using Timings, If Present” under the “Advance Slides” group.

The next option we select will lock a few things in place (which is why you need to select “Using Timings, If Present” first).
Under the “Show Type” group, select “Browsed at a Kiosk (Full Screen)." The “Loop Continuously until Esc” option will be enabled automatically if you haven’t already turned it on, and the option you’ve selected under “Advance Slides” will remain unchanged.
Select “OK” when ready to proceed.

Without the “Browsed at a Kiosk” option enabled, the automatic slide progressions would be disabled if someone were to press the Back key. With it enabled, the Forward and Back keys are locked, allowing the slideshow to automatically progress unattended without fear of someone breaking it.
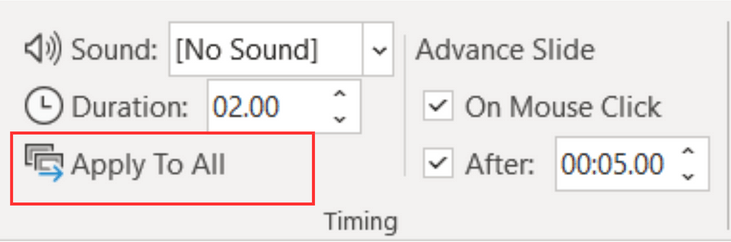
Now it’s time to set the timings of the slides. Head over to the “Transitions” tab. In the “Timing” group, check the box next to “After” and set the timing at which you’d like each slide to progress. Note that it doesn’t matter if the box next to “On Mouse Click” is checked or not---it won’t work.
After that, select the “Apply to All” option in the same group.

Now, when you play your slideshow, it will continuously loop without interruption. To exit the slideshow, press the “Esc” button.
- Microsoft Office

How to Loop a PowerPoint Slide Show to Repeat Automatically

Set up a PowerPoint Presentation That Loops or Repeats Continuously
by Avantix Learning Team | Updated November 12, 2021
Applies to: Microsoft ® PowerPoint ® 2013, 2016, 2019 and 365 (Windows)
You can set up a PowerPoint slide show to loop or repeat automatically. A looping presentation can be used at events, trade shows or even in a reception area in an office. The easiest way to set up a slide show to loop or replay continuously is to apply automatic transitions and then configure Slide Show settings.
Recommended article: 5 PowerPoint Keyboard Shortcuts to Run a Slide Show
Do you want to learn more about PowerPoint? Check out our virtual classroom or in-person PowerPoint courses >
Screenshots in this article are from PowerPoint 365 but are similar in older versions of PowerPoint.
Step 1: Apply transitions to automatically advance slides during a slide show
Transitions occur between slides when you run a slide show.
To apply transitions to automatically advance slides during a slide show:
- In Normal View or Slide Sorter View, display or select a slide.
- Click the Transitions tab in the Ribbon.
- Select a transition in the Transitions gallery (such as Fade).
- Click Effect Options and choose the desired option. Effect Options change depending on the transition you selected.
- In the Timing group, click the arrows beside Duration to set the timing you want (in seconds) for the transition. You may also type a duration.
- In the Timing group, under Advance Slides, deselect or uncheck On mouse click and beside After, select or click the up and down arrows to set the timing to transition to the next slide. You may also type a duration.
- In the Timing group, click Apply to All.
In the Transitions tab in PowerPoint, you can select the type of transition (such as Fade) as well as timing options:

Step 2: Set up a presentation to loop during a slide show
To set up a PowerPoint presentation to loop during a slide show:
- Click the Slide Show tab in the Ribbon and then click Set Up Slide Show. A dialog box appears.
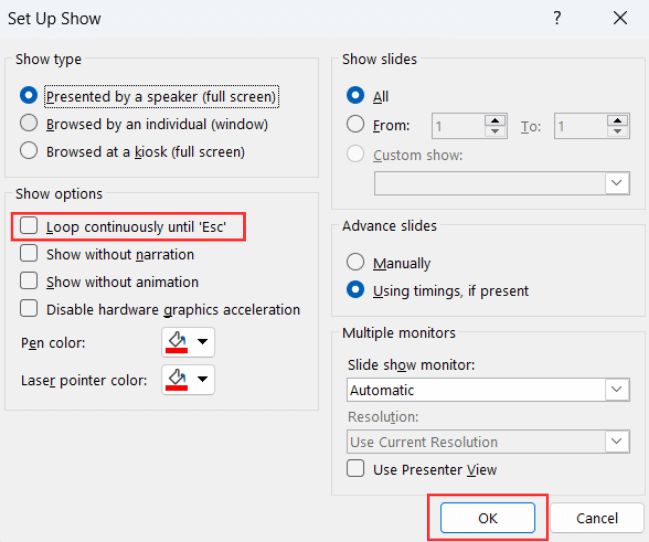
- Under Show type, if you select Presented by a speaker (full screen), the speaker or those watching the slide show will have control over when they advance slides. This is the default setting for slide shows. If you select Browsed by an individual (window), those watching the slide show do NOT have control over when slides advance. If you select Browsed at kiosk (full screen), those watching the slide show do NOT have control over when slides advance and the presentation automatically loops until those watching press Escape (Esc).
- Under Show options, select Loop continuously until 'Esc'. You will be able to select this option if you selected one of the first two options under Show type.
Below is the Set Up Show dialog box with Presented by speaker selected and looping enabled:

If you want to set specific timings for slides to advance or to add narration, check out the article How to Run a PowerPoint Slide Show Automatically (Set Up a Self-Running Presentation) . If you have audio or video in the presentation, you'll need to set the media to play automatically (on the Playback tab in the Ribbon) and animations will also need to be set to run automatically.
Subscribe to get more articles like this one
Did you find this article helpful? If you would like to receive new articles, JOIN our email list.
More resources
How to Embed a YouTube Video in PowerPoint
How to Hide and Unhide Slides in PowerPoint (with Shortcuts)
How to Insert Video in PowerPoint (from a File on Your PC or a Shared Drive)
PowerPoint Keyboard Shortcuts to Play and Control Video During a Slide Show
How to Add Animation in PowerPoint (Animate Images, Text and Other Objects)
Related courses
Microsoft PowerPoint: Intermediate / Advanced
Microsoft PowerPoint: Design for Non-Designers
Microsoft PowerPoint: Animations Bootcamp
Microsoft Excel: Intermediate / Advanced
VIEW MORE COURSES >
Our instructor-led courses are delivered in virtual classroom format or at our downtown Toronto location at 18 King Street East, Suite 1400, Toronto, Ontario, Canada (some in-person classroom courses may also be delivered at an alternate downtown Toronto location). Contact us at [email protected] if you'd like to arrange custom instructor-led virtual classroom or onsite training on a date that's convenient for you.
Copyright 2024 Avantix ® Learning
You may also like

How to Insert or Type E with an Accent Mark in PowerPoint (È, É, Ê, Ë, è, é, ê, or ë)
You can insert or type e with an accent mark in PowerPoint using built-in tools or keyboard shortcuts (including Alt code shortcuts). The letter e can be inserted with an accent in both upper or lower case in text boxes or placeholders on slides, the slide master or layouts. The following are common accents in upper or lower case – È, É, Ê, Ë, è, é, ê, or ë.

How to Fade a Picture or Part of a Picture in PowerPoint (Using a Gradient)
You can fade a picture in PowerPoint by drawing a rectangle shape on top of the picture and then filling the rectangle with a gradient from opaque to transparent. This technique is often used to fade an image into the background of a slide. Since the rectangle is placed on top of the image and then text may be placed on top of the rectangle, you may need to reorder the objects.

How to Lock an Image, Shape or Other Object in PowerPoint
You can now lock an image, shape or other object in PowerPoint. Objects can be locked in Normal View or Slide Master View. Only PowerPoint 365 users can lock objects to prevent moving and resizing. This is helpful if you want to select and move other objects on the slide or prevent others from moving or resizing an object. You can lock items using the context menu or the Selection Pane.
Microsoft, the Microsoft logo, Microsoft Office and related Microsoft applications and logos are registered trademarks of Microsoft Corporation in Canada, US and other countries. All other trademarks are the property of the registered owners.
Avantix Learning |18 King Street East, Suite 1400, Toronto, Ontario, Canada M5C 1C4 | Contact us at [email protected]
Our Courses
Avantix Learning courses are offered online in virtual classroom format or as in-person classroom training. Our hands-on, instructor-led courses are available both as public scheduled courses or on demand as a custom training solution.
All Avantix Learning courses include a comprehensive course manual including tips, tricks and shortcuts as well as sample and exercise files.
VIEW COURSES >
Contact us at [email protected] for more information about any of our courses or to arrange custom training.
Privacy Overview
Pin it on pinterest.
- Print Friendly
How to loop a PowerPoint slideshow so that it automatically starts over as soon as it ends
- To loop a PowerPoint slideshow, you'll need to enable looping in the "Set Up Slide Show" menu.
- Once you set your PowerPoint to loop, it'll start over from the beginning automatically after playing the last slide.
- Visit Business Insider's Tech Reference library for more stories .
If you've designed a Microsoft PowerPoint presentation that's meant to be viewed repeatedly, such as on a kiosk or in a museum installation, you can adjust the settings in PowerPoint so that your slideshow "loops" instead of ending after one viewing.
Getting a PowerPoint to loop is easy. Read on to find out how, using PowerPoint for both Mac and PC.
Check out the products mentioned in this article:
Microsoft office (from $149.99 at best buy), apple macbook pro (from $1,299.00 at apple), acer chromebook 15 (from $179.99 at walmart), how to loop a powerpoint presentation.
1. Open the Microsoft PowerPoint presentation that you want to loop.
2. With your PowerPoint presentation open, click on the "Slide Show" tab, then click on "Set Up Slide Show."
3. In the pop-up window that appears, click on the box next to "Loop continuously until 'Esc'" so that a small checkmark appears inside the box. Feel free to adjust any other settings in this menu as well. Click "OK" when you're finished.
4. To test whether your PowerPoint can loop successfully, click on the "From Beginning" or "Play From Start" button in the Slide Show tab. Click through the slideshow until you reach the end. When your PowerPoint reaches its final slide, it should start over from the beginning automatically. When you're confident that looping is enabled, and you're ready to close the slide show, press the Esc key.
Related coverage from Tech Reference :
How to add a border to slides in powerpoint, and give your slideshow a sleek design, how to embed a youtube video into your microsoft powerpoint presentations using a mac or pc, how to convert google slides to a powerpoint presentation in 4 easy steps, how to create a custom powerpoint template to use or share with others, how to copy or duplicate a powerpoint slide and put it anywhere in your slideshow.
Insider Inc. receives a commission when you buy through our links.
Watch: We compared the $1,200 MacBook Air with the $500 Surface Go, and the results were a mess
- Main content
How to Loop a PowerPoint Presentation
Just like an animated GIF or video clip, you can loop a slideshow in Microsoft PowerPoint. This is ideal if you set the presentation to automatically play because it starts at the beginning each time it ends to create an infinite loop.
Here’s how to loop a PowerPoint presentation on Windows and Mac. Currently, PowerPoint on the web doesn’t offer a Loop feature.
Set the Timing to Advance the Slides
Before you set your PowerPoint presentation to loop, you may want to adjust the timing to advance through the slides. You can use the same time for each slide or display particular slides for a longer amount of time.
- Open your presentation in PowerPoint on Windows or Mac and go to the Transitions tab.
- In the Timing section of the ribbon, check the box for After and enter the time in seconds to the right. You can also use the arrows to move the time up or down in small increments.

- To set different times for slides, select the next slide and use the above step to choose the After timing. Continue this process for the remaining slides.
- To set the same timing for all slides in the presentation, select Apply To All in the Timing section.

- If you only want continuous play to advance the slides, you can uncheck the box directly above for On Mouse Click . However, if you want the ability to advance the slides with a mouse click and after a certain amount of time, you can leave the box checked.

Once you have the timings set to advance the slides, you can turn on the Loop setting.
- Go to the Slide Show tab and select Set Up Slide Show in the Set Up section.

- Under Show type , choose an option to play your presentation.
- If you plan to present the slideshow or have an individual view the show, choose one of the first two options. Then, check the box for Loop continuously until ‘Esc’ in the section beneath.
Confirm that the Using timings, if present setting is marked under Advance Slides.

- If you want the slideshow to play automatically , choose the third option, Browsed at a kiosk . You’ll then see the Loop continuously until ‘Esc’ and Using timings, if present settings are automatically marked and disabled for changing.

- Adjust any other options per your preference and use the OK button to save the settings.
When you’re ready to begin the slideshow and let it play, check out our how-to for starting the PowerPoint presentation as well as navigating it if needed.
Just Let It Play
By looping a PowerPoint presentation, you don’t have to lift a finger to advance through the slides. You can display it at a kiosk, in a waiting room, or at a convention booth and just let it play over and over.
For more, look at how to add narration for an engaging PowerPoint presentation .

Sandy Writtenhouse is a freelance technology writer and former Project, Department, and Program Manager. She turned her education, job experience, and love of technology into a full-time writing career. With all sorts of gadgets in her home and her hands, she seeks to help others make life easier through technology. Read Sandy's Full Bio
Read More Posts:

Home Blog PowerPoint Tutorials How to Loop a PowerPoint
How to Loop a PowerPoint
When a PowerPoint slideshow ends, the screen turns blank after the last slide. However, you can opt to restart the presentation from the first slide by running the slide deck in loop. You might want to loop a slide if you have created a PowerPoint slideshow that needs to run on a screen in loop, such as a self-running slideshow for a kiosk, a PowerPoint template indicating a break at an event, or when you need to go back to one or more of the previous slides from the start for a quick review of the presentation.
How to Make PowerPoint Loop
To loop PowerPoint, go to Slide Show -> Setup Show .

From the dialog box that appears, select Loop continuously until ‘Esc’ to enable looping your slides. By default, all slides are looped in a sequence.

How to Loop PowerPoint from Selected Slides
To loop specific slides, go to Slide Show -> Setup Show , enable loop, and select the slides to run in a loop via Show Slides .

How to Loop PowerPoint Slides Manually and Automatically
You might want to create a slideshow from break or countdown-themed PowerPoint templates or Google Slides templates to indicate a break during an event.
You can select the time each slide remains on screen via the Transitions tab. The Timings menu provides the option to select the duration for each slide and whether you intend the slides to move automatically or on mouse-click.

To loop PowerPoint slides manually or automatically, go to Slide Show -> Setup Show , enable the loop option, and go to Advance slides . Select Manually for moving slides on mouse click, arrow keys, or PowerPoint remote. Alternatively, select Use timings .

Final Words
Whether you need to loop a PowerPoint presentation manually or automatically for an event or to create a self-running slideshow that loops PPT, you can use the instructions mentioned above to customize the settings for your slide deck according to need.
Like this article? Please share
Microsoft PowerPoint, PowerPoint Tools Filed under PowerPoint Tutorials
Related Articles

Filed under PowerPoint Tutorials • September 9th, 2024
How to Convert Illustrator to PowerPoint
Extract powerful graphics and integrate them into your presentation slides. Learn how to convert Illustrator to PowerPoint with this guide.

How to Convert InDesign to PowerPoint
Repurpose your indd files as presentations by learning how to convert InDesign to PowerPoint. Step-by-step guide for Windows and Mac users.

Filed under PowerPoint Tutorials • July 30th, 2024
How to Add a Timer to PowerPoint
Generate expectations for your presentation introductions by mastering how to add a timer to PowerPoint. Step-by-step instructions + templates.
Leave a Reply

How To Loop A PowerPoint Slideshow? Detailed Guide
Microsoft PowerPoint is a popular application for creating and delivering presentations. PowerPoint has numerous options for adding flair and taking your presentations a notch higher, such as the ability to incorporate YouTube videos, GIFs, etc. If you loop your PowerPoint, every slide will display for a predetermined duration. After the presentation, it will automatically resume from the beginning.
But the question is, can you use the looping function effectively? When used correctly, this feature eliminates the need for presenters to click a mouse or computer key to transition between slides. This feature is easy to set up and customize.

Today’s guide will teach us how to loop a PowerPoint slideshow and various tips and tricks for effective looping.
Why You Need to Loop Your Slideshow in PowerPoint?
Before learning how to loop a PowerPoint slideshow, let’s see under what scenarios one needs to loop their slideshow:
One helpful tool in PowerPoint that helps to guarantee a smooth and continuous presentation experience is the ability to loop your slideshow. The constant playback draws and maintains audience attention whether you present information in automated presentations, build interactive kiosks, or show information in exhibitions. Looping makes it possible to communicate information effectively and reinforce essential points for audience members who might join the presentation at different times.
How to Make a PowerPoint Loop?
You can learn how to make a PowerPoint loop through the instructions below. You can use the loop for various events, such as trade exhibitions, information displays, or kiosks.
- Open the PowerPoint presentation that you wish to loop first.
- Go to the Slide Show Tab: The PowerPoint window has several tabs at the top. To access choices relating to presenting your slides, select the “Slide Show” tab.
- Access Setup Show: Several commands and choices are under the “Slide Show” tab. Search for the “Set Up Slide Show” button or menu item in the group labeled “Start Slide Show.” Click on it.
- Display Type: Select “Presented by a speaker (full screen).”
- Preview slides: If you want the slides to play automatically, select “Manually” or enter the desired duration for each slide’s PowerPoint presentation loop timing.
- Enable your presentation to loop indefinitely unless you manually end it by hitting the Escape (‘Esc’) key by enabling this option.
- Click OK: After adjusting these settings to store your options, click the “OK” button.
- Begin Your Loop: Your slides will be set to loop unless you manually stop it by pressing the ‘Esc’ key. To stop it, click “From Beginning” or “From Current Slide” under the “Slide Show” tab to begin your presentation.
How to Loop a PowerPoint SlideShow from Selected Slides
You can choose which slides you want to loop around in PowerPoint. Eliminating manual intervention and maintaining audience interaction can be achieved by carefully choosing which slides to show throughout the presentation. Follow these steps to learn how to loop a PowerPoint slideshow from selected slides:
- Select the “Slide Show” option to start a loop for a particular set of slides. To initiate the loop, click the first slide in the thumbnail pane on the left.
- Click the final slide you wish to add to the loop while holding your keyboard’s “Shift” key. Next, select “Setup Show” and turn on the looping feature.
- Choose the “Custom Show” option and give it a name in the “Set Up Show” dialogue box. Navigate to the “Slide Show” menu and select “Custom Slide Show” to begin your looping presentation from the selected slides.
How to Set Up Auto-Loop for Continuous Playback
Now you know how to loop a slideshow in PowerPoint from selected slides, let us see how you can set up auto-loop for continuous playback:
- Select the Slide Show tab.
- Press the Set Up Slide Show button. You’ll see an options window appear.
- Keep clicking Loop till you reach “Esc.”
Note: Under Show Type, select Presented by a speaker or Browsed by an individual if you want the speaker or individual to continue controlling the presentation and clicking between slides. Clicking “Browsed” at a kiosk checks the Loop until the “Esc” box appears continuously. Moreover, auto-looping may annoy your viewers if your presentation is very repetitive. Use it with discretion and only when it makes sense for your writing subject.
How to Loop A PowerPoint SlideShow Using 2007 Version (older versions).
Use these detailed instructions to loop your slides if you’re using an older version of Microsoft PowerPoint:
- Open your PowerPoint presentation on your 2007 Microsoft PowerPoint .
- Select the tab labeled Slide Show. Select the “Set Up Slide Show” option from the “Set Up” menu.
- Go to the “Show options” section and select “Loop continuously until ‘Esc'” from the dialogue box that appears. Click Ok.
- Select your initial slide from the “Slides” preview side panel. To select your final slide, press and hold Shift.
- Select the tab labeled “Animations.” Turn off “On Mouse Click” and check the “Automatically After” box.
- The “After” box in the “Timing” panel has up and down arrows that you can use to change the time each slide appears. It will automatically loop back to the first slide when your slideshow reaches the last one.
How to Stop or Pause your Slideshow loop at any point.
Learning how to make a PowerPoint loop is of no use if you don’t know how to stop or pause your slideshow loop at any point:
You can use simple keyboard commands to pause or stop your slideshow loop at any time during a PowerPoint presentation. You can manually stop the looping slideshow by hitting the “Esc” key (also known as the Escape key) on your keyboard. It gives presenters a simple and quick option to stop the continuous playback so they can answer queries, have conversations, or go to particular slides that are not playing continuously.
Advanced Techniques for Creating a Seamless Loop in PowerPoint
One of the techniques used for creating a seamless loop in PowerPoint is incorporating videos and GIFs. PowerPoint’s animations, transitions, and triggers can create seamless looping. Here is how:
- Select the video you imported and added to a slide.
- Open the “Animations” tab from the main menu.
- Choose “Play” from the animation gallery’s “Media” section after clicking the “ Add Animation ” button.
- On the right side of the screen, click the “Animation Pane” to open it.
- Right-click the “Play” button and choose “Timing” in the “Animation Pane.”
- Choose “Until End of Slide” or “Until Next Click” as the “Repeat” option in the “Timing” tab.
- Use Triggers to adjust the start and stop times of the video.
Tips and Tricks for Effective Slideshow Looping in PowerPoint
As you can see, creating a PowerPoint loop video couldn’t be easier. It only takes three easy steps to complete. Nonetheless, there are always specific tips you may apply to improve the appeal and attention-grabbingness of your videos.

1. Selecting the Right Video
The length and content of the video are the primary considerations when discussing the “right” video. Therefore, consider the duration of your video when creating a continuous loop.
Yes, longer videos can be more captivating, but they may add to the presentation’s file size and degrade performance. Shorter video clips, however, are less likely to affect performance and can loop more naturally. Regarding the video’s substance, make sure it supports the main idea of your presentation and is pertinent to the subject of your talk. The video aims to increase viewer comprehension and engagement without becoming overbearing or intrusive.
2. Compressing Video Files
Large videos can detract from the overall image of your presentation by making it excessively slow and challenging to share. Therefore, consider using a specialized video compression tool or the built-in PowerPoint compression feature to optimize your presentation by compressing the files. It doesn’t always imply that your presentation will look grainy. Still, it can cause a noticeable quality loss, so keep that in mind when creating the presentation in the first place.
3. Examining the Presentation
Make sure the video loops accurately and smoothly by testing it before you deliver your presentation. Go over the entire presentation, looking for any inconsistent or problematic playback. If you complete your testing on time, you can safely make all the required changes and retest it until the loop video functions as planned.
4. Looping Videos to Create Ambience and Background
You can also use videos that loop to set the mood for your presentation. For instance, a natural setting or a soft animation can produce an aesthetically pleasing and captivating ambiance. Nevertheless, the presentation’s general subject and the background clip are complementary rather than distracting.
To sum up, looping your PowerPoint slideshow is simple. PowerPoint’s “Set Up Slide Show options” allow you to program it to loop indefinitely for a predetermined number of times.
Use transitions carefully, arrange your slides in the correct order, and adhere to best practices while making your looping PowerPoint to give it a polished, professional appearance. Your looping slideshow can operate flawlessly at events without supervision with the correct settings.
How to Loop Slideshow In Powerpoint?
To loop a slideshow in PowerPoint, go to the “Slide Show” tab, select “Set Up Slide Show,” check “Loop continuously until ‘Esc’,” and click “OK.”
Can I loop specific slides within my PowerPoint presentation?
Yes, PowerPoint allows you to loop specific slides.
How do I stop or pause a looped slideshow in PowerPoint?
To interrupt a looped slideshow at any point, simply press the “Esc” key on your keyboard.
Can I customize the duration of each slide in a looped PowerPoint presentation?
Yes, you can control the timing of each slide by adjusting the slide transition settings, allowing for a tailored and dynamic looping experience.
Can SlideUpLift templates be used in looped presentations?
Yes, SlideUpLift provides PowerPoint templates that are compatible with looped presentations. These professionally designed templates can enhance the visual appeal of your slides, making your looped presentation more engaging and impactful.
Table Of Content
Related presentations.

Business Review PowerPoint Template

Business Case PowerPoint Deck Template

Project Status Review Deck Template
Related posts from the same category.

18 Mar, 2024 | SlideUpLift
How To Merge Two PowerPoint Presentations? Detailed Guide On How To Combine PowerPoints
If you work in sales, customer service, or as an independent consultant, you may need to utilize the same templates in many of your presentations. Of course, you don’t want

3 Feb, 2023 | SlideUpLift
How To Make A Graph In PowerPoint?
Do you need help communicating data effectively in your presentations? Data visualization is an essential tool in today's world as it helps represent complex data sets in a simple and

8 Dec, 2022 | SlideUpLift
How To Use Transparency In PowerPoint?
PowerPoint's user-friendly design has made it a top choice among many, one of the key contributing factors to its immense popularity. Microsoft PowerPoint is one of the most used software

25 Jan, 2018 | SlideUpLift
How To Reduce PowerPoint File Size & Compress A PowerPoint
This PowerPoint tutorial explains how to reduce powerpoint file size. Business presentations contain a huge number of slides filled with graphics, audios, videos, etc. making it bulky and taxing on

19 Apr, 2023 | SlideUpLift
How To Add PowerPoint Borders To Your Presentation
Adding borders in PowerPoint is an essential aspect of presentation design as it helps to enhance the visual appeal of your slides. Customizing your presentation with borders can be a

16 Apr, 2020 | SlideUpLift
How To Broadcast A PowerPoint Presentation Online | PowerPoint Tutorial
In this blog, you will learn a powerful PowerPoint feature of how to remotely present a PowerPoint online. In today's time, countless people need to work from home and maintain

19 Aug, 2020 | SlideUpLift
How To Add Speaker Notes in PowerPoint
Are you tired of fumbling through your PowerPoint presentations, struggling to remember every single point you wanted to make? Or are you concerned you'll forget a crucial detail during a

How To Add Annotations In PowerPoint | How To Add Comments In PowerPoint
This PowerPoint tutorial explains how to add annotations in PowerPoint in simple steps. Often presentations are used in business discussions and interactive sessions. During the discussion, you might need to

26 Dec, 2022 | SlideUpLift
How to make a table in PowerPoint?
Tables are an essential element of any presentation, as they allow you to organize and present data in a clear and concise manner. Whether you're creating a business presentation, a

17 Jan, 2023 | SlideUpLift
How to Share PowerPoint Presentations on Microsoft Teams?
In today's digital age, remote work and virtual meetings have become the norm. As a result, knowing how to communicate effectively and collaborate with your team, regardless of location, is
Related Tags And Categories
Forgot Password?
Privacy Overview
Necessary cookies are absolutely essential for the website to function properly. This category only includes cookies that ensures basic functionalities and security features of the website. These cookies do not store any personal information
Any cookies that may not be particularly necessary for the website to function and is used specifically to collect user personal data via ads, other embedded contents are termed as non-necessary cookies. It is mandatory to procure user consent prior to running these cookies on your website.
How to Make a PowerPoint Loop? (Step-By-Step Guide)
Have you ever come across a presentation that just keeps on going? It’s mesmerizing, isn’t it? Imagine being able to create a looping presentation within PowerPoint that is sure to captivate your audience.

Well, you can! In this article, we’re going to walk you through the steps of creating your own looping presentation, from understanding what a looping presentation is to setting the slide show to loop.
We’ll also provide some helpful tips and troubleshooting advice so you can make a successful loop and achieve the presentation of your dreams.
Short Answer
Then go to the “Transitions” tab, and check the box next to “On Mouse Click” and select “Loop Until Stopped”.
What is a Looping Presentation?
A looping presentation in PowerPoint is a great way to capture and keep viewers engaged and entertained.
This type of presentation allows you to create a continuous cycle of animations that play one after the other.
Its an effective way to deliver information in an efficient and engaging way.
Looping presentations can be used for a variety of purposes, such as to educate, explain processes, or just to entertain.
In addition, looping presentations can be used to create a sense of atmosphere.
For example, if youre creating a presentation about a beach, you can use looping to show a continuous cycle of images of the beach.
This can help create an immersive experience for viewers, and help keep their attention on your presentation.
Finally, looping presentations can also be used to create a visual aid while someone is speaking.
What Do You Need to Make a PowerPoint Loop?
To make a PowerPoint loop, you will need a few basic tools.
First, you will need a computer running Microsoft PowerPoint.
Additionally, you may want to have access to a few other tools, such as an image editing program or a video editing program, depending on what type of presentation you are creating.
Finally, you will need to have a basic understanding of how to use PowerPoint and how to use the Animation Pane.
You can add images, text, and videos to your slides to make them more engaging.
How to Use the Animation Pane
To make a PowerPoint loop, the first step is to access the Animation Pane in the ribbon.
To do this, first select the object that you want to animate.
To add additional animations to the sequence, select another object and repeat the steps.
When you have created the sequence of animations that you want to loop, you can adjust the timing of the animations by selecting the animation in the Animation Pane and then clicking on the Timing tab.
Once you are happy with the sequence of animations, you can set the presentation to loop in the Slide Show settings.
Then, check the box next to the Loop Until Stopped option.
This will ensure that your looping presentation will continue to play until the viewer manually stops it.
Creating a Sequence of Animations
To make a PowerPoint loop, you’ll need to use the Animation Pane to create a sequence of animations that will play one after the other.
You can also set the duration of each animation, and the order in which they will play.
This will create a more dynamic presentation that will keep the audience engaged.
In the Slide Show tab, you can choose to loop the presentation continuously, or after a certain number of slides.
By following these simple steps, you can easily create an engaging, looping PowerPoint presentation.
Setting the Slide Show to Loop
Once you have created your sequence of animations within the Animation Pane, you will need to set the presentation to loop in the Slide Show settings.
Once you have enabled this feature, your presentation will loop continuously until you press the Escape key.
You can then enter the number of times you would like the presentation to loop in the Loop for box.
Once you have enabled the looping feature, you can click the OK button in the Set Up Slide Show window to save your settings.
This will ensure that your audience stays engaged and entertained for the duration of your presentation.
Tips for Creating a Successful Loop
2. Make sure your animations are timed correctly. If the animations are too fast or too slow, the presentation wont be as effective.
5. Use transitions to create a seamless loop. Transitions can help create a smooth transition between slides and make the presentation feel more cohesive.
Troubleshooting Common Issues
When it comes to troubleshooting common issues with a PowerPoint loop, there are a few tips to keep in mind.
First, make sure that the animation sequence is set up correctly.
Additionally, always double check the Slide Show settings to make sure the presentation is set to loop.
This will reset the show and should allow the loop to play correctly.
Finally, if the loop isn’t working as expected, try reloading the presentation.
Final Thoughts
With the steps outlined above, you can easily make a looping PowerPoint presentation by using the Animation Pane to create a sequence of animations and setting the Slide Show to loop.
Keep in mind the tips for creating a successful loop and troubleshoot any common issues you may encounter.
James Wilson has extensive knowledge in the information technology industry.His second love, besides dealing with computers, is smart home technology. He is continually updating information to better comprehend this problem and has a deep understanding of the apartment’s support system.
Recent Posts
How to Play PowerPoint Slides Automatically

The PowerPoint autoplay feature is an amazing tool for creating slideshows that advance automatically . Self-running PowerPoint presentations are great for leaving in kiosks or publicity booths. You can even show them with recordings or voiceovers to make sure your audience gets the most out of it.
Forget worrying about clicking from slide to slide, today we will teach you how to play PowerPoint slides automatically!

We’ll cover the following topics:
Why should you use the automatic slideshow PowerPoint feature?
- How to Play PowerPoint Slides Automatically without Clicking - Option 1
- How to play slideshow in PowerPoint automatically - Option 2
How to make PowerPoint slides advance automatically with audio
- How to loop slides in PowerPoint
- Check out some experts’ best practices for Automatic slideshows in PowerPoint
How to automatically play PowerPoint presentations across devices
How to play powerpoint slides automatically without clicking on mac, elevate your presentation with professional designs: try 24slides today.
Using the automatic slideshow feature has many benefits . The main one is its practicality; it is a tool you can set up in advance so that you eliminate the need for ongoing attention and your presentation flow is better.
And that’s not all, you can even add voiceovers, recordings, and even laser pointer gestures to make sure your audience gets the most out of your presentation.
It becomes particularly beneficial in the following scenarios:
- Business presentations: An automatically progressing presentation can help you focus on your content without worrying about going slide by slide, which can often be distracting and disrupt your rhythm.
- Publicity: Self-running presentations can be great if you use them for publicity. For example, if you have a kiosk or booth, a self-running PowerPoint slideshow can help you reach more people without them having to speak one-on-one with a salesperson.
- E-Learning: In e-learning modules or training presentations, autoplay can help learners progress through the material while listening to your lecture. However, they can also pause and rewind to go to the specific section they wish to revisit.
- Photo or Video Slideshows: Autoplay is commonly used in photo or video slideshows for events such as weddings or birthdays. It can serve as a background loop, or you can present it at a special moment along with music or narration to enhance the experience.
How to Play PowerPoint Slides Automatically without Clicking: Option 1
There are a couple of different ways to make your slides run automatically, and we'll go over both options. This first option is for when you need a really customized presentation: personalized timing for each slide, voiceovers, or laser pointer gestures .
If this is your case, go ahead with this section, but if you’d like something a bit simpler, proceed to Option 2.
- The first step is to go to the Slide Show Tab. On the Set Up group, you’ll find the Set Up Slide Show option to start customizing your self-running presentation.

- Once the Set Up Show Window opens, deselect the Presented by a speaker option, as it refers to manually advancing your slides, either by clicking or using keys. Next, consider several options for the automatic slideshow:
- Browsed by an individual is one choice for creating a self-running PowerPoint presentation. This option permits you to deliver your slides within a window, as opposed to the typical full-screen mode. Ensure that the Use timings, if present option is enabled for this feature to function correctly.
- Another option is the Browsed at a kiosk , which allows you to run a full-screen, continuous slideshow automatically. This option locks in both the looping and timing settings, ensuring that your slideshow will continue until you press the ESC key.
If you’re not sure what option is the best for you, remember you can always select manually the loop and timings option . Try different options with these and try out how your presentation will look like with the different settings.
- The next step is to set your timings. This means defining how much time you want your PowerPoint slideshow to spend on each slide before automatically advancing to the next one.
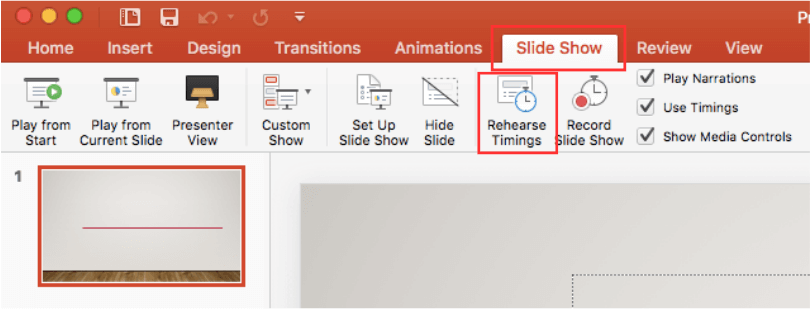
To set your timings, click on Rehearse Timings , which will allow you to go through your presentation slide by slide, and it’ll record how much time you spend on each one.

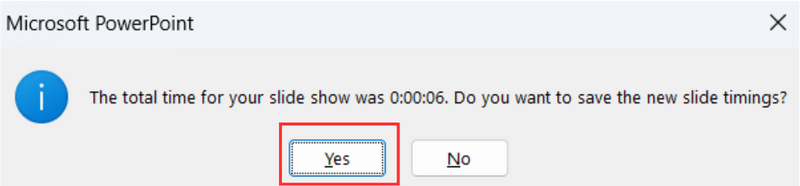
After you finish going through all your slides, a message will pop up to save your timings. Click yes so you can save the time spent on each slide.
How to play slideshow in PowerPoint automatically: Option 2
Let’s take a look at a different way of using the PowerPoint autoplay feature. This option is great if you’re looking for something simple and just want your slides to advance automatically at regular intervals.
- First, open the Transitions Tab and locate the Timing Group.

- Go to the After option and manually add how much time you want to spend on each of your slides.

Select the Apply To All option so all your slides have the same timing.
You can also deselect the On Mouse Click option, depending on whether you want to be able to advance your slides by clicking or not.
Adding audio to your automatic PowerPoint is a fantastic feature to enhance your professional image and communicate your content without needing to be present. Let’s take a look at how to do it:
- Go to the Slide Show Tab and select Record Slide Show . Choose Record From Beginning to start with the first slide.
When the fullscreen opens, you will be able to see your first slide along with several options:
- Start in Settings (1) and select the tools you will be using. You have the option to use a microphone, or you can record yourself talking on camera. Choose your microphone and/or camera for recording.
- Next (2) , decide whether you want to have the microphone or camera you selected turned on. You can also choose to have a video preview.
- When you're ready to start recording, go to the top left corner (3) and click Record to start, Stop to pause, and Replay to review how it went.
- Once you finish with a slide, click on the right arrow (4) to move to the next slide.
- If you have Speaker notes in your slides, you can view them in (5) while you record.
- In the Pens and Markers section (6) , you can draw on the screen and make any annotations you want.
- Finally, the Clear option (7) allows you to clear existing recordings on the current slide or on all slides if you are unsatisfied and want to redo your recording.
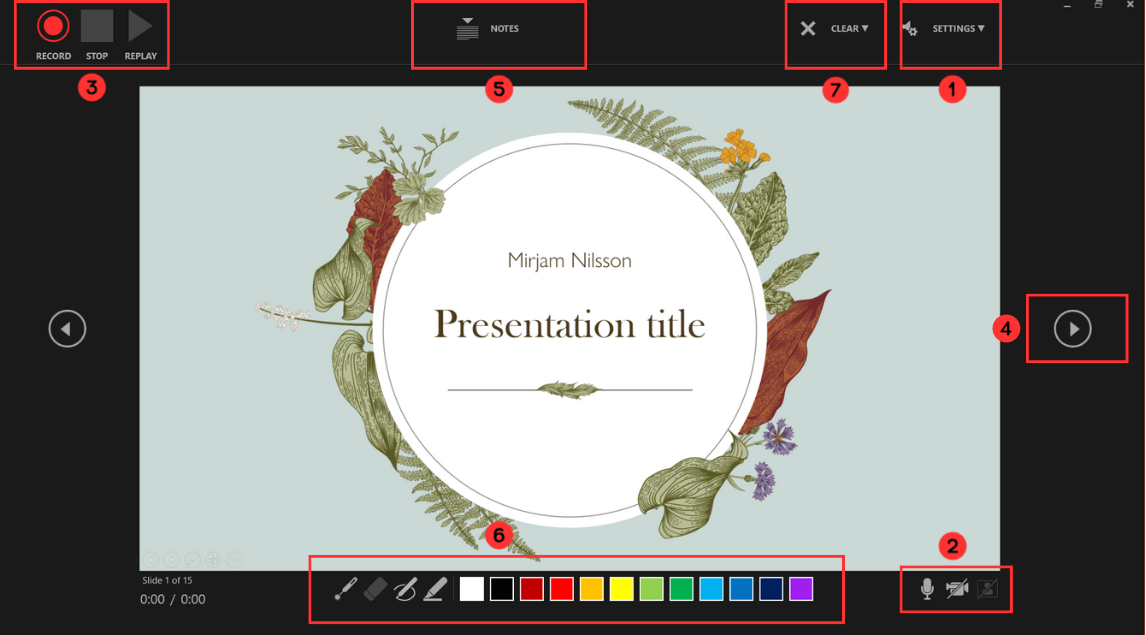
- Now, to review what you've recorded, go to Set Up and make sure Play Narrations and Use Timings are checked. Then, click on From Beginning to start the presentation.
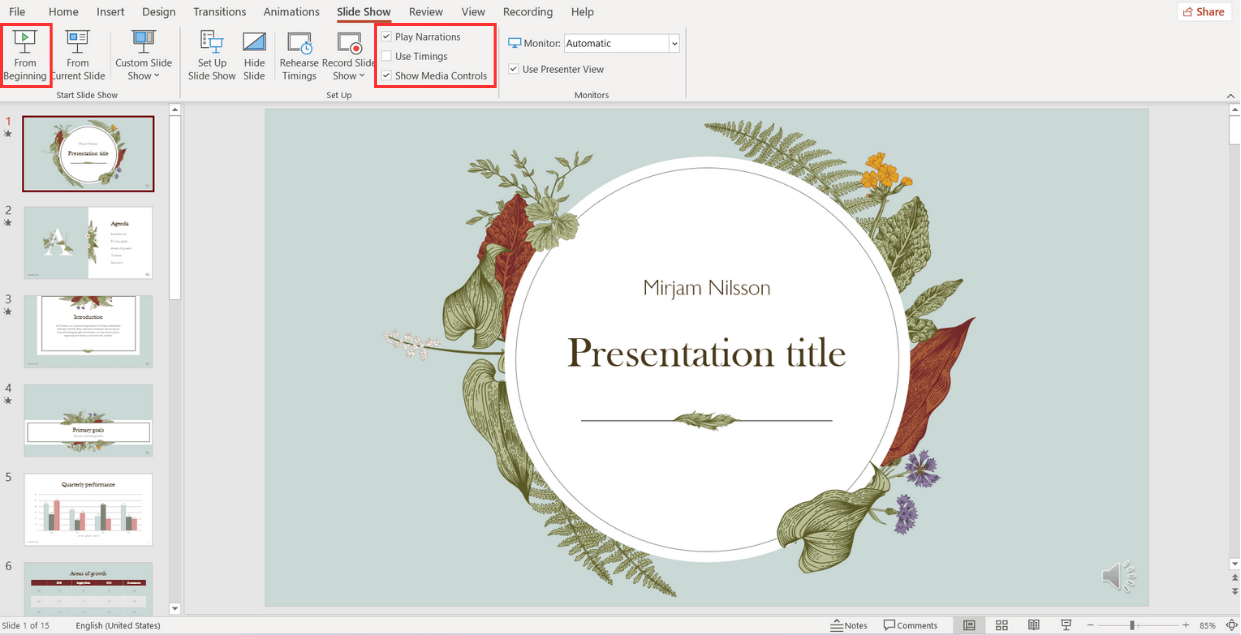
How to loop slides in PowerPoint
If you want to learn how to loop your slides in PowerPoint, follow these steps:
- Go to the Slide Show tab and select Set Up Slide Show .

- When the Set Up Show window appears, go to the Show options group and tick the Loop continuously until ‘Esc’ option. Don’t forget to click OK to apply the new setup!
And all done! Now, your presentation will loop until you select ‘Esc’.
Check out some expert best practices for Automatic slideshows in PowerPoint
Now that you've learned how to make a PowerPoint slideshow run automatically, we'll give you the secrets to make your presentation stand out . Let's take a look at some insights from our expert designers .
Avoid too much text
Remember that your time per slide is limited , so it is important not to put too much text since your audience will not have time to read it. Try to express your message in the shortest possible text, and if necessary, revise and rewrite it as many times as necessary to synthesize it.
Limit interactive elements
Limit or avoid interactive elements such as hyperlinks that rely on user interaction since they may not function in PowerPoint autoplay mode.
However, if you want your audience or potential clients to take a specific action, consider using a QR code. Only make sure to leave the slide displayed for enough time for them to use it.
Practice, practice, practice
Keep in mind that your speech needs to fit perfectly with your timings for each slide. So, practicing your presentation multiple times is crucial to ensure a seamless and synchronized delivery.
First, go to the Slide Show Tab and select Set Up Slide Show .
- When the Set Up Show Window opens, deselect the Presented by a speaker option and consider the following options to set up your automatic slideshow:
- Browsed by an individual : With this option, you can show your slides within a window instead of the typical full-screen mode. Make sure that the Use timings, if present option is selected.
- Another option is the Browsed at a kiosk : This option locks in both the looping and timing settings, ensuring that your slideshow will continue until you press the ESC key.
- Next, you need to set your timings. This involves determining the duration for each slide so that it advances automatically to the next one when you have finished presenting it.
To set your timings, go to the Slide Show Tab and click on Rehearse Timings.
A window will open, allowing you to go through your presentation slide by slide, and it will record how much time you spend on each one . As you progress through each slide, it will confirm the time spent, and you can either agree or choose to re-record.
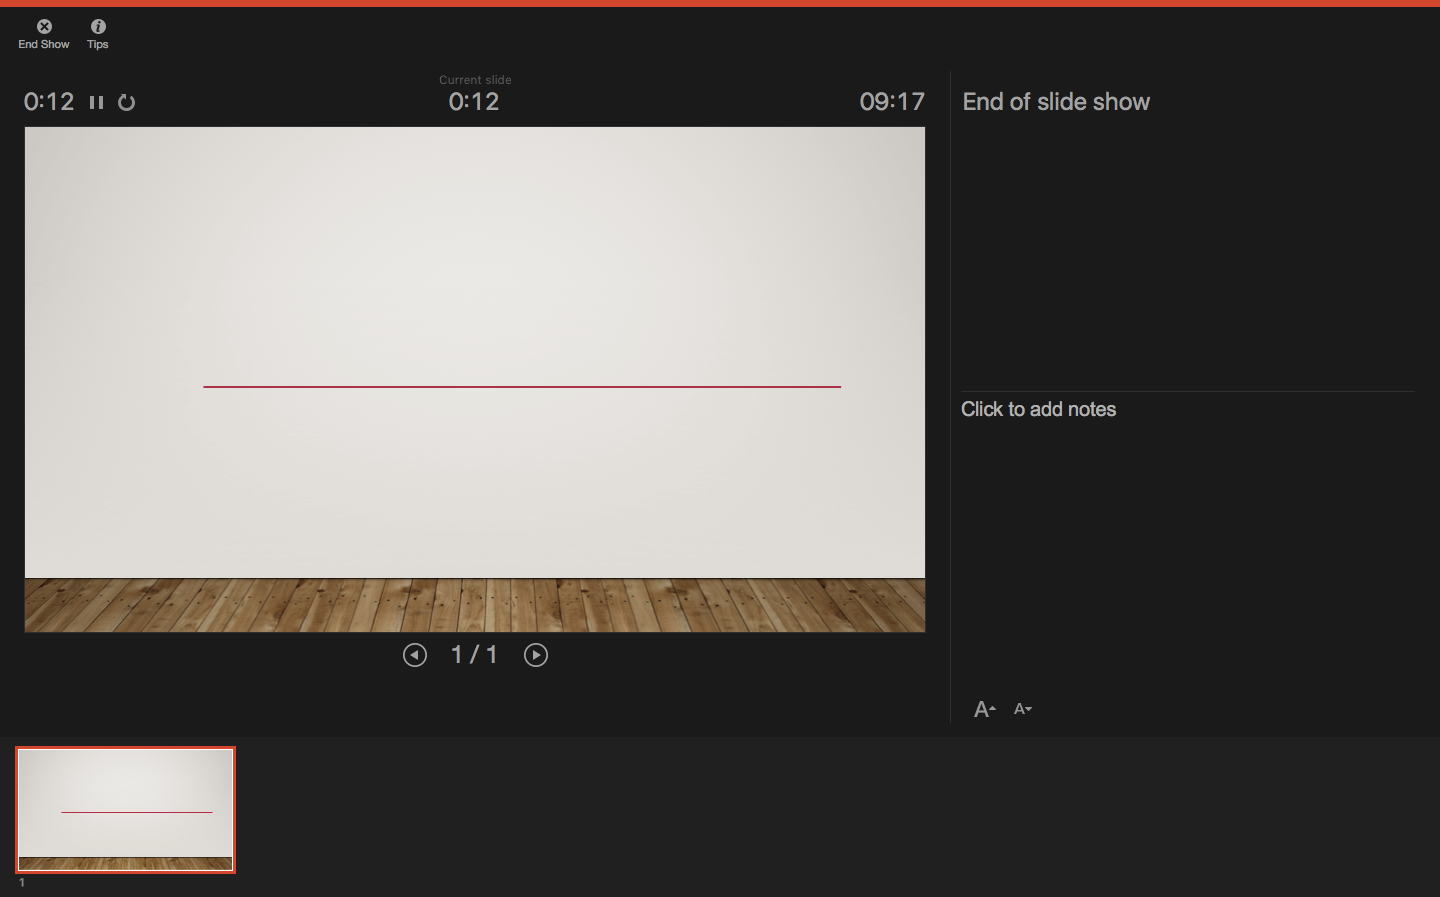
After you finish going through all your slides, a message will pop up to save your timings . Click yes so you can save the time spent on each slide.
If you’re looking to create a presentation that truly wows your audience, you might want to consider professional design assistance for your PowerPoint. Lucky for you, we’re here to help. Check out the fantastic designs 24Slides can help you create today!

You might also like
- How to Add a Timer to Your Powerpoint Presentations
- 11 Time-Saving PowerPoint Hacks For Creating Quick Presentations
- How To Loop a PowerPoint Presentation
- Add a PowerPoint Real-Time Clock to Your Presentations
Create professional presentations online
Other people also read

Tutorial: Save your PowerPoint as a Video
How To Convert Google Slides To PowerPoint and Vice Versa

How To Add Animations To PowerPoint
How to Loop a PowerPoint Presentation?

Table of Contents
PowerPoint presentations are a go-to for clear and informative content delivery. But what if you want your presentation to run on repeat, like at a kiosk or digital sign? The good news is, that PowerPoint has a built-in feature to loop your slideshow, ensuring your message stays on display without interruption.
This blog post will guide you through the simple steps to set your presentation on a loop, keeping your audience engaged and informed around the clock.
What is PowerPoint Looping?
Normally, in a PowerPoint presentation, you have to manually move from one slide to the next by pressing keys on the keyboard or clicking buttons on a mouse or presentation remote.
However, when you enable looping in PowerPoint, the presentation progresses automatically from one slide to the next without requiring manual input. This eliminates the need for the presenter to interact with the computer or mouse during the presentation.
With PowerPoint looping, you can also set each slide to display automatically for a specified duration, determined by you. Once the preset time elapses, the next slide seamlessly appears. Additionally, upon reaching the final slide, the slideshow automatically starts over from the beginning.
Why Do You Need to Loop Your Slideshow in PowerPoint?
There are several reasons why you might want to loop your slideshow in PowerPoint:
- Unattended Presentations: Looping is ideal for situations where the presentation runs without a presenter. This could be at a kiosk, trade show booth, or in a waiting room. Looping ensures the information is continuously displayed for viewers to come and go as they please.
- Automated Playback: Looping allows for a hands-off presentation experience. Once started, the presentation progresses automatically, freeing you up to greet attendees or answer questions.
- Self-Paced Learning: Looping can be useful for self-paced learning environments. Viewers can revisit slides or take breaks without needing someone to control the flow.
- Continuous Engagement: Looping keeps the audience engaged with a constant stream of information. This can be beneficial for displaying menus, directions, or other ongoing updates.
Create presentation slides with AI in Seconds in Google Slides
10M+ Installs
Works with Google Slides

How to Make a PowerPoint Presentation loop?
Ready to loop your presentation? Here’s how it’s done:
Step 1: Open your PowerPoint and head over to the “Slide Show” tab.
Step 2: Click the button that says “Set Up Slide Show.” A new window will pop up.
Step 3: Under “Show options,” find the magic checkbox that says “Loop continuously until ‘Esc’.” Check that box to make your presentation run on repeat.
Step 4: Want to control how long each slide shows? Look for the option “Automatically advance slides” and check it. Then, use the up and down arrows to set the display time for each slide.
Step 5: Once you’re happy with the settings, click “OK” to save them.
Step 6: Time to loop! Go back to the “Slide Show” tab and click “From Beginning” (or “From Start”). Your presentation will start playing and keep going until you press the “Esc” key.
How To Loop a PowerPoint SlideShow from Selected Slides?
PowerPoint lets you loop a customized selection of slides, creating engaging presentations that run unattended. This eliminates the need for manual slide changes while maintaining audience interest. Here’s how to loop specific slides:
Step 1: Select Slides: In the Slide Sorter view, hold “Shift” and click the first and last slides you want to loop.
Step 2: Enable Looping: Go to the “Slide Show” tab and click “Set Up Show.” Check the box for “Loop continuously until ‘Esc'” and choose “Show slides” from the dropdown menu. Select “From” and enter the slide number where your loop should begin.
Step 3: Create Custom Show (Optional): For easier access, name your looped sequence as a “Custom Show” within the “Set Up Show” dialog.
Step 4: Start Looping: Navigate back to the “Slide Show” tab and choose “Custom Slide Show” to launch your looped presentation.
Closing Thoughts
Looping your PowerPoint presentation is a simple yet powerful technique that unlocks a variety of use cases. By following these steps, you can ensure your message runs continuously, keeping your audience informed and engaged, whether it’s at a kiosk, trade show booth, waiting room, or any other scenario that demands unattended playback.
- No design skills required
- 3 presentations/month free
- Don’t need to learn a new software

Frequently Asked Questions
My presentation has animations and transitions. will they loop as well.
Absolutely! When you loop your presentation, animations and transitions will also repeat continuously, regardless of the looping method you choose.
Does looping affect animation timing?
There’s a possibility. Looping might affect how your animations play out, especially if they have specific timings set. To avoid any hiccups, be sure to thoroughly test your looped presentation. This will ensure your animations sync smoothly with the slide transitions.
Can I loop specific slides in my PowerPoint presentation?
Yes! PowerPoint gives you the flexibility to loop a selected group of slides, creating engaging presentations that run unattended.
How do I stop or pause a looped slideshow in PowerPoint?
Need a break? Simply press the “Esc” key on your keyboard to interrupt the looped slideshow at any time.
Can I customize the duration of each slide in a looped PowerPoint presentation?
Yes, you can! PowerPoint allows you to adjust the slide transition settings for each slide. This lets you control how long each slide displays, creating a tailored and dynamic looping experience.
Related Posts

How to Create Agenda Slide in Powerpoint?
Ever feel like your PowerPoint presentations could benefit from a strong start? Using an agenda slide at the beginning can be a helpful way to take charge of your presentation from the get-go.

How to End a PowerPoint Presentation?
Picture this: The lights dim, the room hushes, and your presentation is in full swing. But as you near the end, there’s a sense of anticipation, not boredom. Your audience leans in, hungry for that final spark to ignite their minds. That’s the power of a captivating conclusion. The secret sauce that leaves your audience […]

7X7 Rule in PPT (PowerPoint Presentation)
Captivate your audience with impactful presentations using the 7×7 rule. This design principle encourages a clear and focused approach by limiting slides to a mere 7 lines of text, each containing a maximum of 7 words. By adhering to this format, you can craft presentations that are not only easy to digest but also leave a lasting impression on your viewers. Let’s jump into the article and find out how it works.
Save Time and Effortlessly Create Presentations with SlidesAI

Unsupported browser
This site was designed for modern browsers and tested with Internet Explorer version 10 and later.
It may not look or work correctly on your browser.
- Presentations
How to Loop a PowerPoint Presentation in 60 Seconds
- Bahasa Indonesia
- العربية/عربي
Have you ever wanted your PowerPoint file to keep on looping and showing the slides over and over? Maybe it's set up on display for visitors and you want to keep it repeating. In today's tutorial, let's learn how to loop a PowerPoint presentation.
We also have a helpful compliment to this tutorial. Download our FREE eBook: The Complete Guide to Making Great Presentations . Grab it now before you read on.

How to Loop Your PowerPoint Presentations (Quickly)

Note : Watch this short tutorial screencast or follow the quick steps below, that compliment this video.
1. Select Your PowerPoint Slides to Loop
You can make PowerPoint run on a continuous loop easily. I'll click on the Transitions tab here on PowerPoint's ribbon and make sure all of my slides are selected here on the left side.

Note : In this tutorial we use the Simplicity PowerPoint Template . You can find more great PPT presentation templates on GraphicRiver or in our Ultimate Guide to the Best Microsoft PowerPoint Templates .
2. Set Timing of PowerPoint Presentation Loop
Let's start off by selecting how much time we want each slide to show. Let's tick the After box here and I'll put in 2 seconds , just to test the feature out. Now the slides will advance on their own, each after two seconds. Let's turn on the loop feature now.

3. Set Up the Slide Show Loop in PowerPoint
I'll click the Slide Show tab on the ribbon, and then click Set Up Slide Show. The option that we need to turn on is Loop continuously until 'Esc' . Let's go ahead and press OK to turn that feature on. Let's check to make sure this is all working.

Finishing Up!
I'll click on the first slide in my presentation, and then start the presentation in the lower right corner. After a couple of seconds, it goes to the next slide, then the next slide, and then back to the beginning. So you can see this is working perfectly. The loop feature works great to keep your presentation rolling continuously.
Discover More Great PowerPoint Tutorials
Learn more in our PowerPoint tutorials and quick video tutorials on Envato Tuts+. We have an assortment of PowerPoint material to help you make a great presentation:
Make Great Presentations ( Free PDF eBook Download )
We also have the perfect compliment to this tutorial, which will walk you through the complete presentation process. Learn how to write your presentation, design it like a pro, and prepare it to present powerfully.

Download our new eBook: The Complete Guide to Making Great Presentations . It's available for free with a subscription to the Tuts+ Business Newsletter.

- Customer Help
- X (Twitter)
How to Loop a PowerPoint Presentation: A Simple Step-by-Step Guide
Looping a PowerPoint presentation so it repeats continuously can be very useful for trade shows, lobbies, or other situations where you want your presentation to play on recur. The process is relatively simple and only takes a few steps. In this article, we’ll walk through how to set up a Microsoft PowerPoint presentation to loop automatically. First we’ll discuss why you may want a looping presentation. Then we’ll cover the steps to configure the loop in PowerPoint.
How to Loop a PowerPoint Presentation
Follow these easy steps to set up a looping PowerPoint slideshow in Microsoft PowerPoint 2022 or 365:

- It will repeat, moving from the first slide to the last slide and back to the beginning until you press “Esc”.
With a few mouse clicks, you can easily set up continuous looping for your PowerPoint slide – perfect for unattended presenting.
Tips for How to Loop Slides in PowerPoint
When creating a looping PowerPoint slideshow, keep these tips in mind:
- Time your slides appropriately – 10-20 seconds per slide is ideal. Don’t make them too short or long.
- Use transitions like fades and wipes. Avoid distracting transitions that could disrupt the flow.
- Focus on visuals more than heavy text, which viewers won’t fully read.
- Create a narrative flow from beginning to end, even if it loops.
- Check audio levels if using sound to ensure proper volume.
- Consider adding interactive elements like hyperlinks.
- Preview and test thoroughly to polish schedule and flow.
- Adjust slide timing in the “Set Up Slide Show” menu if needed.
Properly schedule and planning your looping PowerPoint ppt helps create a professional, seamless presentation. See Microsoft’s guide for more tips on perfecting your looping slideshow.
Alternatives to Looping a PowerPoint Presentation
If you want more flexibility than simply looping your PowerPoint slideshow, consider these other approaches:
- Export as a video – Convert your PowerPoint to an MP4 video file that can play on replay on a TV or monitor. This gives you more options for transitions and schedule plan.
- Use presentation software like ProShow Producer to create self-running shows with advanced options for automatically displaying slides.
- Make a self-running PowerPoint using animations and slide timers to move from one slide to the next automatically without needing to loop it.
- Use digital signage platforms like BrightSign to remotely publish and manage your looping presentation.
- Connect your computer to a TV or large monitor and use a media player to display your Presentation on recur.
- Have a presenter show the PowerPoint live if available during your event, rather than pre-recording it.
Consider your specific display needs and venue setup to pick the best approach for looping your content.
In summary, looping your PowerPoint slideshow is an easy way to create a repeating, unattended presentation. Using the “Set Up Slide Show options” in PowerPoint, you can set it to endlessly loop for a certain number of times.
When creating your looping PowerPoint, properly schedule your slides, use transitions wisely, and follow best practices for a professional, polished look. With the right settings, your looping slideshow can run smoothly at events without supervision.
While PowerPoint makes looping easy, you can also export to video or use other software for more advanced presentation options. In the end, looping gives an effortless way to display your slides on continuous repeat.
We encourage you to try looping your next PowerPoint. By following this guide, you’ll be ready to create a seamless, professional replay slideshow for your event.
You must be logged in to post a comment.
- Business articles (22)
- Google Slides (57)
- Keynote (27)
- PowerPoint (83)
- Support (2)
How to Make Your Presentations Loop in PowerPoint

Your changes have been saved
Email is sent
Email has already been sent
Please verify your email address.
You’ve reached your account maximum for followed topics.
Microsoft PowerPoint is already a useful productivity tool to deliver slideshows and presentations, but it's even more versatile than you may realize. PowerPoint offers the functionality for your presentations to loop so that the slideshow restarts right after it ends. Read on to find out how to enable this in your project and why such a feature can be immensely useful in a variety of situations.
How to Loop Your Presentations in PowerPoint
As you make your presentation the way you would like for it to be seen, setting your slideshow up to loop is relatively easy. It mainly involves changing a single setting within PowerPoint.
1. Within the Ribbon at the top of the window, click Slide Show . This will take you to a menu of options for displaying and presenting your slide show.

2. Click Set Up Slide Show in the middle Set Up section. This button will open up a pop-up window of detailed, advanced settings for your presentation.

3. In the Set Up Show window, click Loop continuously until 'Esc' in the Show options section.
4. Click OK to apply the change.
5. Preview the presentation using the From Beginning or From Current Slide buttons in the Ribbon to see that the looping works.
As you might notice when you preview the slide show, enabling the setting is only half the battle. While the presentation does return to the first slide after displaying the last one, the slides don't progress on their own. If you want your slides to loop automatically, you'll need to set up transitions between each slide.
How to Automatically Loop Your PowerPoint Slides
1. Select the slide you want to apply the transition to if you haven't already.
2. Click Transitions within the Ribbon. This opens up a variety of options for adding animations when changing from one slide to the next.

3. Choose one of the transitions in the Transition to This Slide section to use with this slide. There are a variety of transition options available, from the subtle to the flashy.
While you can play with each transition to your heart's content, it's not necessarily required; you can stick with the default None option or a simple Fade if you'd like.
4. Navigate to the Timing section on the right-hand side of the Ribbon. In order to automate your loop, you'll need to specify when each slide moves to the next one.

5. Under the Advance Slide heading, click the After: checkbox to enable it.
6. Set a time (in minutes or seconds) by entering one in the text box (currently reading "00:00.00") or the arrow buttons nearby.
7. Repeat this process for the other slides you have. Alternatively, you can click Apply To All to set the current slide's transition settings across every slide in the presentation.
8. When you've applied the transitions you want, you can preview the presentation again using the From Beginning or From Current Slide buttons in the Slide Show tab of the Ribbon.
In the preview, you'll see that the slides now transition automatically, and the loop now works without any further interaction. When you need to leave the presentation, press the Esc (escape) key to return to the normal PowerPoint window.
Why Would You Want to Loop a PowerPoint Presentation?
There are a number of reasons why you'd want to run a PowerPoint presentation in a loop, and thus multiple ways this functionality is useful.
You can create a continuous carousel of photos for gatherings with family and friends or a relaxing slideshow of beaches at the end of a stressful day. You can use it to display important information, like rules or schedules, at conferences or conventions.
The integration with the regular transition timings also allows for specialized use cases where you may need to have certain slides displayed longer than others. For example, it can be used to show menu pricing at a kiosk or on a food truck or to offer some entertainment to people waiting in a long line.
Keep Your PowerPoint Presentation Skills in the Loop
Learning how to loop PowerPoint presentations is just one of the many lesser-noticed features of the widely-used tool that can take your slideshows to a new level.
Functionality like this helps keep PowerPoint a versatile, popular program built for a variety of presenting needs. Now, it's time to put these features to work for you.
- Productivity
- Microsoft PowerPoint
- Microsoft 365
- Everything to Know About iPhone 16
- Preorder Apple AirPods 4 Now
Loop a PowerPoint Slide Show
- Brock University
What to Know
- In PowerPoint, go to Slide Show > Set Up Slide Show > Browsed at a Kiosk (Full Screen ) > OK .
- Set the time each slide appears on the screen by selecting Slide Show > Rehearse Timings on the first slide.
- Use Next to move to the next slide and Pause to pause recording, or type a length of time in the Slide Time box.
This article explains how to loop a PowerPoint slideshow in PowerPoint 2019, PowerPoint 2016, PowerPoint 2013, PowerPoint 2010, PowerPoint for Microsoft 365, PowerPoint 2019 for Mac, PowerPoint 2016 for Mac, and PowerPoint for Mac 2011.
How to Create a Self-Running PowerPoint Slideshow
PowerPoint slideshows are not always used by a live presenter. Slideshows set to loop continuously can run unattended in a booth or kiosk. You can even save a slideshow as a video to share.
To create a continuously looping presentation, you need to set it up and record slide timings.
To run the slideshow unattended, set timings for slide transitions and animations to run automatically.
How to Set Up the Presentation
Open the PowerPoint presentation you want to loop continuously.
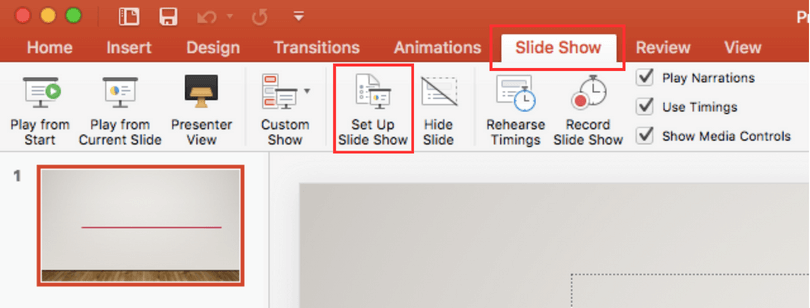
Go to Slide Show .
Select Set Up Slide Show . The Set Up Show dialog box opens.
Select Browsed at a Kiosk (Full Screen) . This enables the presentation to loop continuously until the viewer presses Esc .
Select OK .
How to Rehearse and Record Timings
To ensure that your automated presentation is the right length, record timings to set the amount of time each slide appears on the screen.
PowerPoint for Mac does not have the rehearsal option. Instead, go to Transitions , choose the transition you want to use, set the duration you want, and select Apply to All .
Go to the first slide of the presentation.
Select Rehearse Timings . The slideshow starts and records the time spent on the slide. The time appears in the Slide Time box on the Recording toolbar.
Select Next on the Recording toolbar when you want to move to the next slide.
Select Pause any time you want to pause or resume recording.
Type a length of time in the Slide Time box if you want to display a slide for a specific amount of time.
Select Repeat if you want to restart the recording time for the current slide only.
Select Close when you're done recording.
You'll be asked if you want to save the new slide timings. Select Yes to save the slide timings at the end of the presentation.
If you have a microphone (built-in or external), record a voiceover on your PowerPoint presentation that plays as the slideshow loops continuously.
Get the Latest Tech News Delivered Every Day
- 9 PowerPoint Presentation Tips for Students
- Control Placement in PowerPoint Slides by Nudging Objects
- Tips for Memorial PowerPoint Presentations
- Slide Layouts in PowerPoint
- Edit Music, Sound, or Other Audio Settings in PowerPoint
- How to Hide and Unhide a Slide in PowerPoint
- Play Sound and PowerPoint Animation at the Same Time
- How to Use Speaker Notes in PowerPoint
- How to Put a GIF in PowerPoint
- The 10 Most Common PowerPoint Terms
- How to Do a Voiceover on PowerPoint
- Copy Slides to Another PowerPoint Presentation
- How to Add Page Numbers in PowerPoint
- How to Add PowerPoint Slides Into a Word Document
- What Is Microsoft PowerPoint?
- Use This PowerPoint Template for a Multiple Choice Quiz

Nice to meet you.
Enter your email to receive our weekly G2 Tea newsletter with the hottest marketing news, trends, and expert opinions.
How to Loop a PowerPoint in 5 Simple Steps
May 17, 2024

Public speaking isn’t for everyone.
And if you’re anything like me, the idea of standing up in front of a group of people and presenting a PowerPoint can seem like its own circle of hell.
There are ways to make the nightmare less scary, and that includes putting the PowerPoint on loop, so you can sit back, relax, and let your slides present themselves. If you’re unsure how to loop a PowerPoint, it can be done in just a few steps.
Let’s break it down!
Looping a PowerPoint
There’s a lot you can do in PowerPoint to make it more exciting, like inserting a GIF and embedding a YouTube video . When it comes to looping your PowerPoint, each slide will automatically be shown for a specific amount of time, and when the entire presentation ends, it’ll start from the beginning completely on its own.
How to loop a PowerPoint:
- Click Slide Show from the top menu.
- Click Set Up Slide Show.
- Click Loop continuously.
- Select all slides and click Transitions from the top menu.
- Uncheck “On Mouse Click” and adjust timing.
For more in-depth instructions on how to loop your PowerPoint, including screenshots, keep reading!

1. Click Slide Show
From your PowerPoint presentation, select Slide Show from the top menu.

2. Click Set Up Slide Show
From the Slide Show list of options, click Set Up Slide Show .

3. Click Loop continuously
Under “Show options”, choose Loop continuously until ‘Esc’ , then click OK.

4. Select all slides and click Transitions
Next, select all of your slides from the left-hand menu. Then, click Transitions from the top menu.

5. Uncheck “On Mouse Click” and adjust the timing
Uncheck the box that says “On Mouse Click.” This will allow the slides to move from one to the other without you having to click the mouse.
Then, adjust how long you would like each slide to display before automatically moving onto the next slide. In the below example, each slide will show for two minutes before moving on.

Create an infinite loop
Some things are better on loop, like when your favorite band releases a new song and you can’t wait to memorize the lyrics. Or, a PowerPoint that you’d like to restart completely on its own while you’re busy doing more important things, like listening to that song.
If you frequently use PowerPoint at work, share your thoughts about the popular presentation and leave a review!

Mara Calvello is a Content Marketing Manager at G2. She received her Bachelor of Arts degree from Elmhurst College (now Elmhurst University). Mara works on our G2 Tea newsletter , while also writing content to support categories on artificial intelligence, natural language understanding (NLU), AI code generation, synthetic data , and more. In her spare time, she's out exploring with her rescue dog Zeke or enjoying a good book.
Recommended Articles

Productivity
How to Format a Subscript or Superscript in PowerPoint
You’re here because you need to make a superscript (or subscript) in PowerPoint.
by Maddie Rehayem

The Simple Solution to Creating PowerPoint Borders
Boundaries are healthy, both in relationships and in PowerPoints.
by Grace Pinegar

How to Sign Out of Gmail (On Desktop and iPhone App)
No one likes being snooped on.
by Mara Calvello

Get this exclusive AI content editing guide.
By downloading this guide, you are also subscribing to the weekly G2 Tea newsletter to receive marketing news and trends. You can learn more about G2's privacy policy here .
- PRO Courses Guides New Tech Help Pro Expert Videos About wikiHow Pro Upgrade Sign In
- EDIT Edit this Article
- EXPLORE Tech Help Pro About Us Random Article Quizzes Request a New Article Community Dashboard This Or That Game Happiness Hub Popular Categories Arts and Entertainment Artwork Books Movies Computers and Electronics Computers Phone Skills Technology Hacks Health Men's Health Mental Health Women's Health Relationships Dating Love Relationship Issues Hobbies and Crafts Crafts Drawing Games Education & Communication Communication Skills Personal Development Studying Personal Care and Style Fashion Hair Care Personal Hygiene Youth Personal Care School Stuff Dating All Categories Arts and Entertainment Finance and Business Home and Garden Relationship Quizzes Cars & Other Vehicles Food and Entertaining Personal Care and Style Sports and Fitness Computers and Electronics Health Pets and Animals Travel Education & Communication Hobbies and Crafts Philosophy and Religion Work World Family Life Holidays and Traditions Relationships Youth
- Browse Articles
- Learn Something New
- Quizzes Hot
- Happiness Hub
- This Or That Game
- Train Your Brain
- Explore More
- Support wikiHow
- About wikiHow
- Log in / Sign up
- Computers and Electronics
- Presentation Software
- PowerPoint Presentations
How to Loop in PowerPoint on PC or Mac
Last Updated: November 24, 2021
This article was co-authored by wikiHow Staff . Our trained team of editors and researchers validate articles for accuracy and comprehensiveness. wikiHow's Content Management Team carefully monitors the work from our editorial staff to ensure that each article is backed by trusted research and meets our high quality standards. This article has been viewed 22,955 times. Learn more...
Want to create a self-running PowerPoint presentation for your kiosk, trade-show, performance, or event? It's easy to adjust the options in PowerPoint to make your presentation play back in a continuous loop. When you turn on Slide Show Loop in PowerPoint, your presentation will start over again every time it ends, which means you won't need to be present to restart it. This wikiHow article will show you how to make your PowerPoint presentation loop indefinitely.

- If you haven't yet created your presentation, make one and save it as a file before proceeding.

- For example, to change the amount of time spent on each slide to 10 seconds, you would change the 00:00.00 text box to read 00:10.00 .

- Click File in the upper-left side of the window.
- Click Save As on the left side of the page.
- Double-click the This PC tab in the middle of the page.
- Click the "Save as type" drop-down box, then click PowerPoint Show in the drop-down menu.
- Enter a file name and select a save location.
- Click Save .

- If you're unhappy with a slide's display time, you can change the time by opening the presentation, going back to the Transitions tab, and adjusting the "After" text box.
- You can open a Show file in PowerPoint by dragging the Show file into the PowerPoint window.

- For example, to change the amount of time spent on each slide to 10 seconds, you would type 10.00 into the text box.

- Click File .
- Click Save As... .
- Click the "Format" drop-down box.
- Click PowerPoint Show (.ppsx) in the drop-down menu.

Expert Q&A
- If you use Microsoft Office 365, you can save your PowerPoint presentation as a video instead of a PowerPoint file and then loop the video using your computer's video player's "Loop" function. Thanks Helpful 0 Not Helpful 0

You Might Also Like

- ↑ https://support.office.com/en-us/article/create-a-self-running-presentation-57fc41ae-f36a-4fb5-94a3-52d5bc466037#OfficeVersion=Mac
- ↑ https://support.office.com/en-us/article/file-formats-for-saving-and-exporting-presentations-in-powerpoint-for-mac-a4b76110-697c-496f-b9c5-e318f2bd6eba
About This Article

- Send fan mail to authors
Is this article up to date?

Featured Articles

Trending Articles

Watch Articles

- Terms of Use
- Privacy Policy
- Do Not Sell or Share My Info
- Not Selling Info
wikiHow Tech Help Pro:
Level up your tech skills and stay ahead of the curve
How to: Effortlessly Create PowerPoint Looping Presentations
Looping presentations in PowerPoint can be a game-changer for those needing to display information continuously. It’s a straightforward process: Set up your slides, head to the ‘Slide Show’ tab, click on ‘Set Up Slide Show’, tick the ‘Loop continuously until ‘Esc” box, and voila – your presentation is set to loop.
After completing this action, your PowerPoint presentation will automatically replay from the beginning once it reaches the end. This is particularly useful for presentations displayed at kiosks, trade shows, or in waiting areas, ensuring your audience doesn’t miss any content.
Introduction
Ever been to a trade show and noticed how some booths have screens with presentations that seem to run endlessly? That’s the magic of looping presentations, a feature that’s built into PowerPoint but not always used to its fullest potential.
Having a presentation loop can serve multiple purposes. For those in marketing, it means your message is continually being broadcast without the need for manual intervention. For educators, it could mean students have more time to absorb information. And for those in the corporate world, it ensures that important data is consistently on display for stakeholders and team members to see.
Looping presentations are not only efficient but also incredibly simple to set up in PowerPoint. Knowing how to do this is a great skill to have in your back pocket. Whether you’re prepping for an exhibition, setting up a self-running informational display, or just want to make sure your audience can see your presentation in its entirety, no matter when they walk in the room – this article is for you.
PowerPoint Looping Presentations Tutorial
Before diving into the steps, it’s important to understand what we’re aiming to achieve. By the end of this tutorial, your PowerPoint presentation will be capable of running on its own, looping endlessly until manually stopped. It’s an excellent way to keep an audience engaged with your content, even if you’re not actively presenting.
Step 1: Open your PowerPoint presentation
Open the PowerPoint presentation you wish to loop.
When you have your presentation open, you’ll want to ensure that all your slides are in the correct order and that any timings, animations, or transitions are set up as you want them. This is crucial because once the presentation starts looping, these aspects will play over and over again.
Step 2: Click on the ‘Slide Show’ tab
Navigate to the ‘Slide Show’ tab located on the ribbon at the top of PowerPoint.
The ‘Slide Show’ tab is where you’ll find all the settings related to the presentation’s display. It’s your control center for how the presentation will run.
Step 3: Select ‘Set Up Slide Show’
Click on the ‘Set Up Slide Show’ button within the ‘Slide Show’ tab.
This action opens a new window with various options for running your presentation. It’s like the backstage area before a performance, where you make all the necessary tweaks.
Step 4: Choose ‘Loop continuously until ‘Esc”
In the ‘Set Up Show’ window, check the box that says ‘Loop continuously until ‘Esc”.
This is the setting that transforms your presentation from a one-time run-through to an endlessly looping display. It’s the crucial step in ensuring your content gets maximum exposure.
Step 5: Save your settings
Click ‘OK’ to save your settings and close the ‘Set Up Show’ window.
Once you’ve clicked ‘OK’, your presentation is all set to loop. You can start the slideshow to test it out and see your handiwork in action.
| Benefit | Explanation |
|---|---|
| Continuous Display | Having a looping presentation means your content is always on show, which is excellent for situations where you have a constant flow of viewers who are viewing at different times. |
| Time-Saving | Instead of manually restarting the presentation, it does the work for you, allowing you to focus on other tasks or engage with your audience. |
| Professionalism | A looping presentation adds a layer of professionalism to your setup, demonstrating forethought and technical savvy. |
Continuous Display
By looping your PowerPoint presentation, you ensure that no matter when someone walks by or starts watching, they’ll be able to see the whole thing. It’s ideal for environments where you have a rotating audience, like at conferences or informational booths.
Time-Saving
Once set up, you don’t need to stick around to restart the presentation. It loops automatically, freeing you up to do other things – like interacting with your audience or managing other aspects of your event or meeting.
Professionalism
A self-running, looping presentation can make a statement about your professionalism. It shows that you’ve put thought into how your information is presented and that you’re adept at using technology to enhance your message.
| Drawback | Explanation |
|---|---|
| Can be Ignored | If viewers know the presentation loops, they may pay less attention, thinking they can catch the information later. |
| Technical Issues | If there’s a hiccup with the device or software, the looping can stop, which might go unnoticed if you’re not present. |
| Repetitiveness | The same information cycling over and over can become repetitive for those in the vicinity for an extended period. |
Can be Ignored
When people know a presentation is looping, they might not give it their full attention, thinking they’ll catch the next round. This could mean your message isn’t hitting home as strongly as you’d like.
Technical Issues
Technology isn’t foolproof. If your PowerPoint or the device it’s running on experiences issues, your looping presentation could grind to a halt – often at the most inopportune times.
Repetitiveness
For those who are around for a while, a looping presentation can become like that one song on the radio that’s played too often – annoying. Finding the balance between informative and overkill is key.
Additional Information
PowerPoint’s looping feature might seem simple, but it can be incredibly powerful when used correctly. Think about the last time you walked past a looping video or presentation – it probably caught your eye, at least for a moment. That’s the draw of a looping display; it’s always there, always ready to catch the attention of someone new.
One tip is to ensure your presentation is designed with looping in mind. This means avoiding content that could become quickly dated or using language that implies the presentation is a one-time event. Instead, use evergreen content that will be relevant no matter how many times it’s viewed.
Another consideration is the length of your presentation. If it’s too long, viewers might not stick around for the whole loop, missing out on key information. If it’s too short, it could become annoyingly repetitive. Striking the right balance is essential.
When setting up your looping presentation, think about the context in which it will be viewed. Is it in a noisy trade show hall? Consider adding subtitles or visual cues that can be understood without sound. Is it in a quiet waiting area? Maybe a softer, less attention-grabbing approach is needed.
Remember, the goal of a PowerPoint looping presentation is to inform and engage, not to overwhelm or annoy. Keep your audience’s experience in mind, and you’ll be sure to create a looping presentation that adds value and captures interest.
- Open your PowerPoint presentation.
- Click on the ‘Slide Show’ tab.
- Select ‘Set Up Slide Show’.
- Choose ‘Loop continuously until ‘Esc”.
- Save your settings.
Frequently Asked Questions
What if my presentation has videos.
If your presentation contains videos, make sure they’re set to play automatically and check the box ‘Rewind after playing’ to ensure they loop with the rest of the slides.
Can I loop just one section of my presentation?
Yes, you can loop specific sections by using custom shows within PowerPoint. It’s a bit more complex but entirely possible.
Will looping work if I have transition timings set up?
Absolutely. Your slides will transition according to the timings you’ve set, looping back to the beginning when they reach the end.
How do I stop a looping presentation?
Simply press the ‘Esc’ key, and the presentation will stop looping and exit the slideshow view.
Can I loop a presentation on a Mac?
Yes, the steps are the same for PowerPoint on a Mac as they are for Windows.
Mastering PowerPoint looping presentations is like unlocking a new level in your presentation skills. It’s not just about making your slides look pretty; it’s about ensuring your message is always out there, always engaging, and always ready to inform. Whether you’re in the boardroom, at a booth, or in an educational setting, a well-crafted looping PowerPoint can make all the difference.
So go ahead, give it a try – your audience will thank you for it. And remember, the best presentations are those that not only deliver information but do so in a way that’s seamless and ever-present, just like the perfect loop.

Matthew Burleigh has been writing tech tutorials since 2008. His writing has appeared on dozens of different websites and been read over 50 million times.
After receiving his Bachelor’s and Master’s degrees in Computer Science he spent several years working in IT management for small businesses. However, he now works full time writing content online and creating websites.
His main writing topics include iPhones, Microsoft Office, Google Apps, Android, and Photoshop, but he has also written about many other tech topics as well.
Read his full bio here.
Share this:
Join our free newsletter.
Featured guides and deals
You may opt out at any time. Read our Privacy Policy
Related posts:
- How to Loop a Slideshow on Powerpoint 2013
- How to Set Time for Slides in Powerpoint
- How to Use Looping Backgrounds in PowerPoint: A Step-by-Step Guide
- How to Save Powerpoint as PDF with Notes
- Can I Convert My Powerpoint to Google Slides?
- How to Drag Slides From One PowerPoint to Another: A Step-by-Step Guide
- How to Unhide a Slide in Powerpoint 2013
- How to Add Page Numbers in Powerpoint 2010
- How to Make a Powerpoint Slide Vertical in Powerpoint 2013
- How to Delete a Slide in Powerpoint 2010
- How to Hide a Slide in Powerpoint 2010
- How to Create a PowerPoint Presentation Step by Step: 2024 Guide
- How to Delete Multiple Slides in Google Slides
- How to Insert Slides from Another Presentation in Powerpoint 2010
- How to Change the Font on All Slides in Google Slides
- How to Rotate a Slide in PowerPoint: A Step-by-Step Guide
- How to End Powerpoint on Last Slide in Powerpoint 2010
- How to Run Powerpoint in Kiosk Mode: A Step-by-Step Guide
- How to Change Line Spacing in Powerpoint for Every Slide at Once
- How to Loop a Video on iPhone: A Step-by-Step Guide
How to Loop a Powerpoint Office 365 Slideshow
For typical Powerpoint presentations that you just show to one person, you likely aren’t concerned with what happens when the slideshow is over.
But some situations call for a slideshow to continue playing for an extended period of time.
This means that you will need to learn how to loop a Powerpoint Office 365 presentation so that it plays continuously.
How to Do a Powerpoint for Office 365 Slideshow Loop
- Open the presentation.
- Select the Slide Show tab.
- Choose Set Up Slide Show .
- Check the Loop continuously until Esc box.
- Click the top slide, hold down Shift , then click the last slide.
- Choose the Transitions tab.
- Uncheck On Mouse Click , check After , then set a duration for each slide.
Our guide continues below with more information on how to loop a Powerpoint Office 365 presentation, including pictures of these steps.
Sometimes you will create a presentation in Powerpoint that is going to be shown someplace where it will be unattended.
This could be at a trade show, in an office, or anywhere else where there is a TV or computer screen.
Constantly having to restart that slideshow yourself is often impractical, and would be tedious even if you were physically able to attend to it.
Fortunately, it’s possible to create a slideshow loop in Powerpoint so that the presentation will play continuously once it has concluded.
Our guide below will show you how to create a Powerpoint slideshow loop in Microsoft Powerpoint for Office 365.
Documents with pictures often need some adjustments before they look their best. You can find out more with our how to flip an image in Word article .
How to Make a Powerpoint Slideshow Loop (Guide with Pictures)
The steps in this article were performed in the Microsoft Powerpoint for Office 365 version of the application, but will work in most other versions of the application as well.
Note that the presentation can loop on its own, but you may need to adjust any screensaver or hibernation settings on your computer so that the screen will remain on.
Step 1: Open your slideshow in Powerpoint.
Step 2: click the slide show tab at the top of the window..

Step 3: Click the Set Up Slide Show button.

Step 4: Check the box to the left of Loop continuously until Esc , then click OK .

Step 5: Click your first slide in the column at the left side of the window, then hold down the Shift key, scroll down and click the last slide.

Step 6: Select the Transitions tab at the top of the window.

Step 7: Click the box to the left of On Mouse Click to remove the check mark, check the box to the left of After , then choose the amount of time to display each slide.

I have set my slideshow to display each slide for 5 seconds in the image above.
You can start your slideshow at any time by pressing the F5 key on your keyboard.
You can stop the slideshow by pressing the Esc key on your keyboard.
You should now know how to loop a Powerpoint Office 365 presentation so that it continuously plays on repeat until you press the Esc key on your keyboard to terminate it.
Find out how to change your slide size in Powerpoint if you need a different orientation or slide dimensions for your presentation.

Matt Jacobs has been working as an IT consultant for small businesses since receiving his Master’s degree in 2003. While he still does some consulting work, his primary focus now is on creating technology support content for SupportYourTech.com.
His work can be found on many websites and focuses on topics such as Microsoft Office, Apple devices, Android devices, Photoshop, and more.
Share this:
- Click to share on Twitter (Opens in new window)
- Click to share on Facebook (Opens in new window)
Related Posts
- How to Rotate a Powerpoint Slide Presentation
- How to Mirror Image in PPT Files (An Easy 6 Step Guide)
- How to Change Slide Size in Powerpoint 2016
- How to Do a Powerpoint Google Slides Presentation Conversion
- How to Add a Hyperlink on Google Slides
- Can You Print a Google Slide?
- How to Make Google Slides Vertical (5 Quick Steps)
- How to Save a Picture to Your Computer from Powerpoint for Office 365
- How to Stop Hiding a Slide in Google Slides
- How to Skip a Slide in Google Slides
- How to Make Columns in Word Office 365
- How to Make Text Vertical in Google Docs
- How to Set Google Docs Background Image
- Can You Download Google Slides Files?
- How to Save a Single Slide as a Picture in Google Slides
- How to Change Page Color in Word for Office 365 (An Easy 4 Step Guide)
- How to Get the Excel 365 Developer Tab in Microsoft Excel for Office Today
- How to Not Print Comments in Word (An Easy 5 Step Guide)
- How to Double Space in Word Office 365
- How to Bring an Image to the Front in Google Slides
Get Our Free Newsletter
How-to guides and tech deals
You may opt out at any time. Read our Privacy Policy
- Frequently Asked Questions (FAQ)
How to Loop a PowerPoint Presentation
Setting up a PowerPoint slideshow to loop continuously is easy:
- Switch to the Slide Show Ribbon tab.
- Click on Set Up Slide Show .
- Tick the Loop continuously until 'Esc' checkbox.

By default, PowerPoint advances to the next slide only when a mouse click occurs. If you want your slideshow to advance automatically, follow the steps below:
- Select all slides in the navigation pane.
- Switch to the Transitions tab in the Ribbon.
- In the Timing group under Advance Slide tick the checkbox next to After:
- Enter the duration you want each slide to display.

- May 7, 2018
About ShapeChef

Blog Categories
- Slides and Objects
- Video and Audio
- Presentation Tips and Techniques
Copyright © 2024 Wulfsoft. All rights reserved.
- Terms of Service
- Legal Notice
- Insider Previews
- Write for us
- Send news tip
Microsoft Loop preview users can test uploading Word, PowerPoint, Excel, and PDF files
John Callaham Neowin @JCalNEO · Sep 9, 2024 15:10 EDT with 0 comments

Microsoft is adding a new feature to its Loop collaboration service, based on feedback from users who wanted an easier way to share files with others. People who use the preview version of Loop can now directly upload Word, PowerPoint, Excel, and PDF files to workspaces.
In a post on the Microsoft 365 Insider blog , the company stated:
According to your feedback, many of you work across multiple file types (including Loop files) to collaborate with teammates, manage projects, or just collect knowledge around a topic. Now you can bring all these files together in a Loop Workspace using the “Upload a file” option!
Preview Loop users can go to the official Loop site , and open up your workspace. You can then click on the Create New menu and then select the Upload a file option. You can then select the documents or file that are supported by this new feature and then select the Open option. The file or files should then be uploaded to your selected Loop workspace.
Microsoft notes that each file you upload to Loop cannot be more than 250 GB in size. Any files uploaded to Loop are stored in your OneDrive for Business account under My files > Loop > Workspace Uploads . There's no word on when this new file upload feature will become generally available for all Loop users.
Microsoft recently launched a new Loop 2.0 upgrade . It launched a cleaner and simpler user interface. That includes a new navigation menu placed on the left side of the Loop app along with a new Create button on the top left corner of the app that is supposed to make it easier to create new Loop workspaces. There's also a new Meeting Notes tab that makes it simple to access notes from a Microsoft Teams meeting in the Loop app.
- Microsoft loop

Microsoft launches the preview of the Office Add-ins Development Kit for Visual Studio Code

Apple announces iPhone 16 with a camera button, Action Button, and A18 chip
Subscribe to our newsletter, community activity.
- James Earl Jones, dies at 93 in The Media Room
- I DID IT! - I tamed my i7-14700K in Hardware Hangout
- Beware of MyGermany.com in General Discussion
- CSV / QBO to IIF converter. in Software created by our members
- Crew Dragon: Polaris Dawn (research mission) in Science News & Discussion
- What are you playing? in Gamers' Hangout
- Amazon has changed in General Discussion
- Screen won't wake from lock screen Windows 11? in Microsoft (Windows)
- Tesla Cybertruck in The Neobahn
- Acronyms.... in Jokes & Funny Stuff
Software Stories

Adobe Acrobat Reader DC 2024.003.20112

Glary Utilities 6.15.0.19

Audacity 3.6.3

WebSite-Watcher 2024 (24.5)
Trending stories.

Windows 11 KB5041872/KB5038603 downloads get stuck at 8% with 100% CPU, PC lag, slowdown

Mozilla extends Firefox support on unsupported Windows versions to March 2025

Warhammer 40,000: Space Marine 2 Review: Blissfully brutal mayhem for you and your friends

Microsoft 365 Roadmap Weekly: The new Outlook Windows app will support being opened offline
Join the conversation.
Login or Sign Up to read and post a comment.
0 Comments - Add comment
Report comment.
Please enter your reason for reporting this comment.

Here is what has changed in Windows 11
windows 11 24h2 promo
Windows Server 2025 26280 has a new Sept, 15, 2025 expiration date
windows server insider preview
Age of Mythology: Retold Review - Just how you remember it, but better
age of mythology retold
LincStation N1 NAS review: LincPlus is leading the charge to an all SSD NAS
lincplus lincstation n1
Windows 11 27695 includes Windows LAPS improvements
windows 11 insider preview promo
Windows 11 26120.1542 makes a Widgets taskbar change
Windows 11 build 22635.4145 adds hotspots to windows spotlight.
Doogee DK10 review: thin and light AMOLED 5G phone in a rugged package
doogee dk10
Self-hosting: Installing Docker and an Excalidraw container on Linux
self-hosted
Here is how you can use the Samsung Galaxy Ring gesture functions
How to install proprietary codecs in fedora so vlc can play all your videos, samsung phones block sideloading in one ui 6.1.1, here's how to fix it.
oneui 6.1.1
Filter by Keywords
How to Create a Flowchart in PowerPoint (Templates & Examples)
Praburam Srinivasan
Growth Marketing Manager
September 6, 2024
Start using ClickUp today
- Manage all your work in one place
- Collaborate with your team
- Use ClickUp for FREE—forever
You lead the marketing team at a digital agency, and you’ve just rolled out a new onboarding process for eCommerce clients. It’s detailed and involves multiple steps, from initial contact to final approval, with key decision points along the way.
Instead of overwhelming your team with a long explanation or a bullet-point list, you decide to illustrate the process with a flowchart in PowerPoint.
Your process flow diagram is immaculate. The entire process is clearly laid out in neatly labeled steps, and your team members find it simple and easy to understand and implement.
This is the true power of PowerPoint—going beyond slides to create visuals that communicate complex ideas simply.
Did you know that 37.15% of people use PowerPoint for work or personal projects ? Its versatility makes it the ideal tool for creating engaging visuals like flowcharts.
In this guide, we’ll show you how to create effective flowcharts in PowerPoint, helping you turn a complex process into a clear, easy-to-follow diagram.
Let’s start making better flowcharts.
Method 1: The quick and easy way with a SmartArt Flowchart
Method 2: the flexible way with the powerpoint shape library, expert tips for crafting the perfect powerpoint flowchart, limitations of making a flowchart in powerpoint, clickup whiteboards: a superior flowchart solution, clickup mind maps: rapid flowchart creation, quickly create flowcharts with clickup templates, when to use powerpoint vs. clickup for flowcharts, your flowchart journey starts with clickup, 1. what is the best flowchart for powerpoint, 2. is there a flowchart template in powerpoint, 3. does powerpoint have workflow templates, 4. does microsoft have workflow templates, 5. is it easier to create a flowchart in word, excel, or powerpoint.
How to Make a Flowchart in PowerPoint
PowerPoint offers you two main ways to create flowcharts: using a SmartArt Flowchart or working with the PowerPoint Shape Library.
We’ll walk you through both methods so you can choose the one that works best for you.

SmartArt flowchart is a pre-made collection of shapes that serve as basic, fixed diagram templates. It’s ideal for creating a quick and simple diagram but may not be suitable for more complex flowchart options.
Step 1: Open PowerPoint and navigate to the slide where you want to add your diagram

Step 2: Click the Insert tab in the top menu

Step 3: Click SmartArt from the options

Step 4: Hover over Process in the dropdown list to see various flowchart options

Step 5: Click your preferred PowerPoint flowchart template style to insert it into your slide

How to add text and shapes to your flowchart
- To add text to the existing shape in your SmartArt graphic, simply click the center of each shape outline and start typing
- To add new shapes, select the entire SmartArt graphic and click Add Shape in the toolbar’s upper left corner
- To rearrange all the necessary shapes, click and drag them. The connecting arrows will automatically adjust
How to customize your flowchart
- With your SmartArt graphic selected, two new tabs will appear in the toolbar: SmartArt Design and Format (or the Shape Format tab)
- The SmartArt Design tab allows you to change the diagram type, choose from preset color schemes, and add shapes
- The Format tab offers more specific customizations, including individual shape outlines, text color, shape color, text boxes, and font options
Pros and cons of using SmartArt Flowchart
- Quick and easy to use
- Automatically adjusts layout and connections
- Comes with pre-designed styles
- Limited customization options
- Can be restrictive for complex flowcharts
- May not suit all types of flowcharts
While this method requires more manual work, it offers greater flexibility and lets you create standard flowcharts with process and decision boxes.
Here’s how it works:
Step 1: Go to the Insert tab and click Shapes

Step 2: Scroll down to the Flowchart section in the dropdown menu

Step 3: Select the shape you need (e.g., process box, decision diamond, oval shape)
Step 4: Click and drag on your slide to draw the shape

Step 5: Repeat this process to add all the necessary shapes to your flowchart

💡 Pro Tip: To save time when creating flowcharts in PowerPoint, add a shape that you’ll use multiple times, then copy-paste it as needed.
How to add connecting lines
Before you can complete your flowchart, you’ll need to connect the shapes to show the flow of steps or decisions.
Step 1: Return to the Insert tab and click on Shapes

Step 2: In the Lines section, choose the line type you prefer

Step 3: Click and drag from one shape to another to draw a connecting line

Step 4: Repeat this process to connect all your shapes in the proper sequence

How to label your shapes and lines
- To add text to a shape, select it and start typing
- To label connecting lines, you’ll need to use text boxes. Go to Insert > Text Box
- To draw a text box near the line you want to label, click and drag, then type your text
- Double-click any shape or line to open the format shape pane
- Edit visual elements such as colors, line weight, opacity, etc. here
- Experiment with different styles to create a cohesive and visually appealing flowchart
Pros and cons of using the Shape Library
- Greater flexibility and control over design
- Ability to create complex diagrams and customized flowcharts
- Capability to produce any type of flowchart
- More time-consuming than SmartArt
- Requires manual adjustment of connections
- May be overwhelming for beginners
Now that you know how to create a flowchart in PowerPoint, here are some expert tips for you to design effective flowcharts:
- Keep it simple : Aim for 7–10 blocks in a single flowchart
- Go with the flow : Stick to a consistent direction, usually top-to-bottom or left-to-right. It’s how most people naturally read
- Use color wisely : A pop of color can highlight important steps but stay moderate. Stick to 3–4 complementary colors for a clean, professional look
- Connect the dots : Use elbow connectors instead of straight lines when connecting blocks across different levels. It’ll keep things easy to follow in the process
- Line it up : Use PowerPoint’s alignment and distribution tools to keep everything tidy. A well-organized PowerPoint flowchart is easier to understand and more aesthetically pleasing
- Be consistent with symbols : Use the same shapes for actions or decisions throughout your flowchart. It’ll help your audience follow along more quickly
- Keep text short and sweet : Stick to short keywords or phrases in your flowchart blocks. If you need more detail, consider adding notes or a separate document
- Use white space effectively : Leave some breathing room between elements to make it easier to read
While PowerPoint is a versatile tool for creating flowcharts, it does have some limitations:
- Limited connectivity options: PowerPoint’s connectors can be hard to use. Sometimes they don’t attach correctly to other shapes or need manual adjustments when shapes are moved
- Lack of advanced flowchart shapes: While PowerPoint offers basic diagram shapes, it lacks some of the more specialized symbols found in dedicated flowchart software
- Limited collaboration features: Real-time collaboration on PowerPoint flowcharts can be challenging, especially when compared to cloud-based alternatives
- Version control issues: Keeping track of different versions of a flow chart can be problematic, particularly in team environments where multiple people may make changes
- Export limitations: Exporting flowcharts from PowerPoint to other formats or platforms may result in loss of formatting or interactivity
Alternative to PowerPoint for Creating Flowcharts
While PowerPoint remains popular for designing flowcharts, modern workplace productivity tools offer more robust and flexible solutions. These tools are part of a broader trend toward visual project management , which can significantly enhance team collaboration and project clarity.
ClickUp , an all-in-one productivity and project management tool, has some incredibly effective flowchart tools, starting with ClickUp Whiteboards .
ClickUp’s Whiteboards provide a dynamic, collaborative space for creating flowcharts and other visual diagrams. It bridges the gap between ideation and execution by offering a space for teams to visualize concepts and turn them into coordinated actions within the ClickUp platform. Here’s how:
- Intuitive: Add shapes, connect them, and move things around easily
- Real-time collaboration: Work on your flowchart with your team, no matter where they are
- Infinite canvas: Avoid cramming everything onto one PowerPoint slide
- Integration with tasks: Link your flowchart directly to your project tasks
- Version history: Track changes easily and revert if needed
- Free templates: Start with a pre-made diagram and customize these free templates to your needs. Check out this data flow diagram template by ClickUp for a quick start
- Easy sharing: Share your flow chart with a simple link
- Workflow automation: Automate the workflow to simplify your processes

Here are some top features of this tool:
- Drag-and-drop interface: Easily create flowcharts by dragging and dropping shapes and connectors onto a zoomable canvas, allowing for intuitive design and arrangement of flowchart elements
- Customizable elements: You can customize shapes, colors, and text within the flowchart. This flexibility allows you to create visually appealing and informative diagrams that suit your specific needs
- Collaboration tools: Have multiple team members work on the same whiteboard simultaneously, making it easy to brainstorm and refine flowchart ideas in real time
- Integration with tasks: Link the flowchart elements to tasks and convert ideas and steps directly into actionable tasks. This integration helps streamline project management by connecting visual planning with task execution
Also Read: 10 Free Data Flow Diagram Templates
Here’s how to use ClickUp Whiteboards to create superlative flowcharts:
How to add a whiteboard
Step 1: Click the + View button at the top of your desired location in ClickUp

Step 2: Select Whiteboards from the options

Step 3: Choose the pre-designed Flow Chart Template or Start from Scratch

Step 4: And there you have it, your whiteboard is ready!

How to navigate the whiteboard
- Use the hand tool (press the M key) to move around the canvas without selecting objects
- Press the V key to switch back to the cursor for adding and manipulating objects
- Zoom in and out using pinch gestures on a trackpad or the plus and minus icons
How to create flowchart elements
- Use the shape tool in the left toolbar to add various diagram shapes
- Click the connector tool to draw lines between shapes, creating the flow of your diagram
- Add sticky notes for additional information or annotations
- Click any shape or connector to access the object menu for customization options
- Change colors, styles, and sizes to create a visually appealing and clear flowchart
Check out the handy tutorial below for all you need to know about ClickUp Whiteboards.
For quicker, more informal diagram creation, ClickUp Mind Maps offers an intuitive solution. It allows you to visually represent tasks and concepts, making it easier to brainstorm (alone or with a team) and manage and organize information.
Its key functionalities include:
- Visual representation: Illustrate complex projects simply through mind maps
- Editing capabilities: Edit, delete, or reorganize ideas as needed
- Cascading views: Connect related ideas and tasks efficiently in a simplified manner
- Advanced sorting options: Sort ideas and tasks based on various criteria
- Custom colors: Personalize mind maps with colors for better visual distinction
- Collaboration: Share mind maps with team members for easy collaboration
Overall, ClickUp’s Mind Maps enhance productivity by making project management more intuitive and visually engaging.
How to create mind maps
Step 1: Select any space, folder, or a list of tasks you want to visualize

Step 2: Click Add View and select Mind Maps

Step 3: Your work is instantly mapped into a beautiful mind map that you can expand, collapse, or build upon

This feature allows you to transform existing task structures into visual flowcharts with minimal effort, saving time and ensuring consistency across your project documentation.
If you’re new to mind mapping or want to explore different mind mapping software options, ClickUp is a great place to start. Check out these mind map examples for various use cases. And watch the video below to see ClickUp’s Mind Maps in action.
If you don’t want to start from scratch, try out process map templates . They’re a great starting point that you can customize to fit your specific needs.
ClickUp’s Process Flow Chart Template is an excellent option here.

Here are this template’s key features:
- Custom Statuses: Create tasks with Custom Statuses (e.g., Open, Complete), which helps track the progress of each step in the flowchart
- Custom Fields: Categorize tasks and add attributes to manage them efficiently, aiding in the visualization of each step
- Multiple views: Tailor the flowchart to specific processes by using different views, such as the Hiring Flowchart and Getting Started Guide
- Project management features: Track and manage tasks with tagging, nested subtasks, multiple assignees, and priority labels
You can also try ClickUp’s Data Flow Diagram Template to simplify the creation of flowcharts.

You can create tasks with Custom Statuses like Open and Complete to track the progress of each step in the data flow process, making it easier to visualize where each element stands.
The template supports multiple views, including List, Gantt, Workload, and Calendar, enabling you to visualize your data flow in a way that best suits your needs
Using this template, you can simplify the creation of a flowchart by:
- Assessing the project scope and identifying necessary data points
- Drawing the diagram with symbols and arrows to represent entities and data flow visually
- Labeling and organizing the diagram for better readability
- Validating the diagram for accuracy by checking for inconsistencies
Deciding between PowerPoint and ClickUp for flowcharts depends on your specific needs and the features each tool offers. Here’s a quick guide on when to use each:
Use PowerPoint when:
- You need to create a simple flowchart quickly
- Your flowchart is part of a larger PowerPoint presentation
- You’re working in an environment where everyone uses Microsoft Office
- You don’t need real-time collaboration features
Use ClickUp when:
- You’re creating complex, detailed flowcharts
- You need to collaborate with a team in real time
- You want to integrate your flow chart with project management tools
- You need advanced features like version history and smart drawing
- You’re working on a large-scale project with multiple interconnected processes
Feel free to experiment with both to see what works best for you and your team.
The steps and tips in this guide will help you create an effective PowerPoint flowchart that breaks down complex processes, enhances communication, and streamlines decision-making. However, for those seeking more robust, collaborative, and customizable solutions, ClickUp’s Whiteboards and Mind Maps, along with its other advanced features, can enhance your flowchart creation experience.
Remember, the key to a successful flowchart lies not just in the tool you use but also in your ability to distill complex information into clear, visually appealing diagrams.
Whether you choose Microsoft PowerPoint or a more specialized platform, focus on clarity, consistency, and user-friendliness to create flowcharts that do justice to your ideas and processes.
Sign up for ClickUp today!
Frequently Asked Questions (FAQs)
The best flowchart for PowerPoint depends on your specific needs. However, we recommend using SmartArt for flowcharts due to its ease of use and variety of styles.
Yes, PowerPoint offers built-in flowchart templates. You can find them under the SmartArt graphics in the Process category. You might want to explore other options for a wider variety of customizable flowchart templates.
Yes, PowerPoint includes workflow templates. You can find various workflow templates in the SmartArt graphics and download additional templates from online resources.
Yes, Microsoft offers workflow templates across various products. In addition to PowerPoint’s options, you can find workflow templates in Microsoft Visio, which is specifically designed for creating diagrams and flowcharts. However, if you’re looking for more modern and versatile workflow templates, you might want to explore options beyond Microsoft’s offerings.
Most users find that creating a flowchart is generally easier in PowerPoint due to its intuitive interface and the availability of SmartArt graphics specifically designed for flowcharts. Word and Excel also support flowchart creation but may require more manual adjustments.
Questions? Comments? Visit our Help Center for support.
Receive the latest WriteClick Newsletter updates.
Thanks for subscribing to our blog!
Please enter a valid email
- Free training & 24-hour support
- Serious about security & privacy
- 99.99% uptime the last 12 months
Stack Exchange Network
Stack Exchange network consists of 183 Q&A communities including Stack Overflow , the largest, most trusted online community for developers to learn, share their knowledge, and build their careers.
Q&A for work
Connect and share knowledge within a single location that is structured and easy to search.
Loop a selected part of a Powerpoint presentation
I want to create a stream of slide and then loop some of them in order to have a dynamic background when there are some breaks during the presentation.
Any idea how can I do that?
Thank you very much!
- microsoft-powerpoint
- presentations
Instead of making it all one big show, put the loop slides into another presentation, then add a link to it from the main presentation. It needn't be visible ... a 99% transparent rectangle with an action setting would do the job, you just need to know where to click something you can't see in order to launch the loop.
When you're done watching the loop, press ESC to close it and you'll be back in the main presentation.
You must log in to answer this question.
Not the answer you're looking for browse other questions tagged microsoft-powerpoint presentations ..
- The Overflow Blog
- The hidden cost of speed
- The creator of Jenkins discusses CI/CD and balancing business with open source
- Featured on Meta
- Bringing clarity to status tag usage on meta sites
- Join Stack Overflow’s CEO and me for the first Stack IRL Community Event in...
Hot Network Questions
- Acceleration command in proportional navigation?
- Are fuel efficiency charts available for mainstream engines?
- Potential Syscall Note Loophole?
- Question about word (relationship between language and thought)
- Pólya trees counted efficiently
- How does a miner create multiple outputs in a coinbase transaction?
- Unable to understand a proof of the squeeze theorem
- Is this host and 'parasite' interaction feasible?
- How would you read this time change with the given note equivalence?
- Circuit that turns two LEDs off/on depending on switch
- How high does the ocean tide rise every 90 minutes due to the gravitational pull of the space station?
- Parsing and processing "resolvectl statistics" output using awk
- Is a continuous real function with vanishing derivative in all but countably many points constant?
- Has anyone returned from space in a different vehicle from the one they went up in? And if so who was the first?
- The head of a screw is missing on one side of the spigot outdoor
- How to truncate text in latex?
- How to clean a female disconnect spade connector
- What are the steps to write a book?
- Is my magic enough to keep a person without skin alive for a month?
- Why does each leg of my 240V outlet measure 125V to ground, but 217V across the hot wires?
- Humans are forbidden from using complex computers. But what defines a complex computer?
- What is the resulting initiative order when a readied action triggers after a summoned monsters action but before the summoner?
- Finding nearest edge from face center
- Are there many more verbs like 'abflauen' where the basic infinitive 'flauen' does not exist?
- International
- Education Jobs
- Schools directory
- Resources Education Jobs Schools directory News Search

E-Safety - How to Create a Secure, Memorable Password - full lesson
Subject: Computing
Age range: 11-14
Resource type: Lesson (complete)
Last updated
9 September 2024
- Share through email
- Share through twitter
- Share through linkedin
- Share through facebook
- Share through pinterest
Equip your students with the knowledge to create strong and memorable passwords with this engaging lesson plan and PowerPoint presentation. Designed for secondary school students, this resource helps them understand the importance of cybersecurity and teaches them practical techniques to protect their personal information online.
This lesson includes:
Do Now Activity: An engaging starter question to get students thinking about password security. Reading Exposition: Key information on what makes a password secure. Text Analysis: Interactive discussion points for analyzing different types of passwords. Independent Practice: Activities that allow students to create their own secure and memorable passwords. Exit Ticket Questions: Quick assessments to reinforce learning outcomes. This resource, provided as a .pptx PowerPoint file, is ideal for ICT, Computer Science, or Digital Citizenship classes. It aligns with the KS3 and KS4 ICT curriculum and is perfect for both in-class teaching and remote learning environments.
Whether you’re focusing on online safety, password management, or digital literacy, this lesson provides a structured approach to teaching students how to create secure and memorable passwords.
Keywords: create a secure password, memorable password lesson, password management teaching resource, cybersecurity lesson plan, ICT lesson on passwords, online safety education, secondary school, PowerPoint lesson, ICT curriculum.
Tes paid licence How can I reuse this?
Your rating is required to reflect your happiness.
It's good to leave some feedback.
Something went wrong, please try again later.
This resource hasn't been reviewed yet
To ensure quality for our reviews, only customers who have purchased this resource can review it
Report this resource to let us know if it violates our terms and conditions. Our customer service team will review your report and will be in touch.
Not quite what you were looking for? Search by keyword to find the right resource:
IMAGES
VIDEO
COMMENTS
Learn how to set up your slideshow to loop continuously until you press Esc, and how to apply automatic slide transitions for unattended playback. Follow the step-by-step instructions and screenshots to create a looping PowerPoint presentation.
Learn how to set up a PowerPoint presentation to loop or repeat continuously by applying transitions and configuring Slide Show settings. This article also covers how to run a slide show automatically and how to add narration, video and animation.
Learn how to loop a PowerPoint in 3 easy steps and make your presentation go back to the start automatically. Also, learn how to set up a self-running PowerPoint with automatic slide transitions.
Step 3: Choose 'Loop continuously until 'Esc". In the 'Set Up Show' options, check the box for 'Loop continuously until 'Esc". By checking this option, you're telling PowerPoint to keep cycling through your slides until you press the Escape key to stop it.
Learn how to make your PowerPoint presentation play continuously from the beginning after reaching the end. Follow the simple steps to enable looping in the "Set Up Slide Show" menu for Mac or PC.
Once you have the timings set to advance the slides, you can turn on the Loop setting. Go to the Slide Show tab and select Set Up Slide Show in the Set Up section. Under Show type, choose an option to play your presentation. If you plan to present the slideshow or have an individual view the show, choose one of the first two options.
Learn how to loop a PowerPoint presentation from selected slides, manually or automatically, with different settings and options. Find out how to create a self-running slideshow, a break indicator, or a quick review with looping slides.
In this Microsoft PowerPoint tutorial we are going to teach you how to loop a PowerPoint Presentation so your PowerPoint Slideshow will run again and again ...
Learn how to loop your PowerPoint slideshow from selected slides, set up auto-loop for continuous playback, and stop or pause the loop at any point. This blog also covers the techniques to create seamless loops with videos and GIFs in PowerPoint.
Learn how to create a looping presentation in PowerPoint using the Animation Pane and the Slide Show settings. Follow the steps to add animations, adjust timing, and set the loop mode for your slides.
Learn how to use the PowerPoint autoplay feature to create self-running presentations with timings, audio, and loop options. Follow the step-by-step tutorials and tips for different scenarios and devices.
Learn how to set your PowerPoint slideshow on a loop, ensuring your message stays on display without interruption. Follow the simple steps to loop your entire presentation or a custom selection of slides, and adjust the slide transition settings for each slide.
Learn how to make your PowerPoint file run on a continuous loop with transitions and slide show settings. Follow the quick steps and watch the screencast tutorial to see how it works.
Learn how to set up a PowerPoint slideshow to loop continuously for trade shows, lobbies, or other situations. Follow the steps to configure the loop in PowerPoint or explore alternatives like video, presentation software, or digital signage.
3. In the Set Up Show window, click Loop continuously until 'Esc' in the Show options section. 4. Click OK to apply the change. 5. Preview the presentation using the From Beginning or From Current Slide buttons in the Ribbon to see that the looping works.
Learn how to create a self-running PowerPoint slideshow that loops continuously until the viewer presses Esc. Follow the steps to set up the presentation, record slide timings, and add a voiceover if desired.
Learn how to make your PowerPoint presentation loop continuously until you press Esc. Follow the steps to set up slide show, loop options, and transitions for each slide.
Save your PowerPoint as a "Show" file. While you can simply save your changes to the existing PowerPoint presentation by pressing Ctrl+S, saving the PowerPoint as a Show file will launch the slide show as soon as you double-click the file: . Click File in the upper-left side of the window.; Click Save As on the left side of the page.; Double-click the This PC tab in the middle of the page.
Step 4: Choose 'Loop continuously until 'Esc". In the 'Set Up Show' window, check the box that says 'Loop continuously until 'Esc". This is the setting that transforms your presentation from a one-time run-through to an endlessly looping display. It's the crucial step in ensuring your content gets maximum exposure.
Open the presentation. Select the Slide Show tab. Choose Set Up Slide Show. Check the Loop continuously until Esc box. Click OK. Click the top slide, hold down Shift, then click the last slide. Choose the Transitions tab. Uncheck On Mouse Click, check After, then set a duration for each slide. Our guide continues below with more information on ...
Learn how to set up a PowerPoint slideshow to loop continuously until you press Esc. Follow the step-by-step instructions for different versions of PowerPoint and adjust the slide timing and transitions.
Setting up a PowerPoint slideshow to loop continuously is easy: Click on Set Up Slide Show. Tick the Loop continuously until 'Esc' checkbox. By default, PowerPoint advances to the next slide only when a mouse click occurs. If you want your slideshow to advance automatically, follow the steps below: Select all slides in the navigation pane.
Preview Loop users can go to the official Loop site, and open up your workspace.You can then click on the Create New menu and then select the Upload a file option. You can then select the ...
How to Make a Flowchart in PowerPoint. PowerPoint offers you two main ways to create flowcharts: using a SmartArt Flowchart or working with the PowerPoint Shape Library. We'll walk you through both methods so you can choose the one that works best for you. Method 1: The quick and easy way with a SmartArt Flowchart
1. Instead of making it all one big show, put the loop slides into another presentation, then add a link to it from the main presentation. It needn't be visible ... a 99% transparent rectangle with an action setting would do the job, you just need to know where to click something you can't see in order to launch the loop.
Equip your students with the knowledge to create strong and memorable passwords with this engaging lesson plan and PowerPoint presentation. Designed for secondary school students, this resource helps them understand the importance of cybersecurity and teaches them practical techniques to protect their personal information online.