
How to Add Section in PowerPoint? [And Why to Use them!]
By: Author Shrot Katewa
![How to Add Section in PowerPoint? [And Why to Use them!]](https://artofpresentations.com/wp-content/uploads/2021/09/Featured-Image-how-to-add-sections-in-PowerPoint-optimized.jpg "presentation adding section")
When creating a big presentation (of more than 30 or 40 slides), there are times when you end up looking for a slide that you just created, and it takes you quite some time to locate it! If this happens frequently to you, then you’re perhaps better off adding sections to your PowerPoint presentation!
To add sections in PowerPoint, right-click between any two slides in the slide navigation panel. From the options presented, click on “Add Section”. This will add a section to your PowerPoint presentation.
Adding sections and grouping slides in PowerPoint allows you to stay organized when creating and delivering a presentation. It can come in handy especially when you have a long presentation.
But, what more can you do and how exactly can you benefit from using sections in PowerPoint? Let’s find out!
1. How to Group Slides in PowerPoint?
Let’s first start with the basics once again.
Here’s how it works – to begin with, you need to add sections in your presentation. Then, you’ll want to move the slides around so that the correct slide is present in the correct section! If needed, you can then rename the sections to be on top of things.
We’ll learn how to do all these things in the following sections of the article.
But, let’s start with grouping slides in PowerPoint as this is where the whole process begins.
To group a slide in your PowerPoint presentation, you have to select the “ Add section ” option from the dropdown menu of the slide’s navigation bar as mentioned previously.
Here’s a step-by-step process on how to do it –
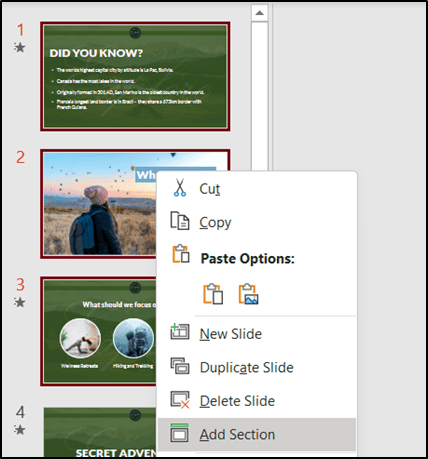
Step-1: “Right-click” on the slide navigation bar
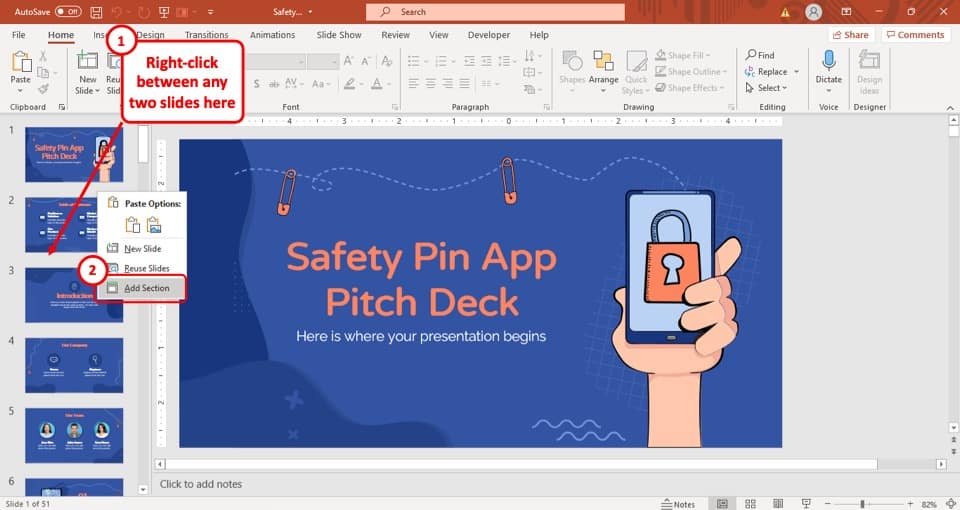
The first step of the process is to “ Right-click ” between any two slides to add a section. Ideally, you should right-click just above the first slide from which you want to group of slides to begin.
When you right-click, you will be presented with a dropdown menu.
Step-2: Click on “Add section”
Now, from the dropdown menu, click on the “ Add sections ” option which is the last option there (as shown in the image in step 1).
Step-3: Give a name to the section
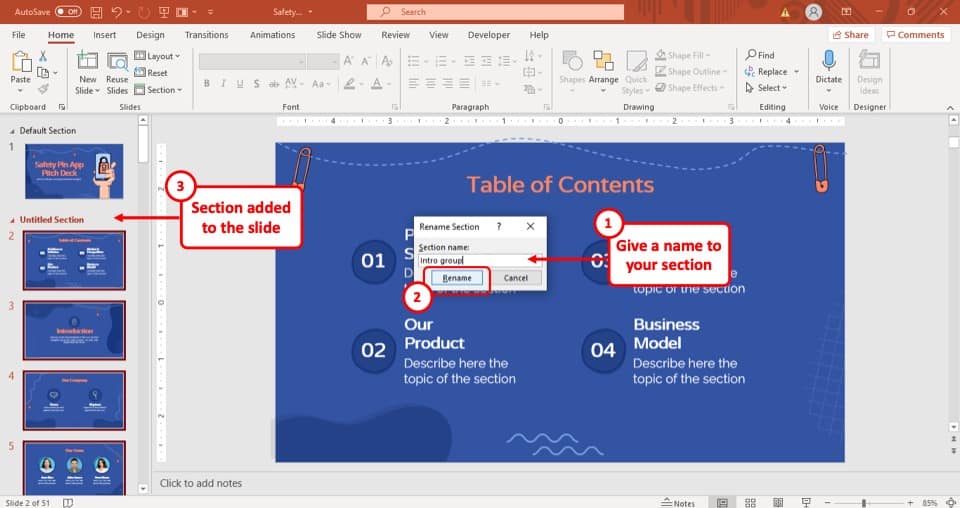
In the pop-up window, give a name to the group and hit the “ Rename ” button. This will group all the slides below the newly added section.
Step-4: Create another group after the last slide
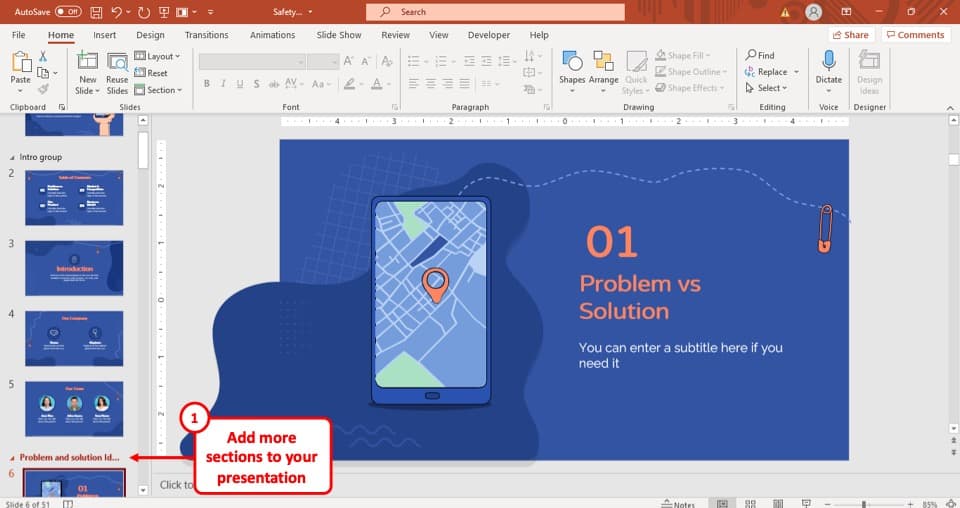
When you add a section above the first slide of the group of slides, it adds all the slides below that section into one group.
To separate one group from another, add another section under the last slide of your group following the same process described above. This will separate the slides in your group from the next group.
2. How to Rename Sections in PowerPoint?
To rename a section in your PowerPoint presentation, you have to select the rename option from the drop-down menu. The easy 3 step process is described below.
Step-1: “Right-click” on the title of the section
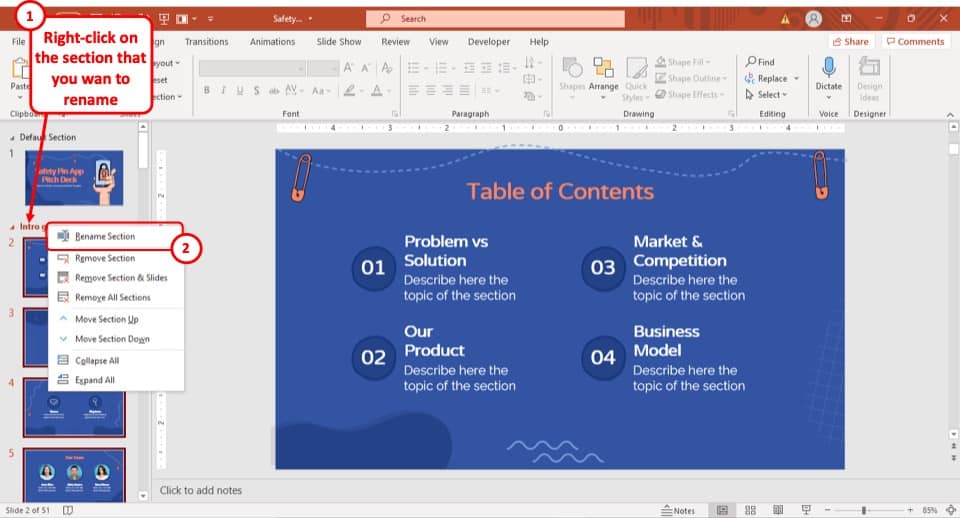
The first step of the process is to “ Right-click ” on the title of the section that you want to rename. This will open a dropdown menu.
Step-2: Click on “Rename section”
In this step, all you have to do is to select the “ Rename section ” option from the dropdown menu. It is the first option in the dropdown menu (as shown in the image in step 1).
Step-3: Rename the slide
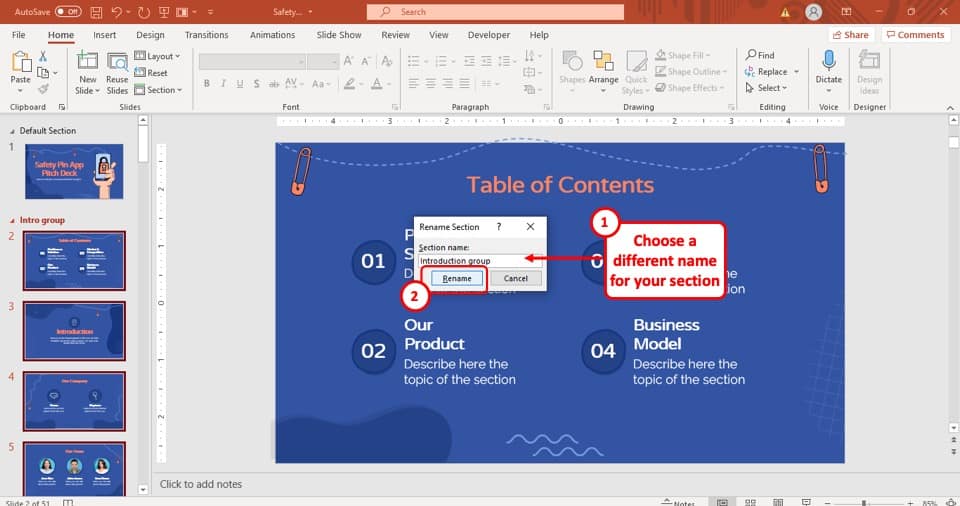
After you click on the “ Rename Section ” option, a pop-up window will appear on your screen. Now, rename the section and then hit the “ Rename ” button.
After that, the section will be renamed accordingly.
3. How to Add Slides to a Section in PowerPoint?
There are two ways in which you can add a slide to a group in your PowerPoint presentation. You can either add a new slide in the group or you can move a slide from another group to your preferred group.
Both of these methods are explained in the following section.
3a. Add New Slides to a Section
To add a new slide to a section in your PowerPoint presentation, you have to select the “ New slide ” option from the drop-down menu. The whole process is described step-by-step below.

The first step of the process is to “ Right-click ” on the slide navigation bar, in the location of the sequence of slides where you want the new slide to be added.
For example, if you want to add the slide as the fourth slide in the slide navigation bar, “ Right-click ” just above the existing fourth slide.
Step-2: Select the “New Slide” option
After you right-click on the slide navigation bar, a dropdown menu will appear on your screen. From the dropdown menu, click on the “ New Slide ” option, which is the first option in the menu.
After that, a new slide will be added to your preferred sequence.
3b. Move Slides from Other Sections
You can also move slides from one group to another
Step-1: Select and hold the slide
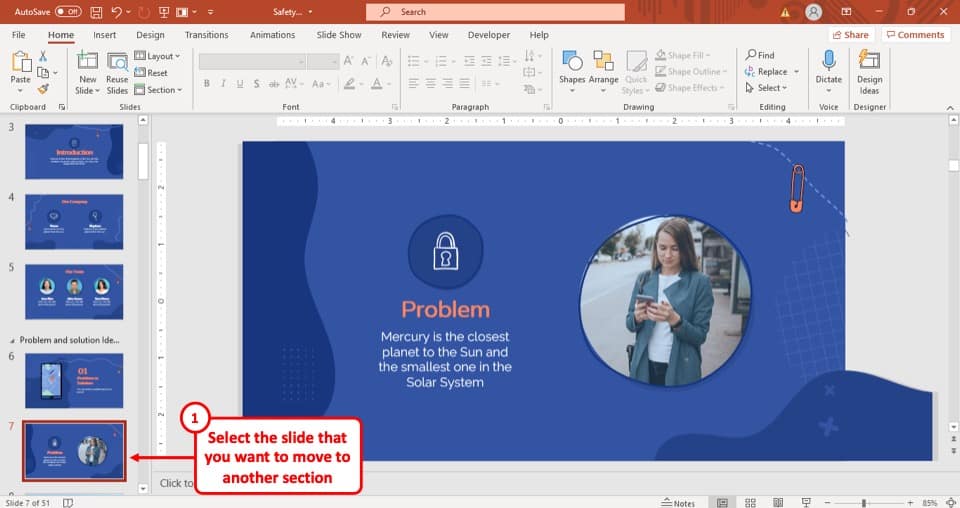
The first step of moving a slide from one group to your preferred group is to select the slide that you want to move and keep holding the “ Left mouse button ”.
This will allow you to move the slide up and down the slide navigation bar.
Step-2: Place the slide in your preferred location
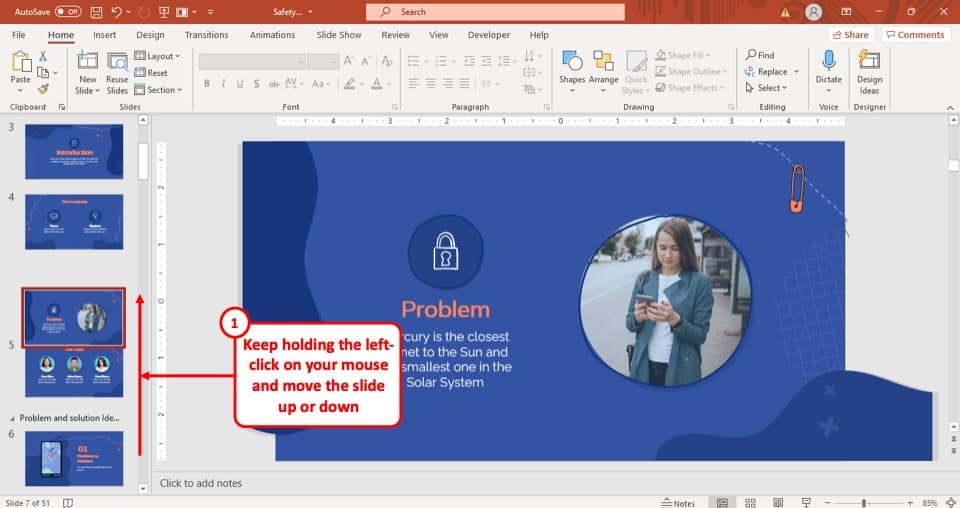
While holding the “ Left mouse button ”, drag the slide from its original position and place it in your preferred location then let go of the “ Left mouse button ”.
This way, the slide from one group will be moved to your preferred group.
4. How to Expand and Collapse Sections in PowerPoint?
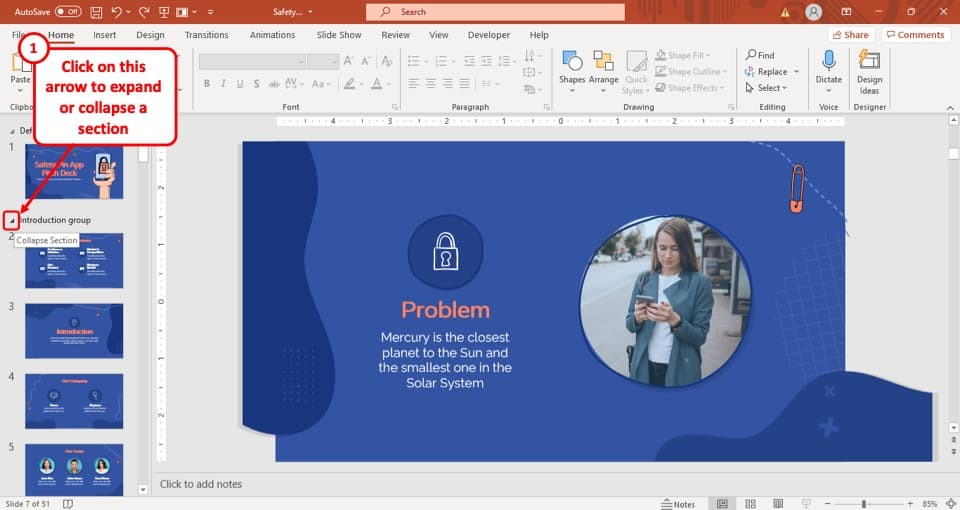
You can also expand and collapse a section or a group of slides in PowerPoint.
To collapse a section in PowerPoint, simply click on the section name or the arrow before the name of the section. This will collapse the section and hide all the slides within the section from the slide navigation panel.
You have to use the same button to expand a section in PowerPoint. If a group is expanded then you will see a triangular arrow pointing downward, located just to the left of the title of the group.
And, if the group is already collapsed, you will be able to expand it using the same button.
4a. How to Expand and Collapse All Sections in PowerPoint?
You can also expand or collapse all sections in PowerPoint in one quick movement! Here’s how to do it –
Step-1: Right-click on any section
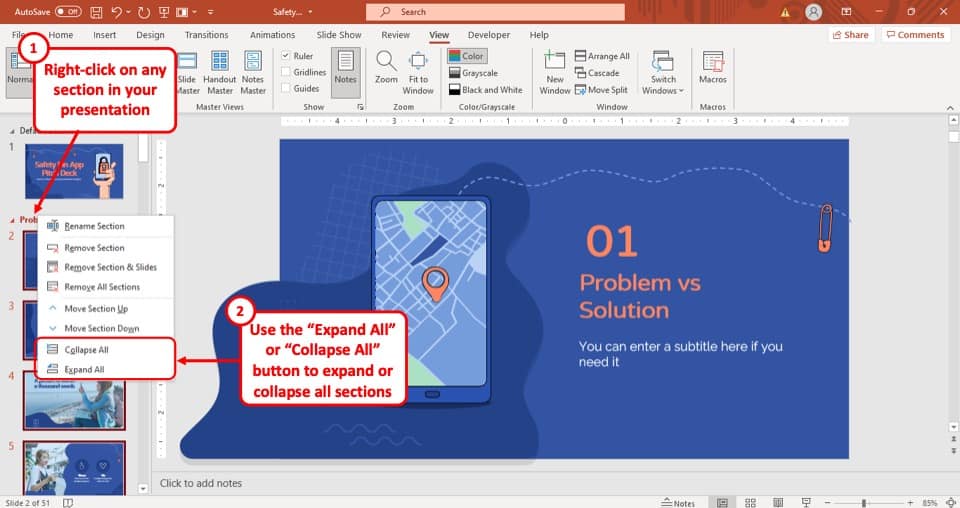
The first step is to right-click on any one of the sections in your PowerPoint presentation. You will be presented with a dropdown menu.
Step-2: Click on the “Expand All” or “Collapse All” options
The next step is to simply click on the “ Collapse All ” option to collapse all the sections in your presentation (as shown in the image in step 1).
You can also click on the “ Expand All ” option to expand all the groups of slides or the sections in your PowerPoint presentation.
Do remember, the “Expand All” option can also be used when only a few sections are in a collapsed state. Using this option then will expand only the collapsed sections.
5. How to Move a Section Up or Down in Slide Thumbnail View?
The process of moving an entire section up or down in the slide thumbnail view is very similar to moving a slide from one group to another. The whole process is described in easy steps below.
Method 1 – Dragging the Sections Up or Down
This method is the easiest when you have all the sections collapsed first.
Step-1: Collapse all the sections
The first step is to collapse all the sections in your presentation as described in the previous section. This will allow you to move a section quickly and easily.
Step-2: Click and hold the title of the section
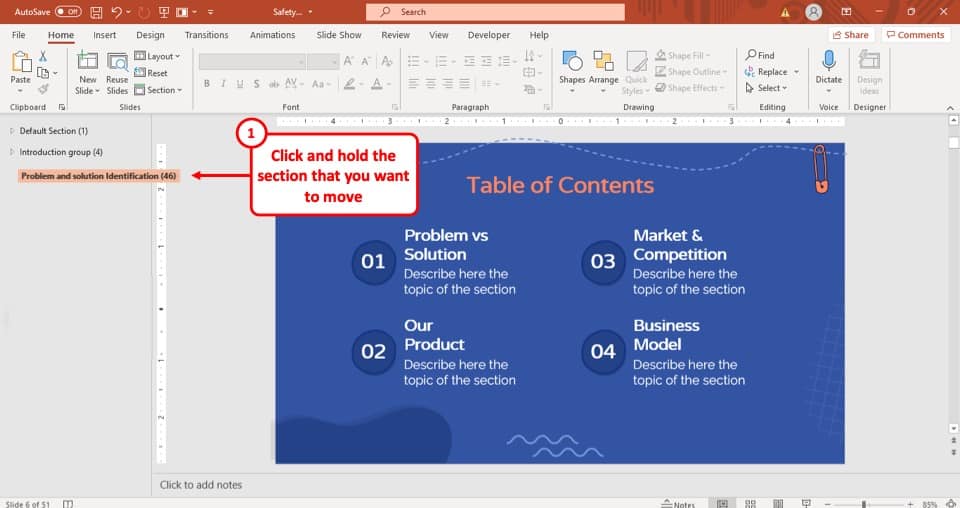
The first step of the process is to select the title of the section and then keep holding the “ Left mouse button ”.
Step-3: Move the section to your preferred sequence
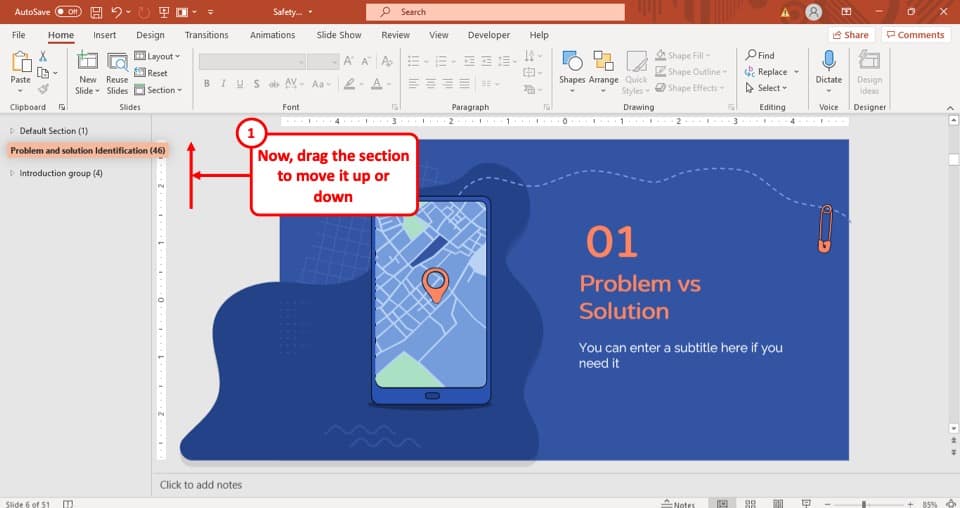
While holding the “ Left mouse button ”, drag the title of the group up or down to the position where you want to move the section.
After that, let go of the “ Left mouse button ” and the entire section will change its position accordingly.
Method 2 – Using the “Right-click” Option
You can also move a complete section using the right-click option. However, it can sometimes be confusing when you have all the slides open.
Nevertheless, here’s what you need to do when moving a section in PowerPoint using this method –
Step-1: Right-click on the section
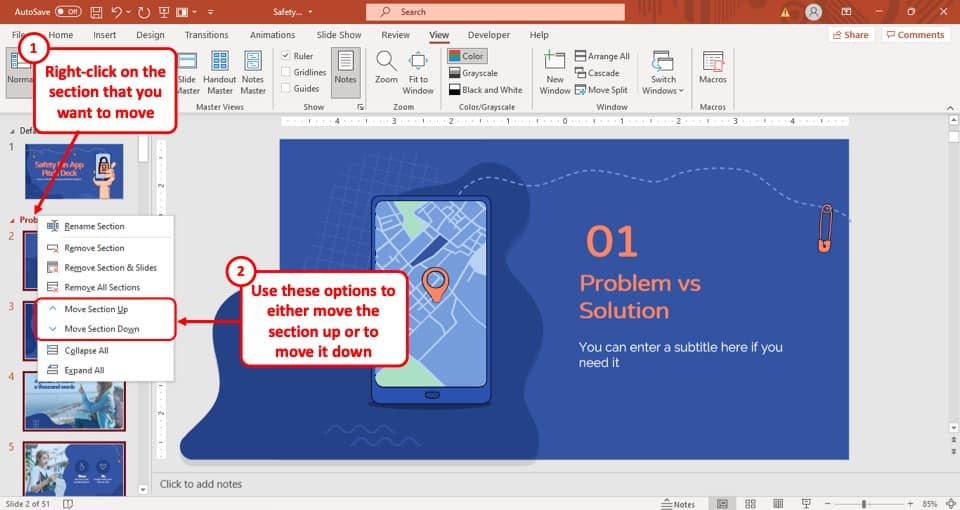
The first step is to “Right-click” on the section that you want to move. A dropdown menu will appear.
Step-2: Move the section
The next step is to simply move the section. You can click on the “ Move Section Up ” to move the section up (as the name suggests).
Likewise, you can also click on the “Move Section Down” option to move the section below the next section.
Repeat the process if you want to move a section up or down multiple steps.
6. How to Delete a Section in PowerPoint?
To delete a section in your PowerPoint presentation, you have to choose the remove section option in PowerPoint.
Here’s how you can remove a section in PowerPoint –
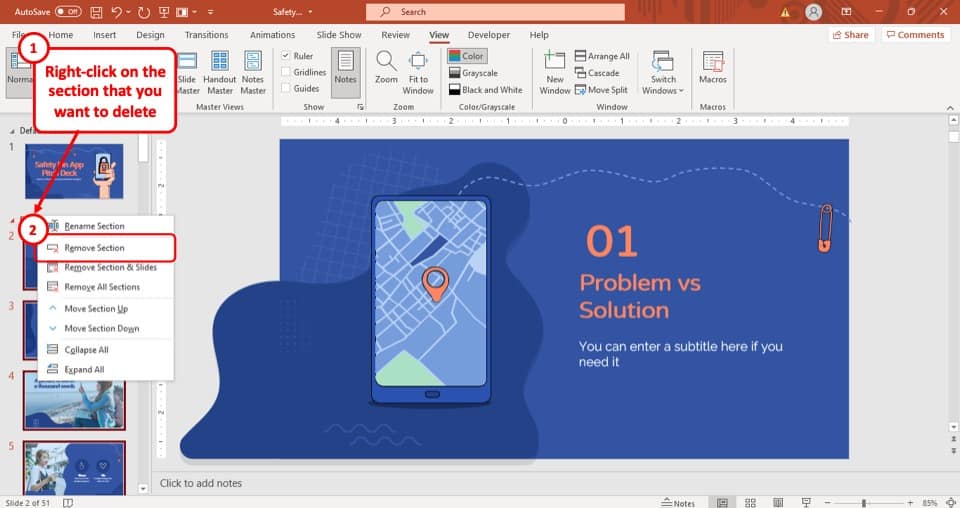
The first step of the process is to “ Right-click ” on the title of the section. This will open a drop-down menu.
Step-2: Click on “Remove section”
After you have opened the drop-down menu, simply click on the “ Remove section ” option, which is the second option of the menu.
After that, the section will be deleted immediately, and the slides in that section will merge with the preceding section.
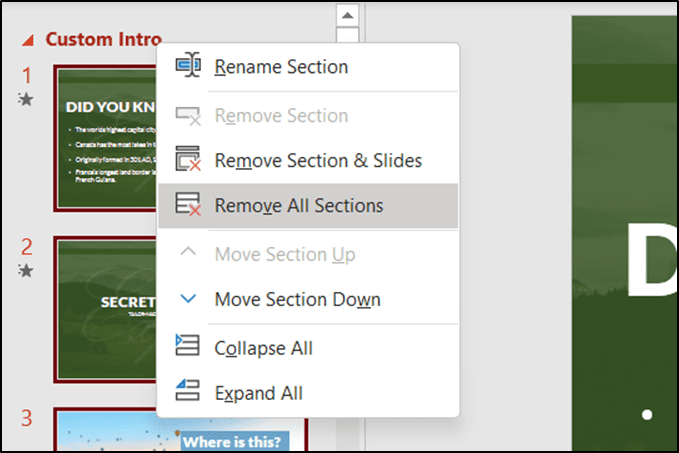
6a. How to Remove All Sections in PowerPoint?
If you want to get rid of all sections in your presentation, PowerPoint provides you with the option to do that as well. Don’t worry, your slides will not be deleted if you choose to remove all the sections from your PowerPoint presentation!
Here’s how to delete all sections in PowerPoint –
Step-1: Right-click on any one section
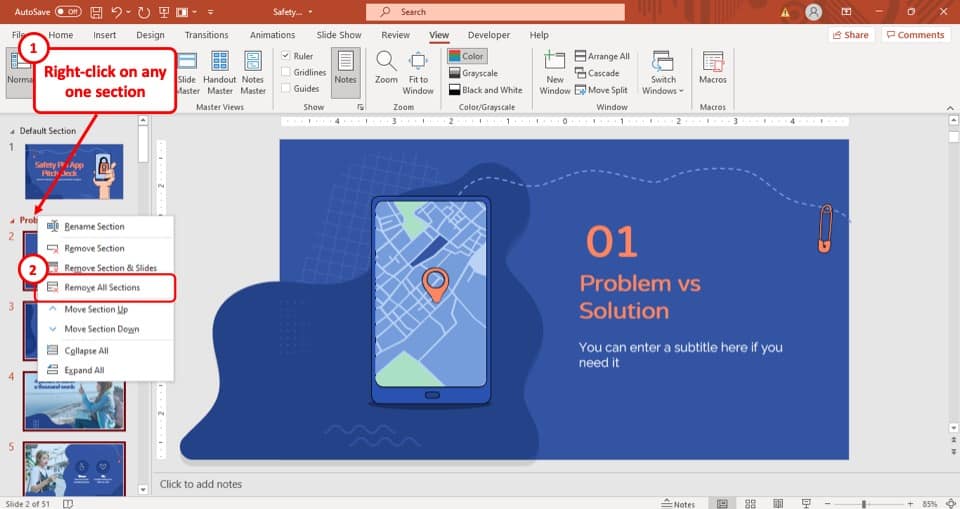
The first step is to right-click on any one section in your PowerPoint presentation. You will be presented with a dropdown menu.
Step-2: Select the “Remove All Sections” option
From the options in the dropdown, simply click on the “ Remove All Sections ” option and this will delete all the sections in your presentation.
As mentioned before, this will not remove any of your slides. It will only remove all the sections.
6b. How to Remove a Section with Slides in PowerPoint?
Using sections comes in really handy especially when you want to delete an entire section from your presentation.
Although deleting a section in PowerPoint doesn’t delete the slides, PowerPoint also provides you with an option to delete a section along with the slides within that section.
Here’s what you need to do –
Step-1: Right-click on the section to delete

As usual, the first step is to select the section that you want to delete and right-click on it. This will open a dropdown menu with options.
Step-2: Select the “Remove Section & Slides” option
From the dropdown, simply click on the “ Remove Section & Slides ” option. This will remove the section along with the slides in that section.
7. Can you Create Sub-Sections in PowerPoint?
Unfortunately, you can’t create a subsection in your PowerPoint presentation.
Although it is quite the obvious upgrade, and many users have been requesting it since the option to add sections was introduced in PowerPoint, you can’t make a subsection in your PowerPoint.
However, to organize your PowerPoint presentation, you can insert a new section and add an underscore (“_”) before the title of the section to identify that it is a subsection.
Credit to cookie_studio (on Freepik) for the featured image of this article (further edited).
Home Blog PowerPoint Tutorials How to Add Sections in PowerPoint
How to Add Sections in PowerPoint

PowerPoint sections can help organize a PowerPoint presentation to help you sort out different subtopics. Adding sections to your PowerPoint templates can be handy for quickly creating new outlines and generating organized slide decks. It also makes finding subtopics in a presentation to revisit specific information easily.
How to Add Section in PowerPoint
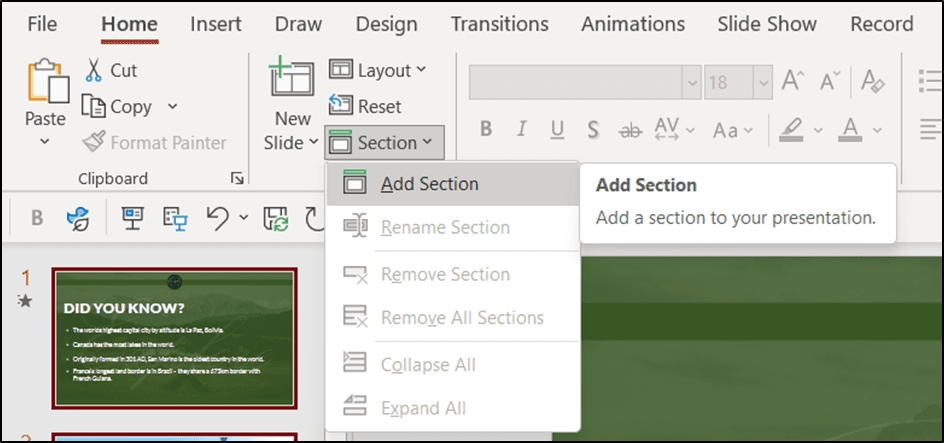
If you’re wondering how to add a PPT section, go to Home -> Section -> Add Section or right-click between slides and select Add Section .

From the dialog box that appears, add a name for your section and click Rename . This will give a name to your section. You can name various sections according to the topic they cover. For example, one section might introduce the topic, another your team, followed by a section about the project, budget, timeline, etc.

How to Rename, Remove, Collapse, and Expand Sections in PowerPoint
To rename, remove, collapse, or expand sections, select the section and go to Home -> Sections .
Rename Section: This option allows you to rename the section.
Remove Section: You can use this option to remove a specific section.
Remove All Sections: This is a quick way to remove all sections simultaneously.
Collapse All: This option can be used to collapse all sections.
Expand All: All collapsed sections can be expanded using this option.

How to Move Sections in PowerPoint
You can either use drag and drop to move sections or via right-click menu. The latter provides options to move sections up or down. You will find various options in the right-click menu via the Sections menu. Furthermore, you can also select Remove All Sections & Slides at once to start over from scratch.

Final Words
You can group slides in PPT by creating sections in PowerPoint. Now that you know how to create sections in PPT, you can create relevant groups of slides clubbed together to generate more comprehensive presentations that are easier to sort and manage.
Like this article? Please share
Microsoft PowerPoint, PowerPoint Tips Filed under PowerPoint Tutorials
Related Articles

Filed under PowerPoint Tutorials • July 30th, 2024
How to Add a Timer to PowerPoint
Generate expectations for your presentation introductions by mastering how to add a timer to PowerPoint. Step-by-step instructions + templates.

Filed under PowerPoint Tutorials • July 23rd, 2024
How to Insert an Excel Sheet into PowerPoint
Optimize your presentation slides with accurate data from spreadsheets. Learn how to insert an Excel Sheet into PowerPoint with this guide.

Filed under PowerPoint Tutorials • July 15th, 2024
How to Select Shape in PowerPoint
Learn how to select any shape in PowerPoint and apply the required transformations. Step-by-step guide.
Leave a Reply
Simon Sez IT
Online software training and video tutorials for Microsoft, Adobe & more
- Get Started
- Access 2021 Beginners
- Access 2021 Advanced
- Access 2019
- Access 2019 Advanced
- Access 2016
- Copilot in Microsoft 365 for Beginners
- Copilot Essentials in Microsoft Office
- Microsoft Excel 365 Essentials
- Microsoft Excel 365 Advanced
- Microsoft Excel 365 Intermediate
- Excel 365 for Beginners
- The Accountants Excel Toolkit
- Microsoft 365
- OneNote Desktop and Windows 10
- OneNote 2016
- Outlook 2021
- Outlook 2019
- Outlook 2016
- Outlook 2013
- Outlook 2010
- Introduction to Power Automate
- Power BI Essentials
- Power BI Training
- Power BI Intermediate
- PowerPoint 365 for Beginners
- PowerPoint 2021
- PowerPoint 2019
- PowerPoint 2016
- PowerPoint 2013
- Project 2021 Advanced
- Project 2021 Beginners
- Project for the Web
- Project 2019
- Project 2019 Advanced
- Microsoft Publisher 365
- Publisher 2013
- SharePoint Online: The Essential Guide (2023)
- SharePoint Online (2021)
- SharePoint Foundation 2013
- SharePoint Server 2013
- SharePoint Foundation 2010
- Microsoft Teams (2023 Update)
- Macros and VBA for Beginners
- VBA for Excel
- VBA Intermediate Training
- Microsoft Visio 2019
- Microsoft Visio 2010
- Windows 11 Advanced
- Windows 11 (2023 Update)
- Windows 10 (2020 Update)
- Microsoft Word 365
- Word 2019 Advanced
- Dreamweaver CC
- Dreamweaver CS6
- Dreamweaver CS5
- Dreamweaver CS4
- Adobe Illustrator CC for Beginners
- Adobe InDesign CC for Beginners
- InDesign CS6
- InDesign CS5
- Adobe Photoshop CC Advanced
- Adobe Photoshop CC Intermediate
- Adobe Photoshop CC for Beginners
- Photoshop CS6
- Photoshop CS5
- Photoshop Elements 2022
- Photoshop Elements 2019
- Photoshop Elements 2018
- Photoshop Elements 15
- Photoshop Elements 14
- QuickBooks Online 2024
- QuickBooks Desktop 2024
- QuickBooks Desktop 2023
- QuickBooks Desktop Pro 2022
- QuickBooks Pro 2021
- AngularJS Crash Course
- Bootstrap Framework
- HTML/CSS Crash Course
- HTML5 Essentials
- Java for Beginners
- JavaScript for Beginners
- jQuery Crash Course
- MySQL for Beginners
- PHP for Beginners
- Advanced PHP Programming
- Matplotlib, Seaborn, and Plotly Python Libraries for Beginners
- Python Object-Oriented Programming
- Pandas for Beginners
- Introduction to Python
- SQL for Beginners
- SQL Server Integration Services for Beginners
- XML Crash Course
- Alteryx Advanced
- Introduction to Alteryx
- Introduction to Data Visualization and Business Intelligence Principles
- Analytical Methods for Effective Data Analysis
- Introduction to Analytics and Artificial Intelligence
- Data Analytics in Excel
- Financial Risk Management
- Financial Forecasting and Modeling
- Qlik Sense Advanced
- R Programming
- Tableau Desktop Advanced
- Tableau Desktop
- Advanced Agile Scrum
- Agile Scrum Training
- Using ChatGPT to Increase Accounting Productivity
- AI In Action: Transforming Financial Operations
- Using Generative AI for Images and Videos
- Generative AI and Cybersecurity
- Introduction to ChatGPT
- Introduction to Asana for Project Management
- Asana for Employees and Managers
- Introduction to Asana
- Effective Communication Tactics for the Modern Workplace
- Introduction to Confluence
- Introduction to Pipedrive
- HubSpot CRM for Beginners
- Google Slides for Beginners
- Introduction to Google Chrome
- Introduction to Google Calendar
- Introduction to Google Drive
- Gmail for Beginners and Pros
- Getting Started in Jira
- Getting Started in Monday.com
- Cybersecurity Essentials: Stay Safe and Secure Online
- Cybersecurity Awareness Essentials
- Introduction to Wrike for Project Management
- Excel Efficiency and Data Management
- Excel Advanced Features and Customization
- Mastering PivotTables
- Microsoft Suite Productivity

How to Add Sections to a PowerPoint Presentation
(Note: S uitable for users of PowerPoint 2016, 2019, 2021, and PowerPoint for Microsoft 365 . )
Divide a PowerPoint presentation up into sections to stay organized and focused.
The Add Sections to a PowerPoint Presentation Explained
PowerPoint presentations can easily get out of control. Before we know it, we have a presentation that contains 50+ slides, and we need to be able to navigate expertly and seamlessly around our presentation. We don’t want to be scrolling through endless linear slides in front of a client, struggling to find the slide they have requested to look at.
Sections can help us with this. We can divide our presentation up into manageable ‘chunks’ or sections. We can give those sections meaningful names. We can collapse up sections that are of no interest and focus on the important sections. We can even create dynamic section zooms to really add the ‘wow’ factor to our presentation.
Sections help us stay organized and get to the right content at the right time.
In this article, we will be working with a presentation with 23 slides.
Add Sections
Slide sorter view, remove sections, to collapse/expand individual sections, collapse/expand all sections, moving sections, section zoom.
Related reads:
How to Wrap Text in PowerPoint
How to Add a Watermark in PowerPoint
How to Add a Hyperlink to a PowerPoint
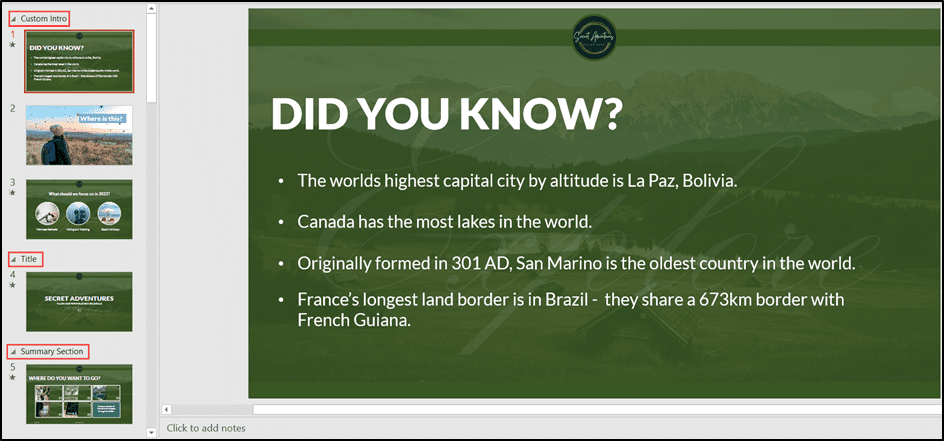
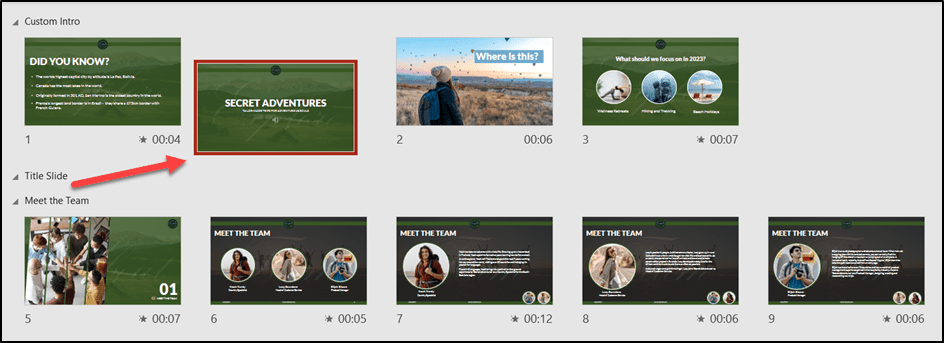
To create a section, we first need to select all the slides that belong in that section. We want three slides in the first section.
- Click on the first slide.
- Hold down the CTRL key and click on the other slides to select them.
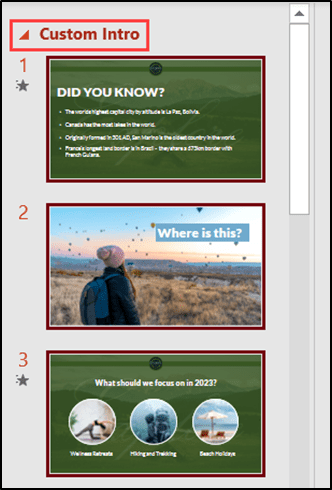
These slides are our custom intro slides. We will have these rotating automatically as people join the presentation to give them something interesting to look at while waiting for the other attendees to arrive.
- Right-click on any of the slides.
- Choose Add Section from the menu.
- Alternatively, from the Home tab, in the Slides group, click the drop-down arrow next to Section .
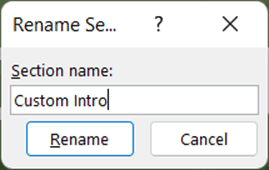
- Type a name for the section.
- Click Rename .
The section is now renamed. Notice the small red arrow next to the new section name. We’ll speak about this a bit later on in this article.
We need to repeat this process throughout the presentation. Select the slides, add a section, and give the section a name.
Sometimes, it is hard to see all slides and sections in our presentation when working in Normal view. Switch to the Slide Sorter view to get a better overview of the layout of the presentation.
- From the View tab, in the Presentation views group, click Slide Sorter .
This view shows our presentation split into sections.
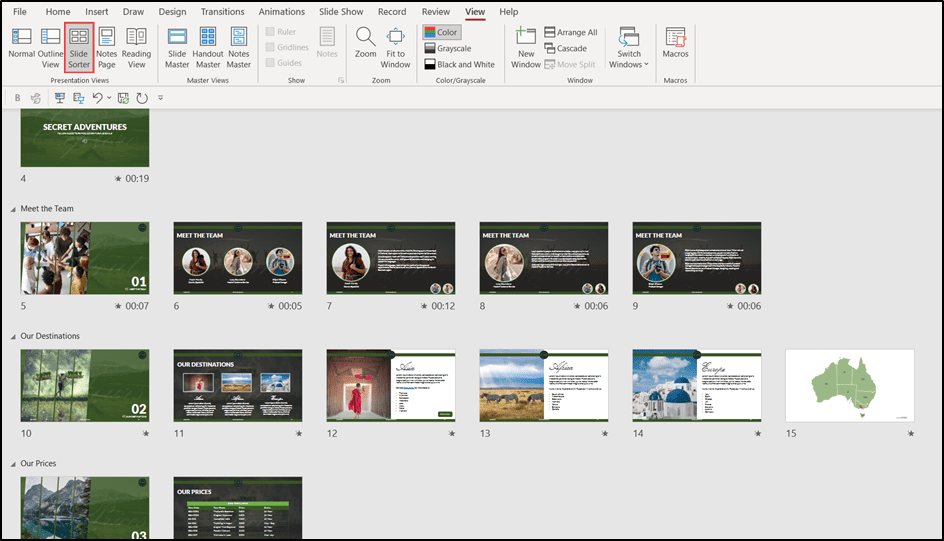
This is also a great view to use if we need to move slides from one section to another.
- Click on the slide to be moved.
- Drag and drop it to its new location.
Suggested reads:
How to Change PowerPoint Slides to Portrait
How to Change Slide Size in PowerPoint
How to Save PowerPoint as Video
We can remove redundant sections in two ways. We can remove just the section OR the section and all slides contained within that section.
- Right-click on the section name.
- Choose Remove Section to remove the section, but keep any slides.
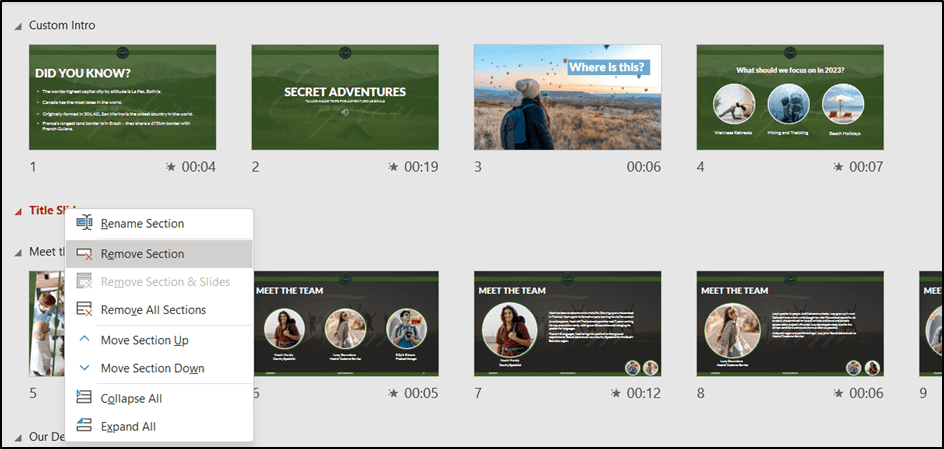
We can remove sections in the Slide Sorter view or Normal view. The process is exactly the same.
If we want to remove all sections from our presentation but keep the slides, we can select Remove All Sections from the contextual menu.
Collapse and Expand Sections
Earlier in this article, I highlighted the red arrow that appears next to each section. This red arrow is the collapse/expand option.
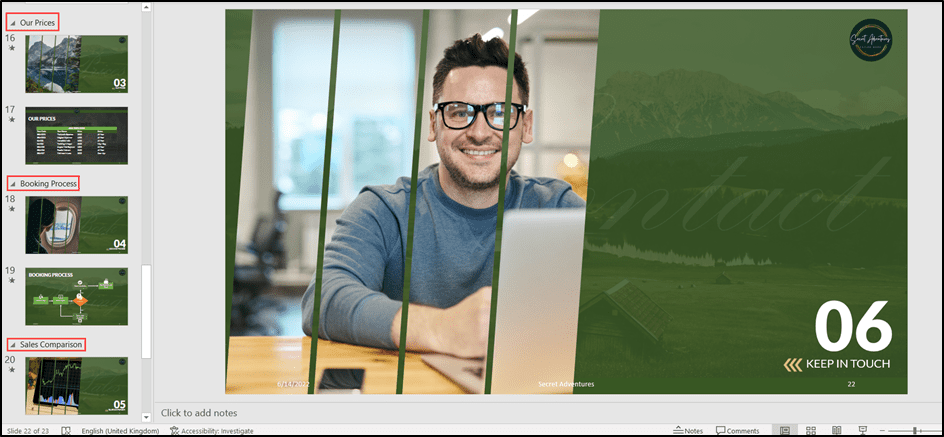
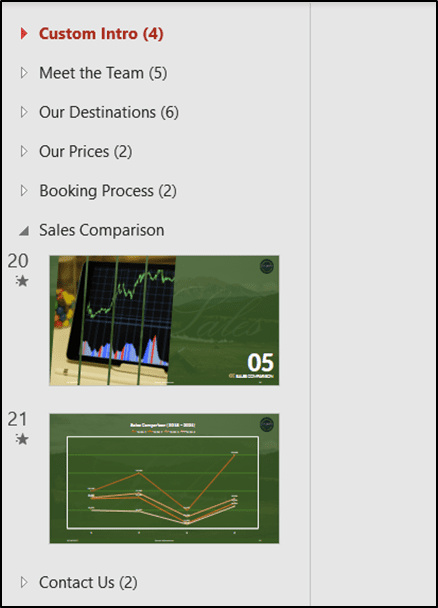
We can collapse or expand each section depending on the sections and slides we want to see. For example, maybe my audience only wants to see the ‘Sales Comparison’ section. I could collapse all the other sections and keep ‘Sales Comparison’ expanded.
This has a couple of advantages. It enables us to focus only on what is of interest to the audience and it prevents the audience from being overwhelmed with unnecessary slides of information.
We can collapse and expand individual sections or collapse and expand all sections.
- Navigate to the section.
- Click the red arrow to expand or collapse.
In this example, I have clicked on the red arrow next to every section except the ‘Sales Comparison’ section.
Notice the number in brackets (parentheses) after the section name. This tells us how many slides are contained within that section.
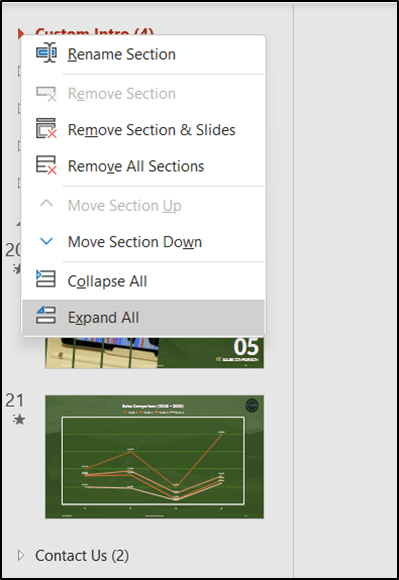
We can quickly collapse or expand all sections in our presentation.
- Right-click on the red arrow next to any section.
- Choose Collapse All or Expand All .
We can move entire sections within our presentation. When we move a section, the section and all the slides contained within that section will move too.
- Choose Move Section Up or Move Section Down .
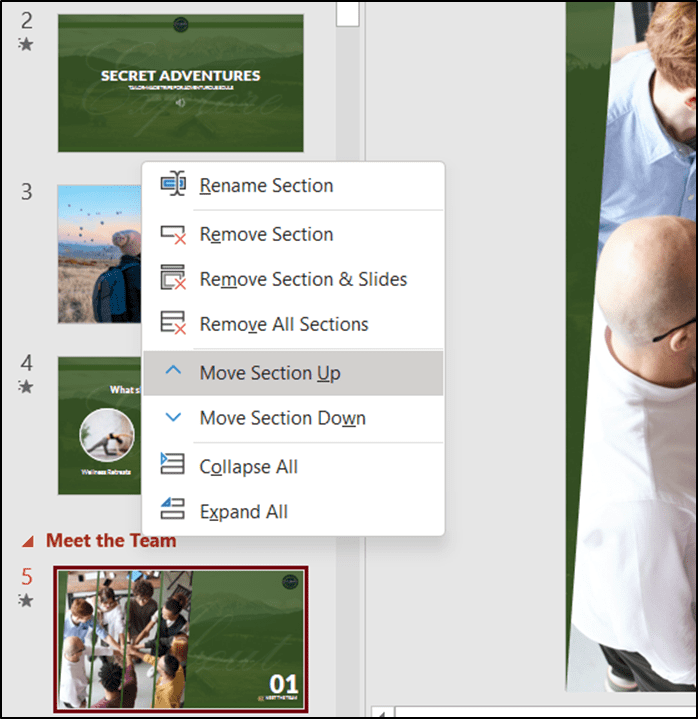
This method will move the section up one or down one. To move a section to a completely different location, drag and drop from the Slide Sorter view or Normal view.
One of the newer features introduced in PowerPoint is Section Zoom. Using section zoom, we can create a really nice zoom-in and zoom-out effect and jump between different sections in our presentation. Section zooms are similar to a table of contents in a document. They allow the presenter or the customer to choose their own route through the presentation.
In order for section zoom to work correctly, we must have a presentation already divided into sections.
- From the Insert tab in the Links group, click the drop-down arrow underneath Zoom .
- Click on Section Zoom .
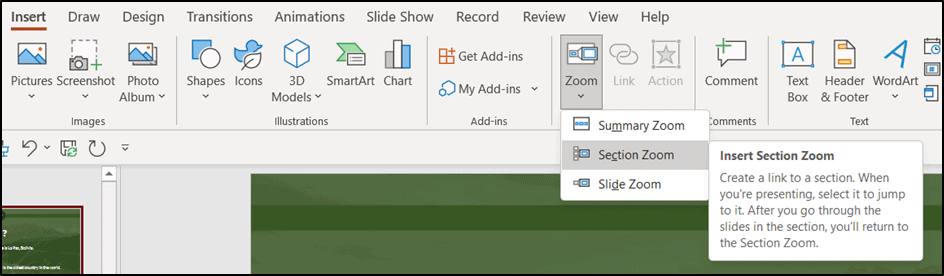
The Insert Section Zoom window will open. We can see our sections represented by a thumbnail that shows the first slide in the section.
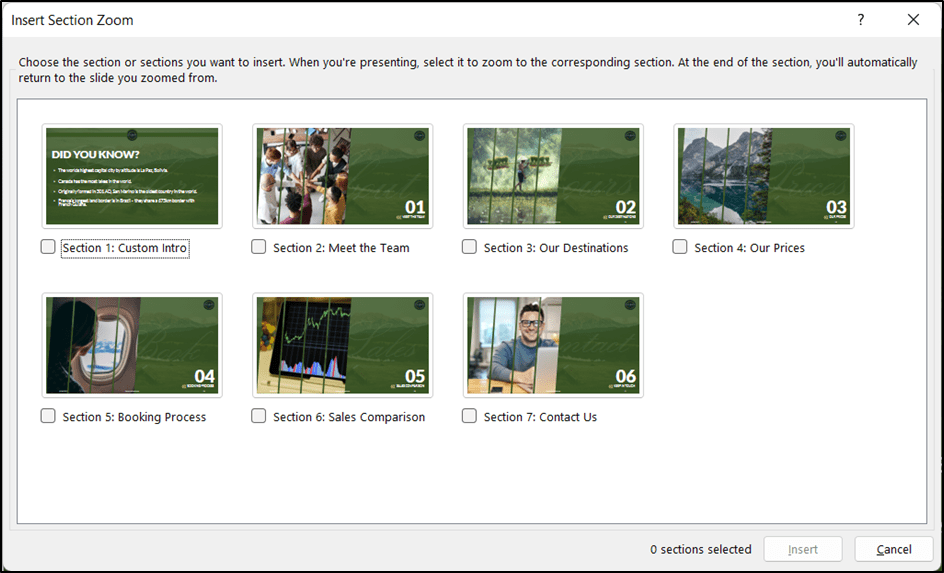
- Select the sections to include in the zoom.
We are going to include all sections except the Custom Intro.
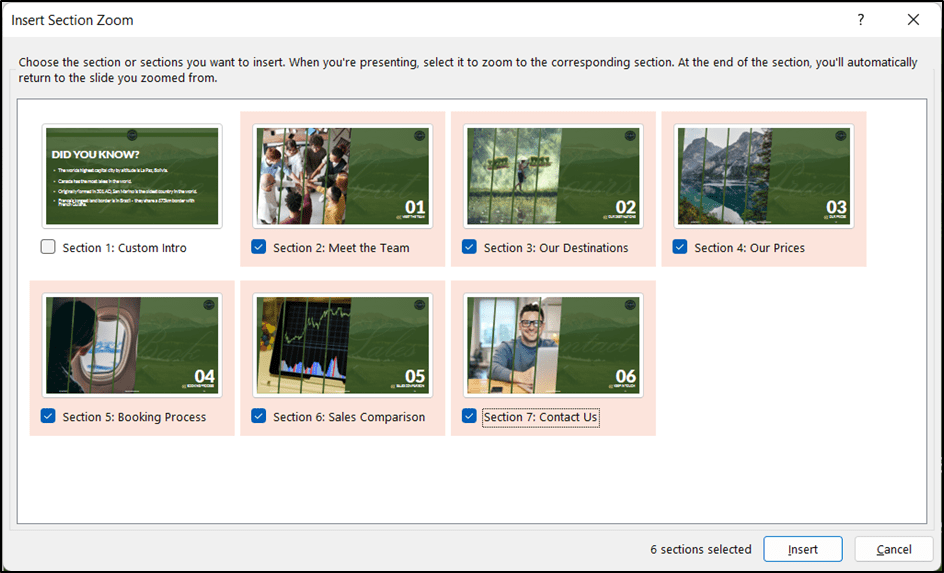
- Click Insert .
The thumbnails will appear on the slide. Drag and drop to rearrange them.
The presenter or customer can now choose which topic they are interested in.
- Press F5 to run the slide show.
- Click on any thumbnail.
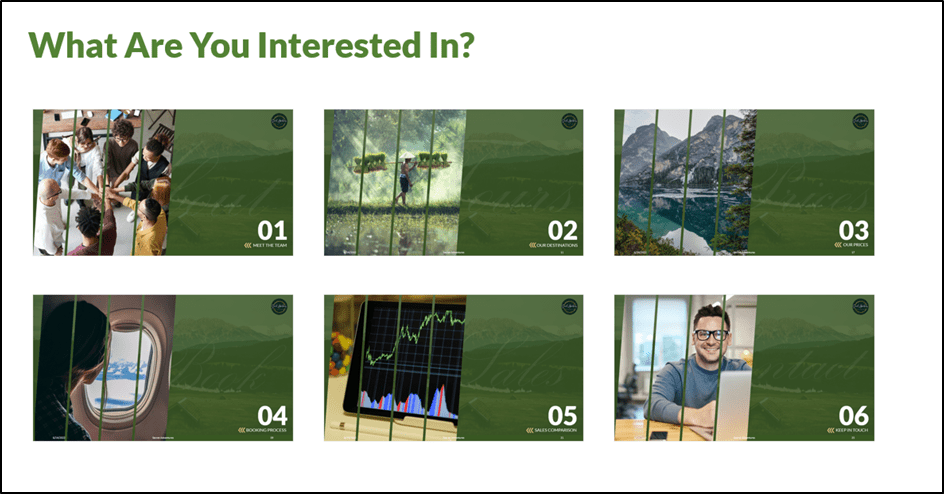
The result is a slick zoom-in effect. When the presenter clicks the mouse, PowerPoint will move on to the next slide in that section. When the section is complete, PowerPoint will zoom back out to the main page.
Section Zooms are highly customizable.
Notice the Zoom contextual ribbon. Using this ribbon, we can change the thumbnail image, apply a zoom style, add a border, add effects, change the height and width, and control how we want the zoom to transition between slides.

How to Insert GIF into PowerPoint
How to Superscript in PowerPoint
How to Add Slide Numbers in PowerPoint
Please visit our free resources center for more high-quality PowerPoint and Microsoft Suite application guides.
Ready to dive deep into PowerPoint? Click here for basic to advanced PowerPoint courses with in-depth training modules.
Simon Sez IT has been teaching PowerPoint and other business software for over ten years. You can access 160+ IT training courses for a low monthly fee.

Deborah Ashby

Deborah Ashby is a TAP Accredited IT Trainer, specializing in the design, delivery, and facilitation of Microsoft courses both online and in the classroom.She has over 11 years of IT Training Experience and 24 years in the IT Industry. To date, she's trained over 10,000 people in the UK and overseas at companies such as HMRC, the Metropolitan Police, Parliament, SKY, Microsoft, Kew Gardens, Norton Rose Fulbright LLP.She's a qualified MOS Master for 2010, 2013, and 2016 editions of Microsoft Office and is COLF and TAP Accredited and a member of The British Learning Institute.
Similar Posts
Create an Excel Dashboard in 5 Minutes – The Best Guide
Using Project 2010 Work Breakdown Structure (WBS) Codes – Part 1
How to Protect Cells in Excel Workbooks —5 Easy Ways
How to Create a Template in Word: Creating Templates in Word
How to Set Print Area in Excel? Step-by-Step Guide
Managing CSS Rules in Dreamweaver CS6
- Privacy Policy

ADVANCE YOUR CAREER
Gain instant access to 200+ courses. Earn a CERTIFICATE each time you complete a course.
- Video Tutorials
- Knowledge Base
- Group Licenses
- Why Choose Us?
- Certificates
- PowerPoint Tutorials
PowerPoint Sections: How to Create Sections in PowerPoint to Reorganize Presentations Quickly
In this tutorial, you’ll learn how to use PowerPoint sections, including how to create them, rename them, and use them to rearrange entire segments of the presentation in the Slide Sorter View.
- Tutorial Summary
- Files & Resources
- Premium Course
PowerPoint sections are useful for collapsing and expanding multiple slides, removing multiple slides, and rearranging segments of presentations.
To add a section, press Alt, H, T1 in the PC version of PowerPoint and select “Add Section”:
(This shortcut is Alt, H, T in older, non-365 versions; there is no built-in Mac shortcut for this command, so you must go to the “Home” menu and click on “Section” manually.)

Once you do this, the section name will appear on the left-hand side of the screen on top of the presentation slides in this new section:

You can now collapse and expand all the slides in this section by right-clicking it or going to the “Section” menu with Alt, H, T1:

You can also drag around the section and put it before or after other parts of the presentation:

Sections are useful in this “normal view,” but to use them most effectively , you’ll need to enter the Slide Sorter View (see below).

PowerPoint Pro
Master PowerPoint by creating a sell-side M&A / valuation pitch book for Jazz Pharmaceuticals - plus company/deal profiles and more.
Video Table of Contents:
0:39: Slide Sorter View
3:42: Sections
9:21: Exercise: Add Sections to the Jazz Slides
14:50: Recap and Summary
[Click the “Files & Resources” tab to get all the PowerPoint files for this lesson.]
The Slide Sorter View and PowerPoint Sections
The default viewing mode in PowerPoint is too limited to use sections effectively because you can only see a few slides on the screen at once.
To use sections more effectively, you should enter the Slide Sorter View with the Alt, W, I shortcut (⌘ + 2 on Mac):

This “Slide Sorter View” removes the main slide edit area and presents only a high-level presentation summary.
You can’t use this view to edit slides, but you can use it to move around normal slides.
To return to the “normal view,” press Alt, W, L on PC or ⌘ + 1 on Mac.
Most shortcuts that work in the normal viewing mode of PowerPoint also work in the Slide Sorter View:
Move to Previous or Next Slide: Arrow Keys (PC / Mac)
Jump to First Slide: Home (PC) / Fn + <– (Mac)
Jump to Last Slide: End (PC) / Fn + –> (Mac)
Select Multiple Slides: Shift + Click (PC / Mac)
Insert Slide: Ctrl + M (PC) / ⌘ + Shift + N (Mac)
Insert Slide and Select Layout: Alt, H, I / N/A on Mac
Delete Slide: Del (PC / Mac)
Duplicate Current Slide: Ctrl + Shift + D (PC) / ⌘ + Shift + D (Mac)
Without even using sections, you can select multiple slides in the Slide Sorter View by pressing Shift and clicking on each one, and you can drag them to any position you want:

Doing this in the normal editing view is much less efficient because you must scroll to select multiple slides.
How to Create Sections in PowerPoint: Best Practices
When you add sections in PowerPoint, you should always start at the end of the presentation and move to the front .
When you add a section, PowerPoint applies it to all the slides after the insertion point – so if you add a section on slide 1, every slide in your presentation will be in that section!
Let’s say that your presentation has 25 slides, and they’re organized like this:
Slides 1 – 10: Introduction
Slides 11 – 14: Market Analysis
Slides 15 – 19: Leadership Team
Slides 20 – 25: Conclusions
If you want to add sections to this presentation, you should open the Slide Sorter View, go to slide 20, and add the “Conclusions” section there with Alt, H, T1, A.
Then, you should move to slide 15 and add the “Leadership Team” section, move to slide 11 and add the “Market Analysis” section, and, finally, move to slide 1 and add the “Introduction” section.
Ideally, each section will start with a normal slide that indicates the section’s title or marks it as the next “part” of the presentation.
We follow this approach in the Jazz Pharmaceuticals slides here:

With these “Section Divider” slides in the normal presentation, it’s easy to enter the Slide Sorter View and use the Alt, H, T1 shortcut to add sections in the right spots:

In the Slide Sorter View, you can also press the Right Mouse Button (RMB) on a Section Name to activate additional commands, such as “Remove Section & Slides” and “Move Section Up/Down”:

These commands can be useful if you start with an existing presentation and remove large parts rather than specific slides.
PowerPoint Section Practice Exercise: How to Add Sections to a Long Presentation
Your practice exercise in this lesson is to take the “Before” version of the Jazz Pharmaceuticals slides , add sections in the right spots, and rearrange the entire presentation so the sections are in the correct numerical order.
The presentation should start with Section 1 and then move to Section 2, 3, and so on, and the last two parts should be Appendix A and Appendix B.
You can start this exercise by entering the Slide Sorter View with Alt, W, I, and jumping to the end of the presentation with the End key (Fn + –> on Mac):

You can then move to slide 48 and press Alt, H, T1, A to add a section and name it “Financial_Projections”:

And then, you can proceed backward to slide 44 and add a section and name for the Appendix B slides.
Next, go to slide 32, add a section, and do the same on slides 28, 23, 14, and 2.
When you’re done, your presentation should look like this in the Slide Sorter View:

Now you need to reorder the presentation.
For this part, you might have to enter the normal viewing/edit mode with Alt, W, L to read the “Section Numbers” on each divider slide.
For your reference, here’s the correct numerical order:
Section 1: Market Update and Summary
Section 2: Review of Jaguar Management Forecasts
Section 3: Jaguar Valuation
Section 4: Potential Strategic Alternatives
Section 5: Process Recommendations
Appendix A: Financial Projection Assumptions
Appendix B: Valuation Data
For this part of the exercise, it’s useful to collapse all the sections with the Alt, H, T1, O shortcut so you can focus on just their order:

Once you’ve done this, you can click on each section name and drag it up or down to put the section in its proper position:

When you’ve finished rearranging all the sections, you can expand everything once again with Alt, H, T1, X, and your presentation should look like this in the Slide Sorter View:

Finally, you’ll need to move the “Table of Contents” slide to the Introduction section.
Currently, it’s at the end of the “Management Forecasts” section, which is incorrect:

Beyond PowerPoint Sections: More Advanced Methods for Organizing Your Presentations
Sections and the Slide Sorter View are very useful for organizing and reordering your presentations, but they only scratch the surface of the proper PowerPoint setup required for investment banking pitch books .
It’s also critical to understand the Slide Master , templates based on custom layouts, and how to use tools such as Drawing Guides, Theme Colors, and “reference shapes” to make your presentations easy to modify.
We cover all that and more in the full PowerPoint Pro course on this site, and we even give you tools and templates for workflow automation, including our full PowerPoint macro package.

About Brian DeChesare
Brian DeChesare is the Founder of Mergers & Inquisitions and Breaking Into Wall Street . In his spare time, he enjoys lifting weights, running, traveling, obsessively watching TV shows, and defeating Sauron.
Files And Resources
Premium Courses
Other biws courses include:.
Perfect Your PowerPoint Skills
The BIWS PowerPoint Pro course gives you everything you need to complete pitch books and presentations in half the time and move straight to the front of the "top tier bonus" line.

How to Use Sections in PowerPoint to Organize Slides

Organize Your PowerPoint Presentation Using Sections
by Avantix Learning Team | Updated June 9, 2021
Applies to: Microsoft ® PowerPoint ® 2013, 2016, 2019 and 365 (Windows)
You can manage a PowerPoint presentation by organizing it into sections. Although you can work with sections in Normal View or Slide Sorter View, it's easier to work with sections in Slide Sorter View. You can insert, name, move, collapse, expand and remove sections in PowerPoint. If you are working with a team on a large presentation, you can assign team members to different sections. In PowerPoint 2019 or 365, you can also use Summary Zoom to create links to different sections.
The Sections command appears on the Home tab in the Ribbon in the Slides group (although you can use the context menu to add and manage sections). Sections created with the Sections command are different from section layouts.
In this article, we'll be using the Slide Sorter to work with sections.
Recommended article : How to Quickly Remove All Animations in PowerPoint
Do you want to learn more about PowerPoint? Check out our virtual classroom or live classroom PowerPoint courses >
Below is a sample presentation organized into sections:

Working with sections in Slide Sorter View
You can work with sections in Slide Sorter View in 3 ways:
- Right-click to access the context menu
- Press Shift + F10 or press the Context key on your keyboard (if available) to access the context menu
- Use Sections on the Home tab in the Ribbon in the Slides group
Below is the Sections command on the Home tab in the Ribbon in the Slides group:

Adding a section
To add a section in Slide Sorter View:
- Right-click the slide you want to use as the starting slide in a section or right-click between two slides where you want to add a section. You can also click Sections in the Slides group on the Home tab in the Ribbon or press Shift + F10 or the Context key to access the context menu. A drop-down menu appears.
- Select Add Section. A section marker appears as a bar across the screen. PowerPoint will also create a default section at the beginning of the presentation. A dialog box appears.
- Enter a name for the section and click Rename.
- Repeat to create other sections.
Renaming a section
To rename a section in Slide Sorter View:
- Right-click the section marker (which may be Untitled or have been named). The section marker appears as a bar across the screen. You can also click Sections in the Slides group on the Home tab in the Ribbon or press Shift + F10 or the Context key to access the context menu. A drop-down menu appears.
- Select Rename. A dialog box appears.

Collapsing and expanding sections
To collapse or expand sections, in Slide Sorter View, click the arrow to the left of the section marker to collapse or expand a section.
Moving a section
To move a section in Slide Sorter View:
- Click the arrow to the left of the section marker to collapse the section.
- Drag the section marker up or down to move the section. You can also right-click the section marker and select Move Section Up or Move Section Down (or press Shift + F10 or the Context key to access the context menu).
- Click the arrow to the left of the section marker to expand the section.
Removing a section
To remove a section in Slide Sorter View:
- Right-click the section marker. You can also click Sections in the Slides group on the Home tab in the Ribbon or press Shift + F10 or the Context key to access the context menu. A drop-down menu appears.
- Select Remove Section. A dialog box appears.
- Select Remove Section, Remove Section & Slides or Remove All Sections.
- A dialog box may appear to ask you to confirm the deletion. Click OK.
Sections will also appear in Normal View in the slide thumbnails area on the left.
Subscribe to get more articles like this one
Did you find this article helpful? If you would like to receive new articles, join our email list
More resources
PowerPoint Slide Show Shortcuts (50+ Shortcuts)
How to Print a PowerPoint Presentation with Notes
How to Embed a YouTube Video in PowerPoint
How to Add Audio in PowerPoint Presentations
How to Remove the Background of an Image in PowerPoint (2 Ways)
Related courses
Microsoft PowerPoint: Intermediate / Advanced
Microsoft PowerPoint: Design for Non-Designer s
Microsoft Excel: Intermediate / Advanced
VIEW MORE COURSES >
Our instructor-led courses are delivered in virtual classroom format or at our downtown Toronto location at 18 King Street East, Suite 1400, Toronto, Ontario, Canada (some in-person classroom courses may also be delivered at an alternate downtown Toronto location). Contact us at [email protected] if you'd like to arrange custom instructor-led virtual classroom or onsite training on a date that's convenient for you.
Copyright 2024 Avantix ® Learning
You may also like

How to Insert or Type E with an Accent Mark in PowerPoint (È, É, Ê, Ë, è, é, ê, or ë)
You can insert or type e with an accent mark in PowerPoint using built-in tools or keyboard shortcuts (including Alt code shortcuts). The letter e can be inserted with an accent in both upper or lower case in text boxes or placeholders on slides, the slide master or layouts. The following are common accents in upper or lower case – È, É, Ê, Ë, è, é, ê, or ë.

How to Fade a Picture or Part of a Picture in PowerPoint (Using a Gradient)
You can fade a picture in PowerPoint by drawing a rectangle shape on top of the picture and then filling the rectangle with a gradient from opaque to transparent. This technique is often used to fade an image into the background of a slide. Since the rectangle is placed on top of the image and then text may be placed on top of the rectangle, you may need to reorder the objects.

How to Lock an Image, Shape or Other Object in PowerPoint
You can now lock an image, shape or other object in PowerPoint. Objects can be locked in Normal View or Slide Master View. Only PowerPoint 365 users can lock objects to prevent moving and resizing. This is helpful if you want to select and move other objects on the slide or prevent others from moving or resizing an object. You can lock items using the context menu or the Selection Pane.
Microsoft, the Microsoft logo, Microsoft Office and related Microsoft applications and logos are registered trademarks of Microsoft Corporation in Canada, US and other countries. All other trademarks are the property of the registered owners.
Avantix Learning |18 King Street East, Suite 1400, Toronto, Ontario, Canada M5C 1C4 | Contact us at [email protected]
Our Courses
Avantix Learning courses are offered online in virtual classroom format or as in-person classroom training. Our hands-on, instructor-led courses are available both as public scheduled courses or on demand as a custom training solution.
All Avantix Learning courses include a comprehensive course manual including tips, tricks and shortcuts as well as sample and exercise files.
VIEW COURSES >
Contact us at [email protected] for more information about any of our courses or to arrange custom training.
Privacy Overview
Pin it on pinterest.
- Print Friendly
- Slide Library
- Slide Library for PowerPoint
- Downloadable slides and shapes
- Slide Library search
- Search Library via shortcut keys
- Slide Library update alerts
- Rename or delete objects
- Share Slide Library
- Save slides or shapes to Slide Library
- Save presentation to Slide Library
- Manage Templates
- View all templates and set default
- Agenda Wizard
- Create Agenda Slides
- Update Agenda Slides
- Agenda Slide Numbering
- Navigate via Agenda
- Table of Contents
- Import Agenda Items
- Save Agenda Format
- Manage Colors
- Color Palette Toolbar
- Customize Color Toolbar
- Apply fill with outline color
- Recolor Charts
- View RGB color values & names
- Theme Color Tints and Shades
- Share Color Palette with team
- Insert Shapes
- Standard PowerPoint shapes
- Callouts / Speech Bubbles
- Hand Drawn Circles
- Harvey Balls
- Create Mini Slides
- Move to Multiple Slides
- Right Facing Centered Triangle
- Status Indicators
- Arrange and Align Shapes
- Select same color or size
- Select shapes by attribute
- Align shapes
- Align to first selected shape
- Choose Align anchor point
- Align using shortcut keys
- Copy paste position multiple shapes
- Straighten Lines
- Swap positions
- Distribute evenly
- Set Horizontal Gaps
- Set Vertical Gaps
- Squeeze or expand gaps
- Remove gaps
- Group Objects by Row
- Group Objects by Column
- Send to back, bring to front
- Send backward, bring forward
- Flip or rotate
- Group, ungroup and regroup
- Edit Shapes
- Same height, same width
- Copy paste position, size
- Resize shapes
- Slice shapes
- Multiply shapes
- Stretch shapes and fill gaps
- Toggle line weight and style
- Change margins toggle
- Chevrons same angle
- Paragraph Styles
- Save Paragraph Styles
- Apply Paragraph Styles
- Use PowerPoint Indent Increase/ Decrease to apply bullet styles
- Reset Paragraph Styles
- Ticks and Crosses bullets
- Paint Formatting
- Advanced Format Painter
- Position & Size Painter
- Table Format Painter
- Style Painter
- Text Format Painter
- Change Shape Painter
- Chart Format Painter
- Angles & Curves Painter
- Animation Painter
- Cycle Accent Colors
- Format Text
- Fit text to textboxes
- Wrap Text Toggle
- Merge Textboxes
- Split Textboxes
- Increase/ Decrease Font size
- Change Text Case
- Color Bold Text
- Delete Text or Replace
- Insert Superscript text
- Format Tables
- Create table from text boxes
- Convert table to text boxes
- Convert text to table
- Insert columns and rows
- Paste Excel data without source formatting
- Paste Excel data into text box tables
- Export Table or Box Table Data to Excel
- Set cell margins
- Express Table layout
- Table stripes
- Autofit columns
- Evenly space columns
- Align shapes over tables
- Harvey Balls for Tables
- Status Indicators for Tables
- Customizable PowerPoint Shortcut Keys
- Extra PowerPoint shortcuts
- Add PowerPoint shortcuts
- Search shortcut keys
- Reassign PowerPoint shortcuts
- Reset PowerPoint shortcuts
- McKinsey PowerPoint shortcuts
- F4 or Ctrl+Y redo or repeat
- Printable PowerPoint Shortcuts PDF
- How to Print a Custom Shortcuts list
- Search Shortcut Keys
- Searchable PowerPoint Shortcuts list
- Format Toolbar Overview
- Format Toolbar Layout Options
- Lock or Unlock Objects
- Lock objects
- Lock objects to the Slide Master
- Unlock objects
- Proofing Tools
- Fix Lines & Outlines
- Fix Layout, Transitions, Animations
- Fix Punctuation & Language
- Fix Margins, Bullets, Indents
- Check for Confidential items
- Reduce File Size
- Check Slide Master
- Sync Template Settings
- Set Proofing Language
- Change set language for PowerPoint presentations
- Flip PowerPoint Slides
- Flip Slides for Translation
- Slide Numbering
- Manage Slide Numbering
- Slide Numbers with totals
- Add words to Slide Numbers
- Change Starting Slide Number
- Skip Slide Numbers on Hidden Slides
- Slide Navigator
- Footers & Footnotes
- Filename Footer
- Enlarge Footnotes
- Refine Slides
- Add summary slide
- Format slide title
- Display No Fly Zone
- Send slide to appendix
- Camouflage mode
- Format Painter
- Set Grayscale
- Format Images
- Compress file size
- Format Charts
- Charts Toolbar
- Config Options
- Customize Settings
- Dark Mode Display
- Review Slides
- Customizable Status Stamps
- Sticky Notes
- Tag slides with filename and page number
- Share Slides
- Email selected slides in PPT or PDF format
- Print selected slides
- Save selected slides
- Slide Library for Teams
- Team Slide Library
- Create multiple Team Slide Libraries
- Synchronize Team Slide Libraries
- Synchronize Team Slide Library to your company Dropbox/ Box/ OneDrive folder
- Updating your Team Slide Library
- Import entire presentation to the Slide Library
- Share Slide Library with a colleague
- Share Custom Settings
- Share Custom Settings with Team
- Getting Started
- Getting started with PPT Productivity add-in for PowerPoint
- Downloadable PowerPoint Elements for Slide Library
- Tutorial - How to Create Custom Paragraph Styles for PowerPoint
- Can I use PPT Productivity on a Mac?
- PPT Productivity Basic Tools Tutorial
- PPT Productivity Plus Tools Tutorial
- New Features
- August 2023 update: Color Toolbar enhancement, new icons and more
- February 2023 update: New Slide Libraries available to download!
- January 2023 Update: Agenda Wizard, Format Painters + More
- How to copy and paste formatting in PowerPoint
- PowerPoint How To
- What are the most popular PowerPoint shortcuts?
- Where are PPT templates stored? Finding templates in PowerPoint
- Pasting data into a PowerPoint table without source formatting?
- Consulting Toolkit
- How to create effective consulting slides using Minto Principles
- Missing the McKinsey PowerPoint Shortcuts?
- Missing the Accenture QPT for PowerPoint?
- Missing the BCG PowerPoint Tools?
- Missing the Bain Toolbox for PowerPoint?
How to add Stamps or Stickers to PowerPoint slides?
- Looking for a Consulting PowerPoint Toolbar?
- Top 10 PowerPoint Hacks / Shortcuts used by strategy consultants
- PowerPoint Tips
How to organize PowerPoint Presentations with PowerPoint Sections
- February 1, 2023
What are PowerPoint Sections?
PowerPoint sections are section breaks which you can use to group slides within PowerPoint presentations. Sections can make organizing, navigating, and managing your slides easier - particularly when working with very large presentations.
Why use PowerPoint Sections?
You can use Sections in PowerPoint as a way to organize your slides into meaningful groups. These groups can then be used to outline your presentation, or to assign to other team members when collaborating.
Adding PowerPoint Sections to your presentations also makes creating Agenda and Table of Contents Slides with the PPT Productivity Agenda Wizard super easy. Read on to learn how to use PowerPoint Sections, including tips about how to use sections along with the PPT Productivity Agenda Wizard for PowerPoint feature.
How do I add a Section in PowerPoint?
You can add PowerPoint Sections to a PowerPoint document either in Slide Sorter view or in Normal View
To insert a PowerPoint section in Slide Sorter View:
- Right-click the PowerPoint slide you want to use as the starting slide in a section, or right-click between two slides where you want to add a section. Alternatively you can click Sections in the Slides group on the Home tab on the Ribbon. You can also use keyboard shortcut Shift + F10. A drop-down menu will then appear.

- Select Add Section . Your slides after the Section will move to a new line in slide sorter view. PowerPoint will also create a default section at the beginning of the presentation. A dialog box will appear.

- Enter a name for the section and click Rename .

- Repeat the above steps to create additional sections.
To insert PowerPoint Sections in Normal View
- Right-click the slide you want to use as the starting slide in a section or right-click between two slides where you want to add a section. Or click Sections in the Slides group on the Home tab in the Ribbon. You can also use keyboard shortcut Shift + F10. A drop-down menu appears.

- Select Add Section. PowerPoint will create a default section at the beginning of the presentation. A dialog box will also appear.

- Enter a name for the section and click Rename.

- Repeat to create other sections.
How do PowerPoint Sections work?
PowerPoint Sections insert a Section break between groups of slides. Each Section has a name or Section Header/Title. Any slide after the section header is grouped into that section, until the next section break. This means you can effectively group the slides for treatment - when you select the Section Header/Title you can delete a whole section of slides or move or whole section to a different location in your presentation at the same time.
In the below image, the PowerPoint section name has been selected, so all slides in that that group have also been selected. Right mouse click on the section name to reveal the Sections dropdown menu

From the Sections dropdown menu, you can choose to collapse or expand the slide group, move the slide group in the document, remove all Sections, remove all Sections and their slides, remove the selected Section or rename the Section.
Can I rename PowerPoint Sections?
Yes, you can change the name of your Sections easily. To rename a Section in Slide Sorter or Normal View:
- Right-click the Section Header/Title. You can also click Sections in the Slides group on the Home tab in the Ribbon or press Shift + F10. The Sections drop-down menu will appear.
- Select Rename.

- The Rename dialog box will appear. Enter a name for the Section and click 'Rename'

- Your Section name will now update to the name entered in the dialogue box.

How can I move or reorder PowerPoint Sections
To move a section in Slide Sorter or Normal View:
- Click the arrow to the left of the Section Header/Title to collapse the Section.

- The number off slides in the selected Section will appear in parenthesis next to the Section Header/Title. For example in the image about the number 3 indicates that there are 3 slides in the Section/group.
- Drag the Section marker up or down in your document to move the Section. You can also right-click the Section marker and select Move Section Up or Move Section Down (or use Keyboard shortcut Shift + F10)

- Once the Section is in it's new position in the deck, click the arrow to the left of the Section marker to expand the Section.

Can I remove PowerPoint Sections from document?
You can remove Sections from PowerPoint presentations. There are 3 methods for removing PowerPoint Sections;
- Remove Section break so slides merge with the previous Section
- Remove Section & Slides . This will remove not only the Section break but all slides within the group
- Remove All Sections . Removing all Sections will remove all Section breaks from the document. All slides will remain intact and in the current order
Method 1 - Remove Section break and merge slides with previous Section
To remove a PowerPoint Section and leave slides intact, in Slide Sorter or Normal View:
- Right-click the Section Header/Title. You can also click Sections in the Slides group on the Home tab in the Ribbon or use Keyboard shortcut Shift + F10. A drop-down menu will appear
- Select Remove Section.

- The Section break will be removed from the document. The slides that were previously grouped in the selected Section will be merged with the previous Section
Method 2 - Remove Section including slides contained in Section group.
To remove a PowerPoint Section including all slides within the Section group, in Slide Sorter or Normal View;
- Select Remove Section & Slides

- The Section break, along with any slides within the group will be removed/deleted from the PowerPoint document. Any Sections & Slides following the Section that has been removed will be moved 'up' in the presentation.

Method 3 - Remove All Sections, Only Sections removed. Slides within Section groups remain intact
To remove all PowerPoint Sections from a presentation without deleting or changing the order of slides, in Slide Sorter or Normal View;
- Select Remove All Sections

- All Section breaks will be removed from the presentation. Slides will be unaffected. (Image below shows the same document with all Sections removed, Slides remain intact)

Creating PowerPoint Table of Contents and Meeting Agenda's using PowerPoint Sections
The PPT Productivity Agenda Wizard allows you to quickly create PowerPoint Table of Contents and Agenda Slides with ease. In addition to typing the individual Agenda items, Agenda content can be imported from mulitple sources including;
- Section names
- Selected slide titles
- All slide titles
- Slide content
- Clipboard content
In this article we will explain how to create PowerPoint Agenda and Table of Contents slides using PowerPoint Sections
To create a Table of Contents or Agenda from PowerPoint Sections,
- Open the PPT Productivity Agenda Wizard. You'll find the Agenda Wizard in the Insert Group on the PPT Productivity Format Toolbar

- The Agenda Wizard dialogue box will open. Here you can add your Agenda contents manually or select 'Import Agenda Items' to import content for the Agenda/ToC from PowerPoint Sections

- The Import Agenda items window will open. Select 'Load section names'. You will see a preview of the section names that will become the items listed in the Table of Contents/Agenda

- Click OK. The Generate Agenda window will reopen with Agenda items populated according to the Sections contained in the PowerPoint presentation.

- While on the 'Edit Agenda Items' tab in the 'Generate Agenda' window you can set your Agenda preferences. Update the Title, or deselect 'Show' to create Agenda's without a Title. Set the purpose of the Agenda - either a Meeting Agenda or Table of Contents. (For this example I have selected Table of Contents). Decide whether to include item numbers and/page numbers on the Agenda/Table of Contents slide.
- Once you have happy with your preference, select 'Next'
- Selecting Next will take you to the 'Format Agenda' tab in the 'Generate Agenda' window. Here you can select preferences for your Cover Slide and Divider Slides. PPT Productivity will automatically select a slide layout and colors that are based on your Master theme so in general you will not have to do anything except decide whether you require Divider Slides to be generated along with the Agenda/Table of Contents slide. However you can make alternative formatting selections via the dropdown menus linked to Slide Layout, Agenda Style, Primary Color and Secondar Color if desired.

- Once you have set your preferences click 'Create' (Note, if you want to set these same preferences as your default for Agenda/ToC slides select 'Save Settings' before creating your Agenda)
- Your new Agenda/ToC slide, along with Divider slides will be inserted directly into your PowerPoint presentation. Dividers slides will be inserted at each Section break, at the beginning of the Slide group.

- If you reorder the PowerPoint Sections in the document, simply open the Agenda Wizard and hit 'Update' to Sync the Agenda/ToC and Dividers Slides based on the new order of the Sections in the presentation.

See our tools at work
Book a personal demo with our PPT professionals

Start 30 Day Free Trial
Start your 30 day free trial - Microsoft Office for Windows
Download and Install
Existing customers download to install on a new computer
Related productivity tips

Looking for PowerPoint stamps and stickers? Perhaps you’ve come out of one of the top tier ...

How to reduce file size of PowerPoint Presentations?
You’ve spent hours creating an awesome presentation, including lots of well thought-out images and...

Add Sticky Notes to PowerPoint Slides - Six Colors
PPT Productivity PowerPoint add-in has been updated to improve the appearance of our sticky notes ...
- October 2024: Report Redesign
- November 2024: Powerful Presentations
- December 2024: Dashboard Design
- Self-Paced: Soar Beyond the Dusty Shelf Report
- Full-Day Workshops
- Conference Keynotes
- Shirts & Hoodies
- Chart Templates
Leave a Reply Cancel reply
Your email address will not be published. Required fields are marked *
Save my name, email, and website in this browser for the next time I comment.
How to Organize Your PowerPoint Slides by Adding Sections

Want to organize your PowerPoint slides a little better? There’s a behind-the-scenes trick that I love using in my own presentations: Sections!
In March 2021, I was speaking with GEDIs about dataviz tricks for presentations. (The GEDI program is the Graduate Education Diversity Internship within the American Evaluation Association.)
I was scrolling through my slides, and someone asked how I created these “sections” to organize my content.
Adding sections to PowerPoint has been a gamechanger for me personally. They help me stay organized behind the scenes, which helps my audience, too. An organized presenter = an organized presentation = a happy audience that can learn from us headache-free.
Watch the 7-Minute Tutorial on Sections
I started to write a blog post with screenshots about sections… but that felt impossible. I wanted to show you how sections work, so I recorded you a tutorial.
What’s inside:
- A demo of what sections are
- How to add them
- How I use them to hide topics
- How I use them to re-order topics
What Are PowerPoint Sections?
Sections help us organize our slides into meaningful groups, categories, chunks, buckets, or chapters of a presentation.
In the video, you’ll see what they look like.
Can you spot the words above some of the slides?
Our audience won’t see the sections. They’re for us, the presenters.
How to Add Sections
It’s easy to add new sections to a presentation.
Here’s how:
- I like to be in Slide Sorter view first. (The birds-eye-view of the presentation where you can view all the miniature slides.)
- Decide which slide is going to start the new section. Click on that slide to activate it.
- Right-click and Add Section.
- In the pop-up window, give your section a name. I use names like Introduction, Case Study, Conclusion, etc.
That’s it!!!
How to Use Sections to Hide Topics
I like to keep all my slides for a given workshop within a single file.
While prepping for upcoming talks, I go through the full file – all 900+ slides! – and choose which sections I’ll talk about.
I might cover Sections A, B, and C for one group.
I might cover Sections A, D, and E for another group.
I might add Sections F, G, and H as brand new topics for another group.
(For private trainings, I review the group’s materials ahead of time and hold some planning calls to figure out which sections are going to be the best use of our time together.)
As I’m deciding which sections to include, I simply hide and unhide the slides. In the video, you’ll learn how to hide and unhide slides.
(Yes, you can hide and unhide slides without having any sections. I personally like using sections so I can think about an entire category of slides that should be shown or hidden.)
How to Use Sections to Re-Order Topics
I definitely recommend outlining your presentation in a document or spreadsheet before making all your slides.
Our outlines don’t need to be 100% finished before we make our slides. I almost always make changes along the way.
One common change is re-ordering topics. I might envision covering topics A, B, and C, in that order. But later, as I’m designing the slides, I might decide to cover topics A, C, and B.
In the video, you’ll learn how to drag and drop entire sections to re-order them.
Let me know how you’ve used sections to keep your content organized!
You Might Like
Soar beyond the dusty shelf report, your dataviz icons: too big and too dark, powerful presentations.
- First Name *
How To Use Sections In Powerpoint To Group Slides

Adding sections to your presentation can make it easier to organize the content and keep track of where you are in your presentation. Sections can also help you group slides together based on a single theme or topic.
In this article, we will discuss how to use sections in PowerPoint to organize your content and group related slides together.
Adding Sections
1. Place your cursor above the slides you want to separate into a section.
2. Right-click and then click “Add Section.”

3. Rename the section.

You have successfully added a section to your presentation. Adding multiple sections gives you more freedom to organize your content.
Organizing slides and sections
Rearranging slides and sections is easy. Simply drag and drop the slides and sections to rearrange them in your presentation. Alternatively, you can also rearrange slides and sections by using the “Slide Sorter” in the “View” menu.

Organizing your slides and sections is an important step in creating a professional presentation. With sections, you can group related slides together and make it easier to navigate through your content. Whether you are creating a PowerPoint for work or school, using sections is a useful tool that can help improve the clarity and organization of your presentation.
Related Posts:

- PowerPoint Training
PowerPoint Sections
How to Make Sections in PowerPoint

PowerPoint Training Features:
Interactive bite-sized lessons
Get Certified
Accurate skill assessments
Customizable, LMS-ready content
4.9 out of 5 on G2

Sections allow you to group slides together into different categories, which makes it easier to keep a presentation organized.
Add a Section
- Select the slide where the new section will begin.
- Click the Section button on the Home tab.
- Select Add Section .
Right-click the first slide of the section in the Thumbnails pane and select Add Section .
The section is added as Untitled Section.
- Type a name for the section.

The slides are grouped into a new section. When you create your first section, all of the slides after the selected slide are included in the section.
Rename a Section
You can rename an existing section after it's been created.
- With the section heading selected, click the Section button on the Home tab.
- Select Rename Section .

The section is renamed and the new name is displayed in the Thumbnails pane.
Collapse Sections
To more easily see all the sections in your presentation, collapse them down.

All sections are collapsed, hiding the slides behind the section labels.
Remove Sections
If you no longer need a particular section, you can remove it. Removing a section does not remove the slides in that section.
- Select the section you want to remove.

The section is removed, and the slides that were in it move to the section above it.
Remove all of the slides in the section by right-clicking the section heading and selecting Remove Section and Slides .
Move Sections
You can move sections around in the outline, which will move all of the slides in that section at once.

FREE Quick Reference
Free to distribute with our compliments; we hope you will consider our paid training.
- LinkedIn-ready certificate
- Skill assessments
- Bite-sized, interactive lessons
- Saved progress

Creating slide subsections in PowerPoint

One of the best new features introduced in PowerPoint 2010 (and also included with PowerPoint 2013) is the ability to group presentation slides into sections. Almost as soon as we got sections, we wanted subsections. Until this feature is included, you can create simulated subsections by using an underscore to name your subjections.
Visually, it will be easy to discern which are main sections and which are subsections. So you might have a section title of Employee Benefits, followed by subsections named _Tuition Reimbursement and _Health Savings Account.
WHAT TO READ NEXT

How to Add Speaker Notes in PowerPoint (Tutorial)

Speaker notes in PowerPoint can be a lifesaver for presenters who need a quick reference during their talk. Instead of struggling to remember key points or losing your place during a presentation, you can have your notes right in front of you.
Whether you're a seasoned presenter or new to public speaking, this tutorial will help you feel more confident and prepared for your next presentation. With insights and practical tips from our in-house presentation designers , you'll have all the tools you need for success.
Let's dive in and explore how to add speaker notes in PowerPoint, taking your presentations to the next level!

In this tutorial, we’ll cover the following topics :
- Starting with the basics: How to add speaker notes in PowerPoint
- Ready to Captivate Your Audience? Let’s see how to view speaker notes while presenting
- From PCs to Macs, learn how to print speaker notes in PowerPoint
- Get answers to your FAQs and unlock tips for better presentations
Let’s start with the basics - or feel free to skip to your preferred section using the list above.
Adding speaker notes in PowerPoint
Adding notes to PPT is a reasonably straightforward process, regardless of your operating system. Here's how to add notes in PowerPoint:
- Select a slide you want to add notes to.
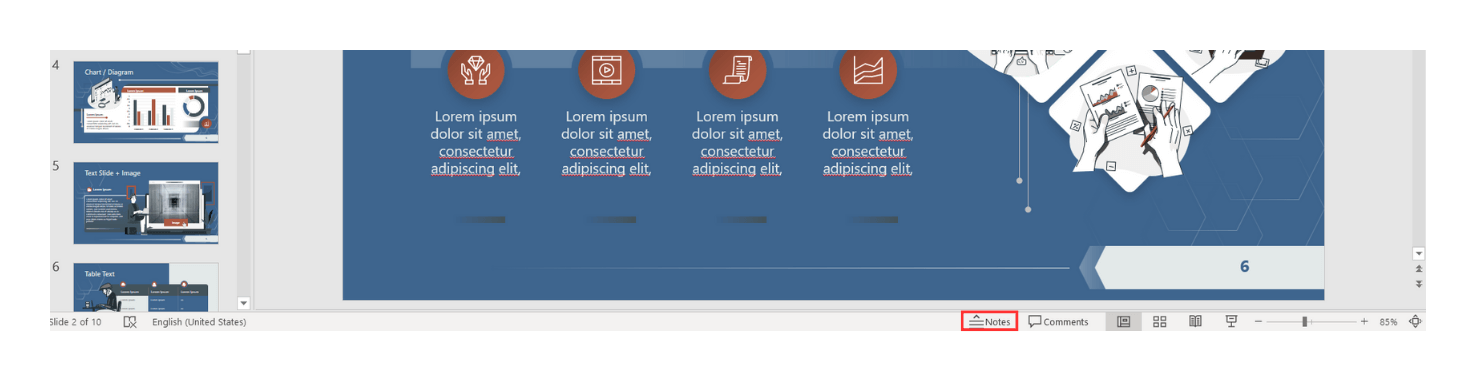
- View the Notes pane located beneath each slide. If it's not visible, you can make it appear by clicking Notes on the bottom taskbar.
- You will see a blank space with the prompt "Click to add notes." That's where you can enter your speaker notes.

Pro tip: Add Notes Via Notes Page view
Are you looking to give an impeccably organized presentation? Feronika Wulandari , design manager from 24 Slides, has a pro tip for you!
"For presentations that will be copied or distributed to the audience as a reference later, it is crucial to provide detailed speaker notes. Merely looking at our presentation slides may leave the audience struggling to grasp the context.”
If you're aiming for an impeccably organized and informative presentation, Feronika's advice is invaluable. Take your presentations to the next level by utilizing the powerful Notes Page view in PowerPoint . This feature allows you to incorporate comprehensive speaker notes into your slides, ensuring your audience can fully grasp the context after the presentation.
In the Notes Page view, you have complete control over the content of your speaker notes. Customize the font size, and enrich the notes with images, shapes, charts, and more. You can even tailor the background color to suit your preferences or corporate branding. As Feronika says:
“In the notes view, we can include ample text to facilitate the audience's understanding of the presentation's context. It also is an excellent tool for attaching references and citations, particularly for content-heavy presentations like scientific ones.”
Ready to try it out? Here's how you access the Notes Page view:
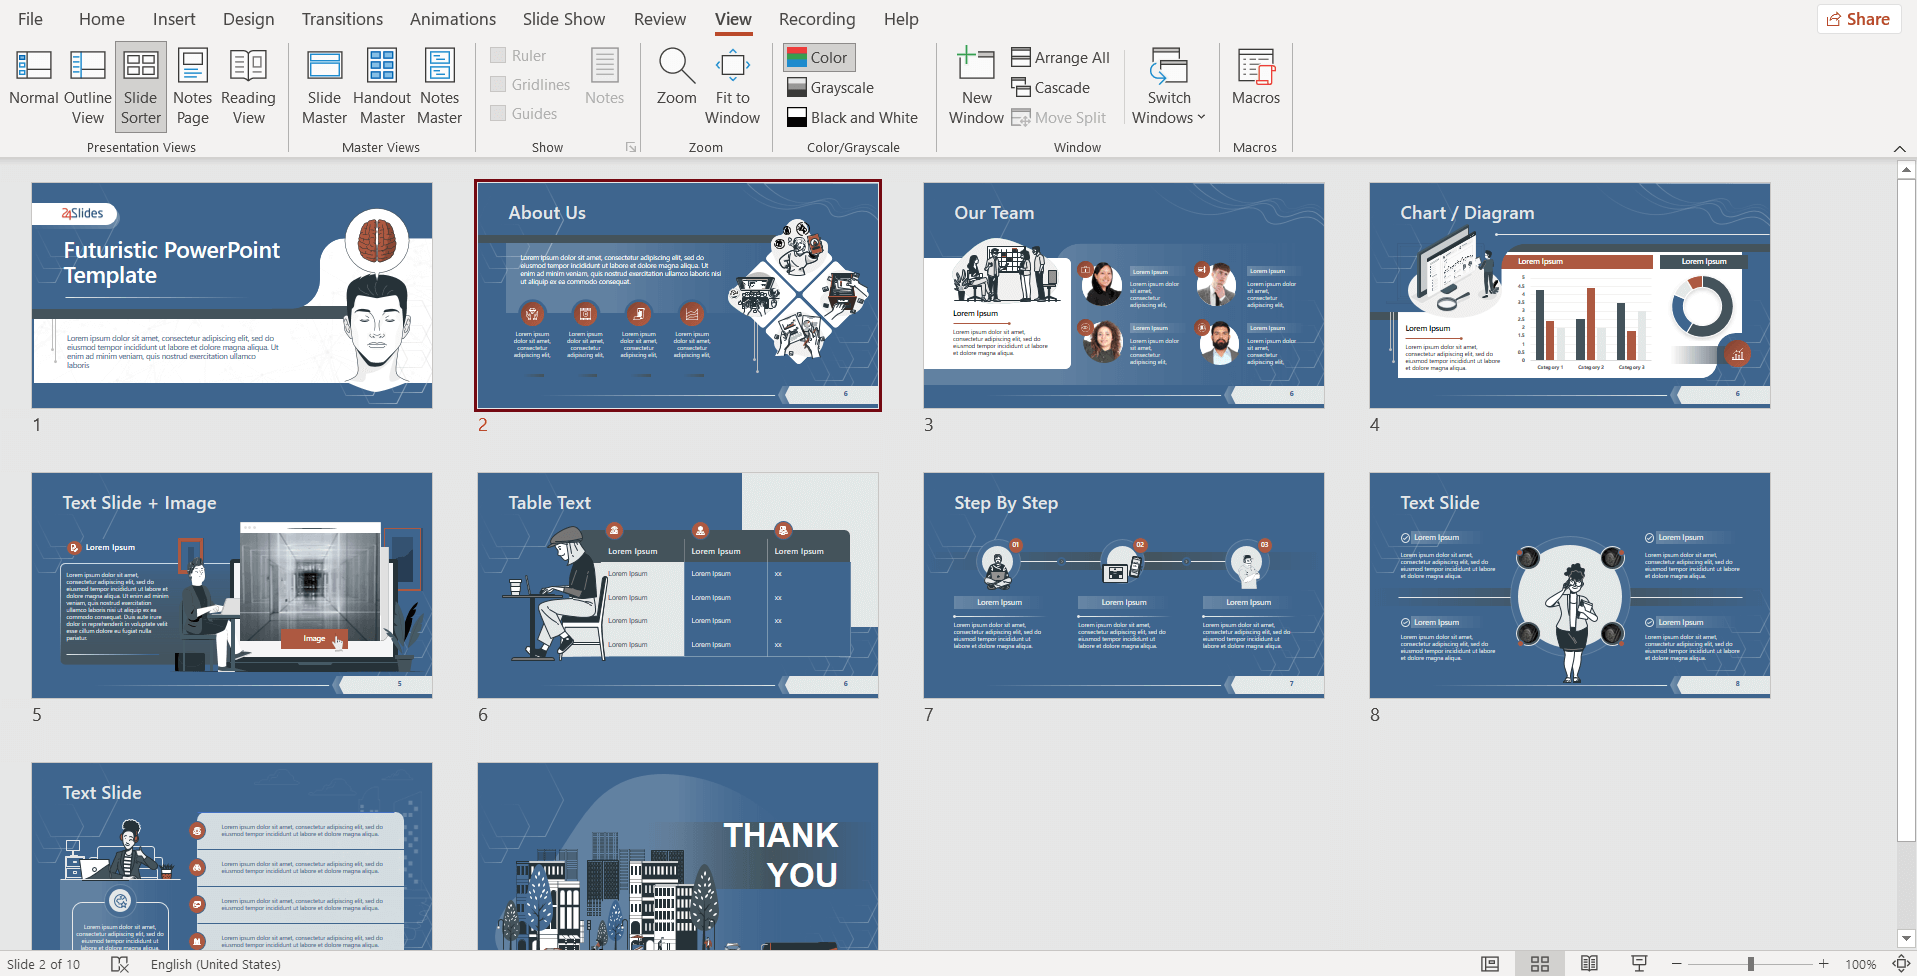
- Click View .
- Look for the Presentation Views section .
- Select Notes Page .

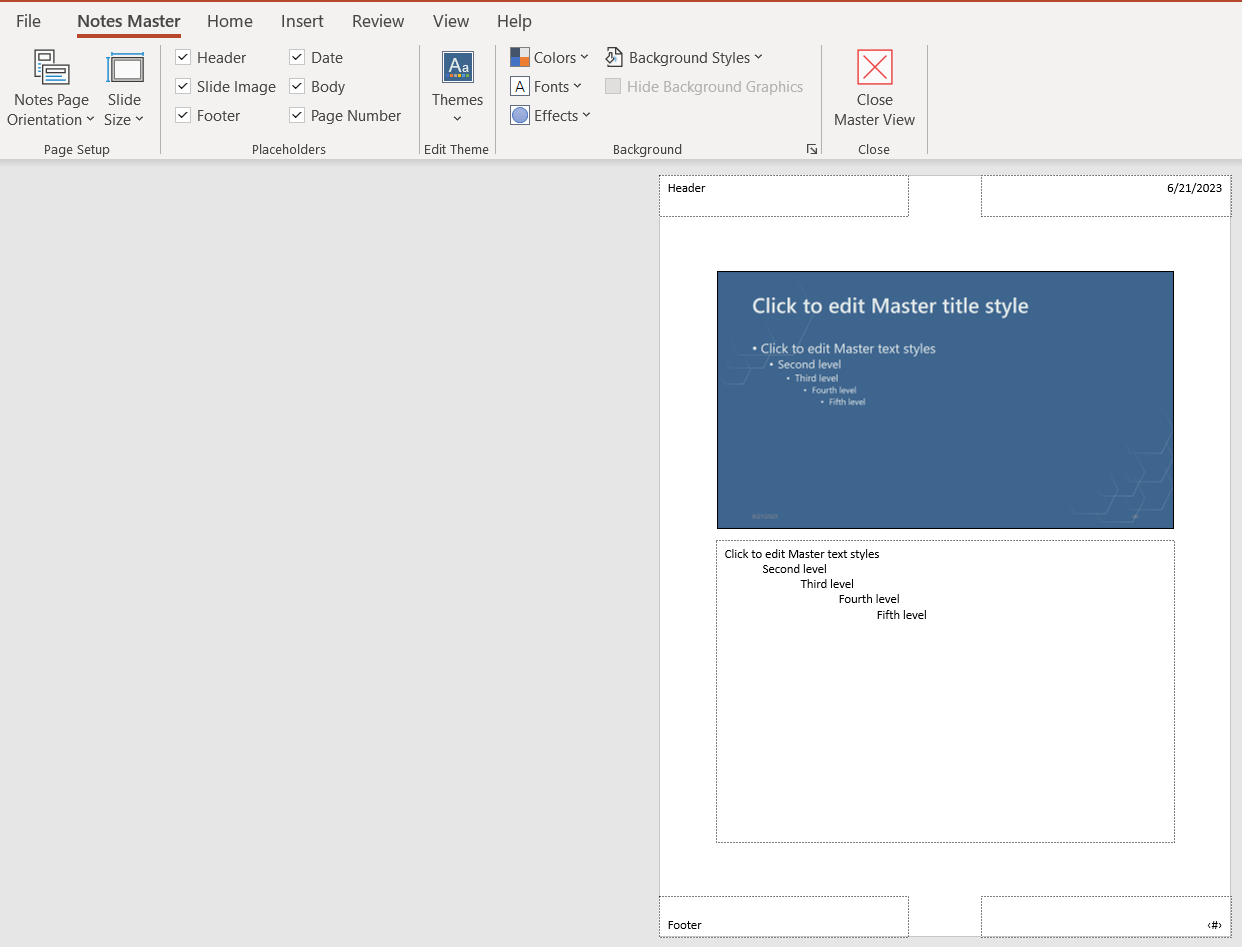
If you want even more control over how you want your notes to look, you can check out the Notes Master . This is how you can try it out:
- Look for the Master Views section .
- Select Notes Master.

Here you can choose the design and layout of the notes page and select options for your page setup. This is what the Notes Master looks like:
Now that you know how to add notes to PowerPoint, let's see how to present PowerPoint with notes.
Ready for your next presentation? Check out how to see speaker notes while presenting
To prepare for your next presentation, follow these steps so you can have your notes on hand without your audience being able to see them. First, click on the Slide Show tab , and select the box Use Presenter View . This is what the Presenter View in PPT looks like:
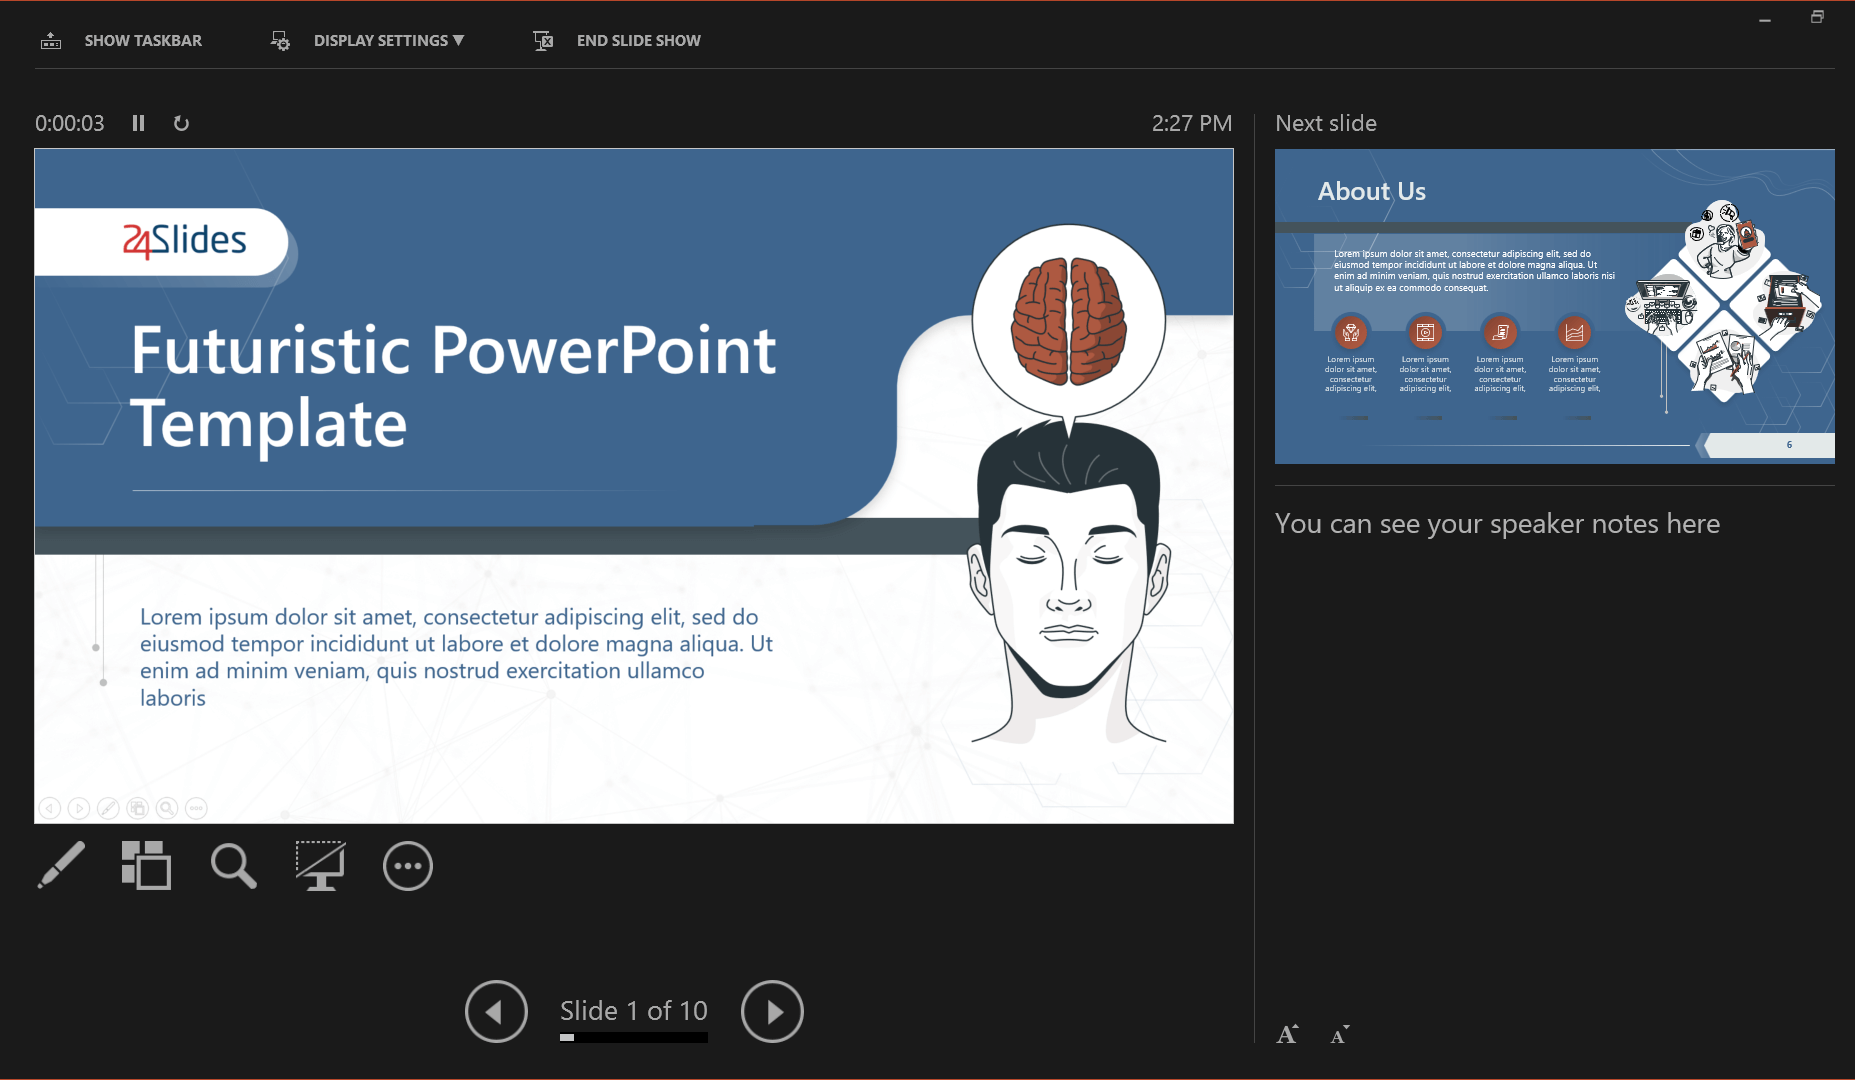
To access the presenter view, start your slideshow and then click on the left button of your mouse. From the options that appear, select Show Presenter View .
And last, learn how to print notes in PowerPoint
Printing PowerPoint presenter notes can be done in different ways, depending on your operating system. Let's look at each one of them.
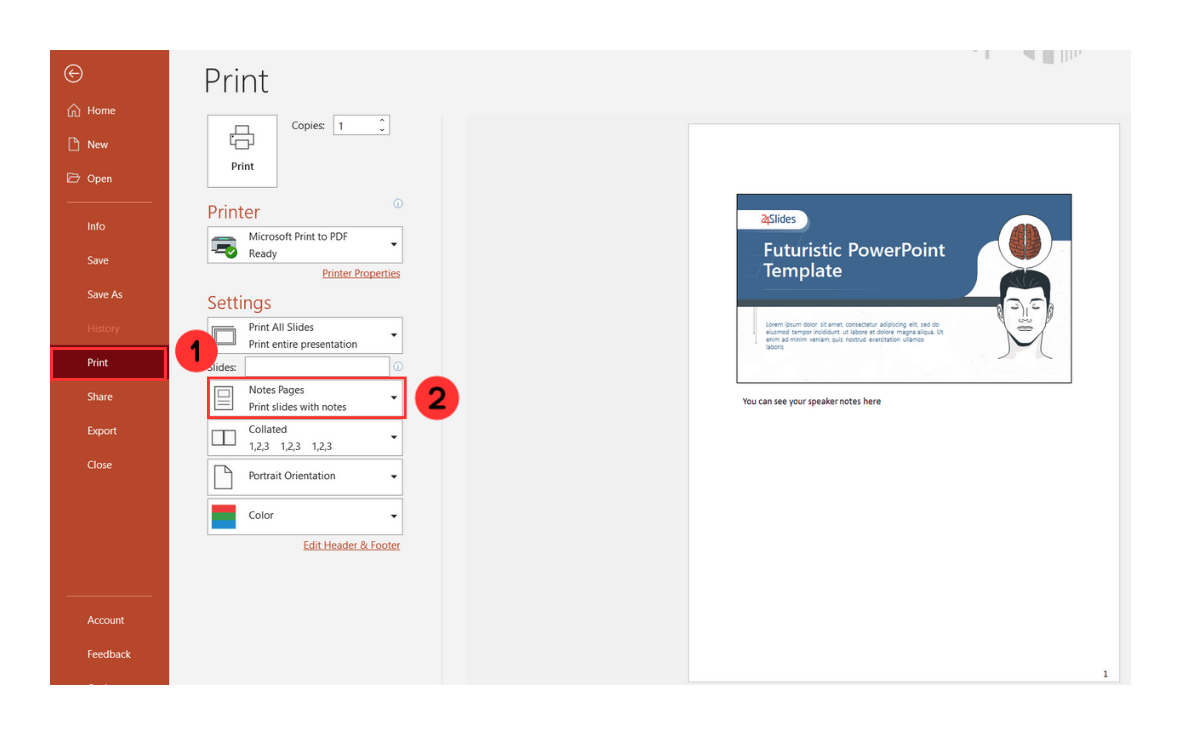
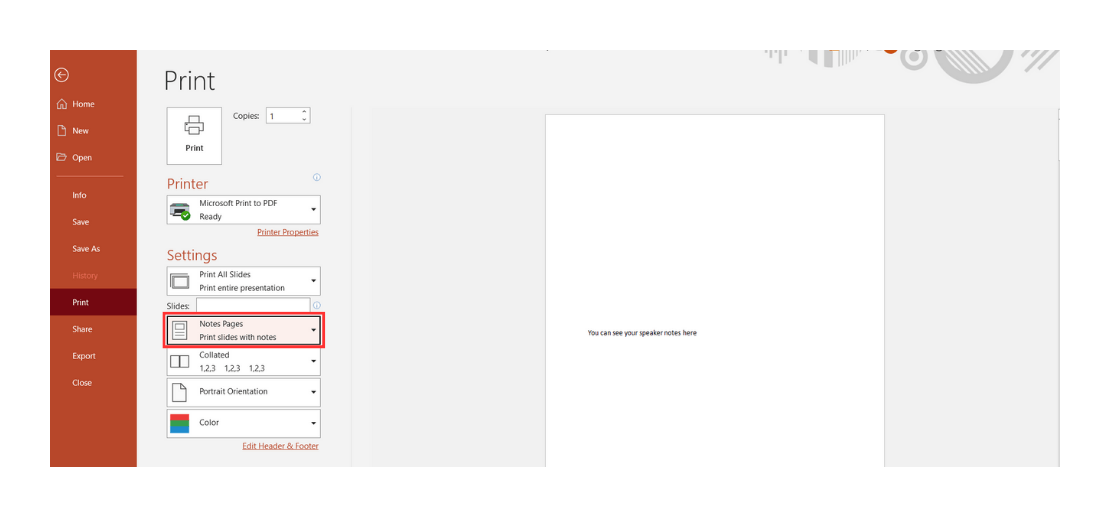
How to print Speaker Notes (PowerPoint - Windows)
- Click File in the top left corner.
- Choose Notes Pages from the Settings dropdown menu.
- Adjust any other printer settings.
- Click Print .
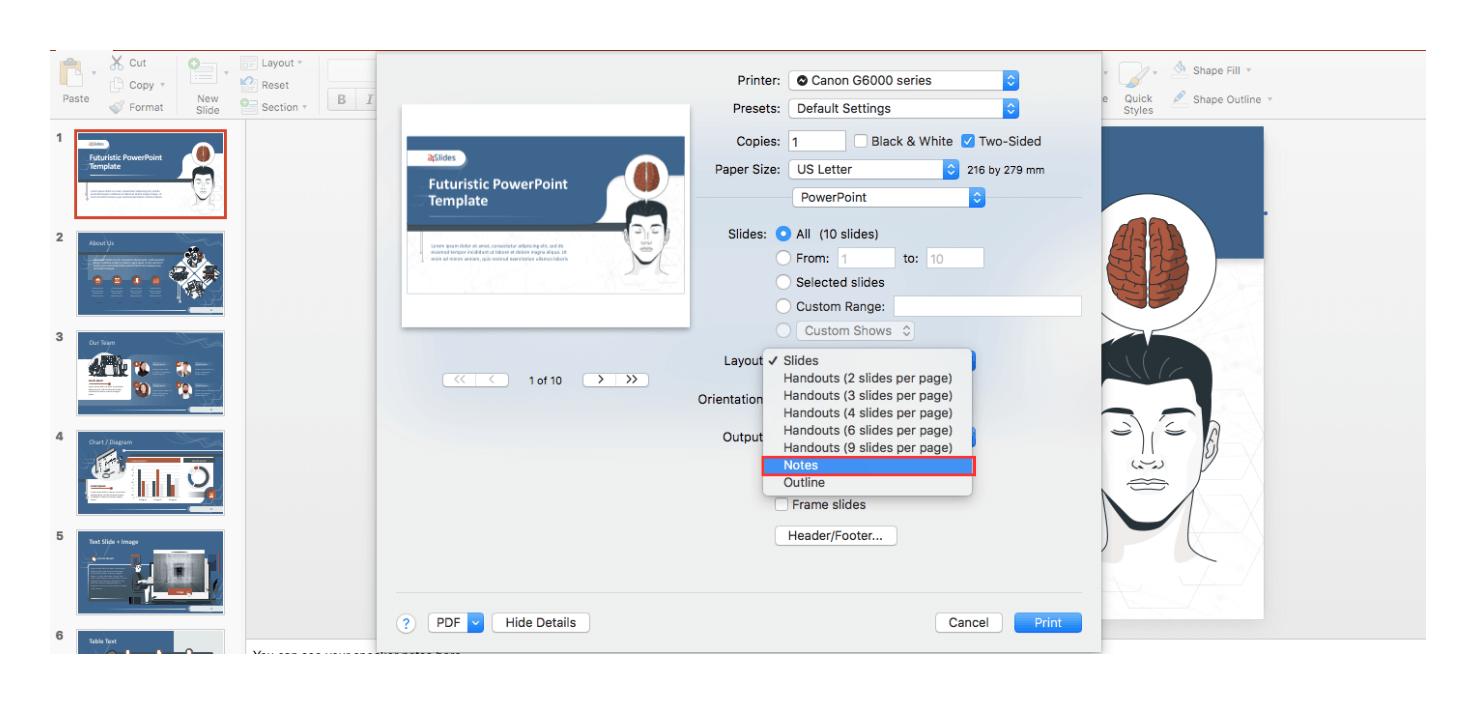
How to print Speaker Notes (PowerPoint - macOS)
- Click File .
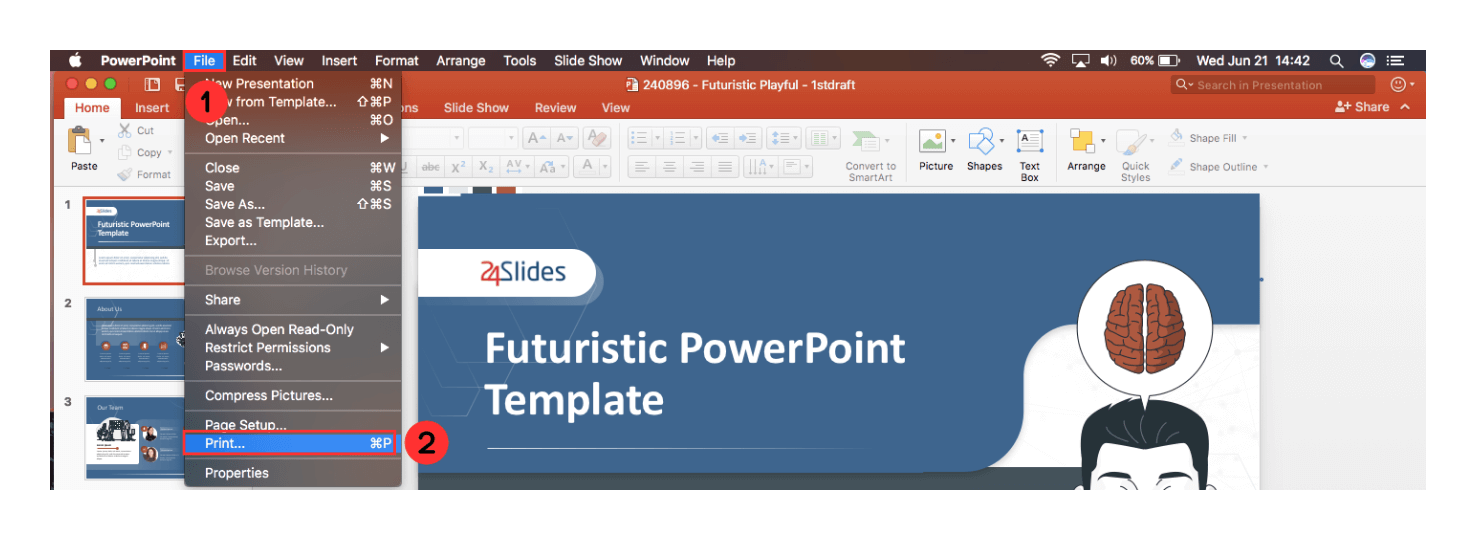
3. Click Show Details .
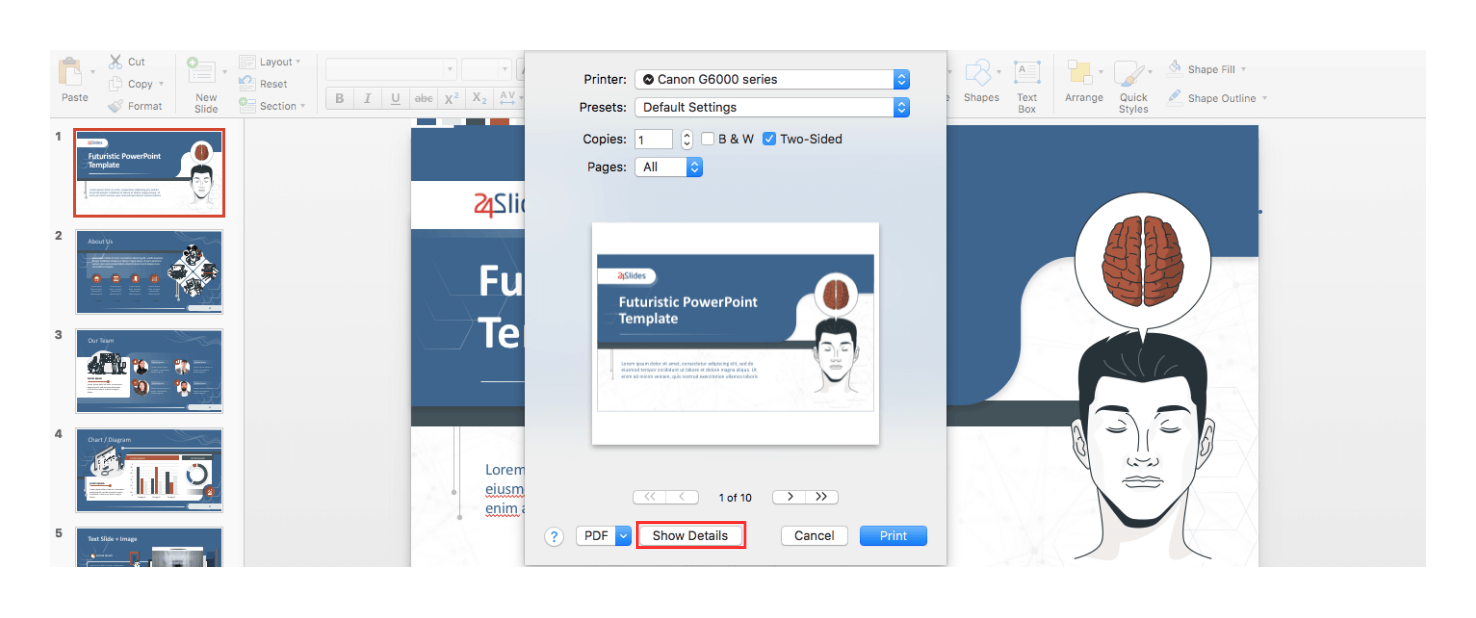
4. Select Notes from the Layout dropdown menu.
5. Adjust any other printer settings.
6. Click Print .
You may also want to know: How to print notes without slides?
If you want to print speaker notes only, this is what you should do:
- Go to the View tab and click Notes Page . On each page, you’ll see a thumbnail of the slide and the notes it has.

2. Select the thumbnail on each page and press delete . Repeat this step for each notes page.
3. Finally, go to the File tab and click Print. Now, repeat the note-printing process shown in the section above.
How to print PowerPoint slides with notes: Multiple per page
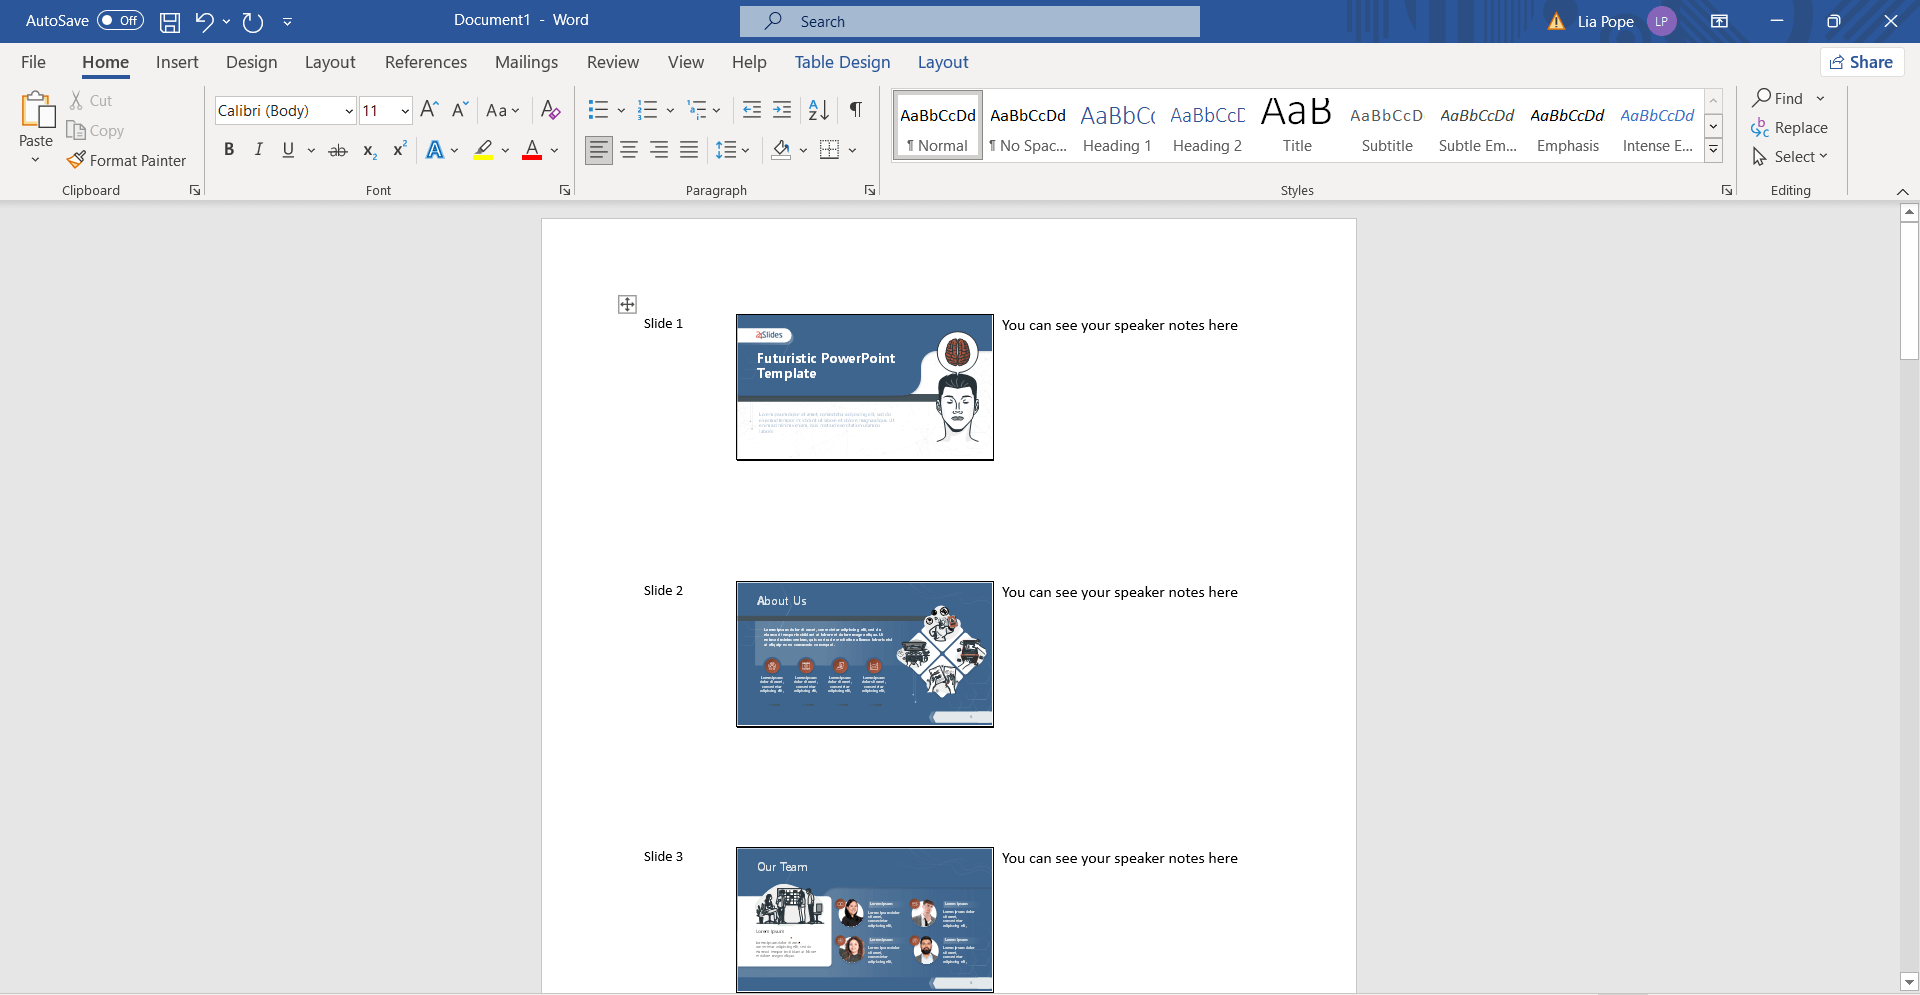
If you want to print multiple slides on the same page, including the notes, follow these steps: 1. Open the File menu, select Export , and click on Create Handouts.
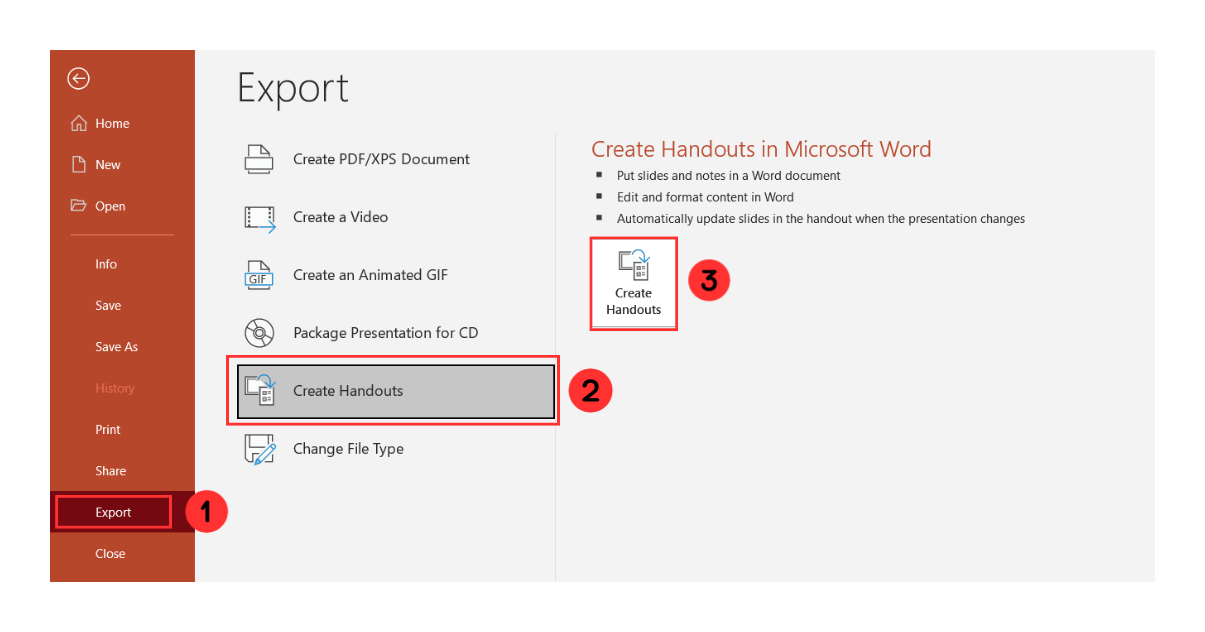
2. Select Notes next to slides , and click OK.
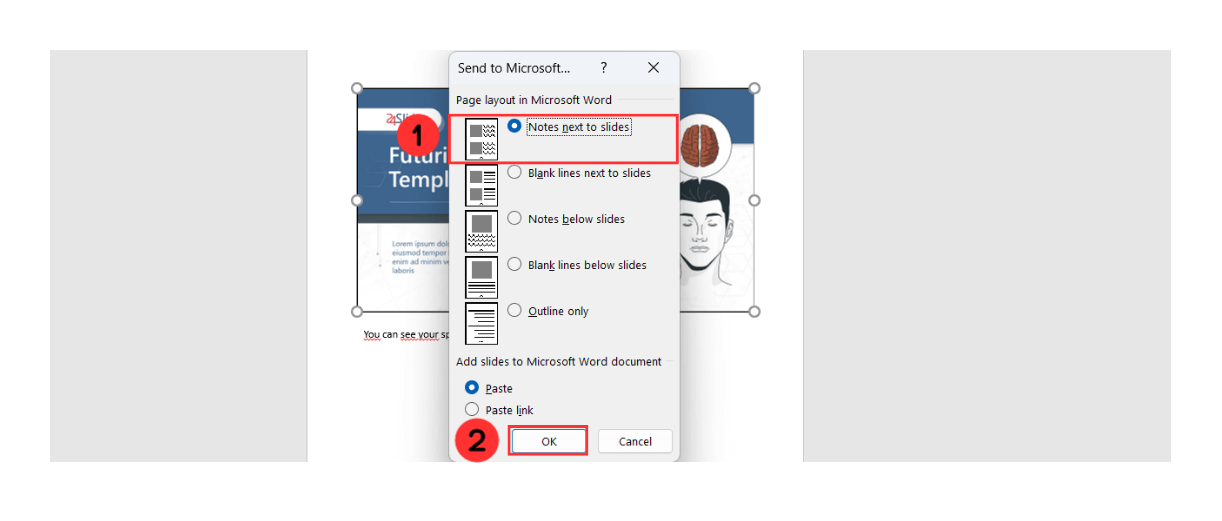
This will begin the export to Word, where you can finish printing your slides and notes as a document.
Customer Frequently Asked Questions
What are speaker notes in powerpoint.
Speaker notes on PowerPoint presentations are a feature that allows presenters to add additional information that won't appear in the presentation slides.
PowerPoint notes can be used to provide additional context and details about the content on the slide, such as statistics or critical messages. They can also help emphasize specific points without cluttering their slides with too much information. They are a valuable tool for presenters to keep essential points at hand while giving a presentation.
These are some examples of speaker notes in PowerPoint:
Benefits of using speaker notes in PowerPoint
Why add speaker notes to PowerPoint? Learning how to use notes can be a game-changer , it can benefit you in many ways.
Speaker notes on PowerPoint can help you recall important points and key messages as you give a presentation. They also provide a security blanket, giving you the confidence to deliver your speech without worrying about forgetting something.
Remember, not worrying about memorization can help you prioritize inflection and tone and make you look more professional and connected with your audience.
How do I edit slide Notes?
A good thing to remember is that you can edit your speaker notes anytime you want. So, if there is a last-minute change or a new detail you would like to consider, you can follow these steps:
- Select the slide where you want to edit notes.
You will be able to see the Notes written in the Notes Pane . Click inside it so you can edit de content. Click outside the Notes Pane to save your changes.
What is the use of Notes Page view?
The Notes Page view is a PowerPoint feature that can help you upgrade your note-taking experience . Rather than presenting your notes in a simple text format, this feature presents them as individual pages with diverse layouts, colors, and formatting options for you to explore and customize.
If you would like to check out this feature, check out our Notes Page View section .
What is the advantage of the Notes Page view?
So, why is this feature impressive? Well, the Notes Page view offers several advantages that simplify the management of your notes:
- Organization: When it comes to giving presentations, being organized is essential. You can't afford to waste time deciphering your notes. With the Notes Page view, you effortlessly organize them into distinct pages, sections, or categories, allowing you to find what you need quickly.
- Personalization: The Notes Page view also puts you in complete control. It lets you customize the appearance and layout of your notes according to your preferences. You can explore a wide array of templates, themes, and styles, making your note-taking experience unique.
What is the difference between Slide Sorter view and Notes Page view?
The Slide Sorter view and Notes Page view are two different viewing options in PowerPoint .

The Slide Sorter view in PowerPoint provides a condensed and sequential display of all the slides in your presentation. It presents miniature versions of each slide in a grid layout, allowing you to manage the order and structure of your presentation easily.
This view is beneficial when you need to reorganize your content or gain a quick understanding of your entire presentation at a glance.
On the other hand, the Notes Page view allows you to see your slides along with any accompanying speaker notes . It is ideal for creating and reviewing speaker notes, providing a dedicated area to jot down the additional information you want to reference during your presentation.
You can customize and format your notes as needed, making them a valuable resource for guiding your delivery or providing more in-depth explanations.
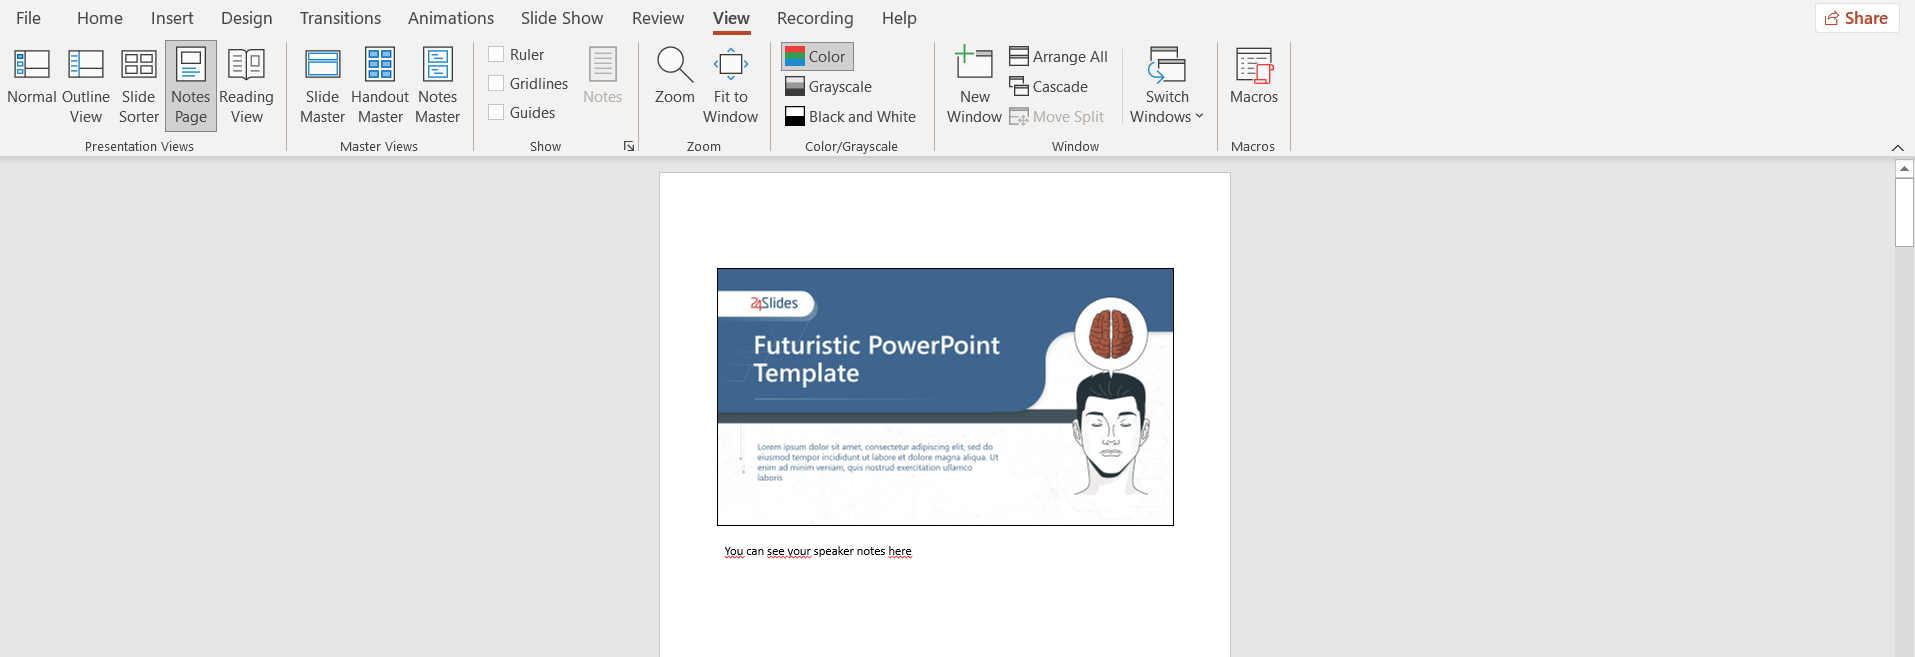
Get outstanding presentations that make you stand out from the crowd!
If you want to improve your presentation skills and give a more professional image to your business, this tutorial can help. However, the design for your presentation is crucial, and that's where our presentation design solutions come in.
At 24Slides , we transform presentations from "good" to "extraordinary," saving you time and effort. Say goodbye to long working hours on PowerPoint and let our design experts amaze you overnight!

You might also like these articles:
- How to Add a Timer to Your Powerpoint Presentations
- How to Make a PowerPoint Slideshow that Runs Automatically
- How to Create Your Perfect Webinar Presentation (+Examples)
- Master Slides 101: How to Create and Use Master Slides in PowerPoint
- How to Track Changes in PowerPoint
Create professional presentations online
Other people also read

Tutorial: Save your PowerPoint as a Video
How To Convert Google Slides To PowerPoint and Vice Versa

How To Add Animations To PowerPoint
How-To Geek
Everything you need to know about animations and transitions in powerpoint.

Your changes have been saved
Email is sent
Email has already been sent
Please verify your email address.
You’ve reached your account maximum for followed topics.
If Your PC Won't Run Windows 11, Here Are 5 Great Linux Operating Systems to Try Instead
Microsoft office apps provide a new path for hackers, mail merge is more useful than you think: 4 practical uses, quick links, what are animations, what are transitions, things to note before you begin, how to add, amend, and remove an animation, how to add, amend, and remove a transition, using the morph transition.
PowerPoint's animations and transitions can help you grab your audience's attention, present information in bite-sized chunks, and—when used sparingly—deliver a more professional presentation. In this article, we'll run through the nuts and bolts of these useful PowerPoint tools.

Animations are effects you can add to your slides' text, pictures, shapes, graphics, tables, and other elements. There are four different types of animations:
- Entrance animations—These are the effects you can add to make an object appear on your slide in different ways.
- Emphasis animations—You can add an emphasis animation to an object already visible on your slide, such as changing its size or color.
- Exit animations—The opposite to entrance animations, exit animations make objects disappear from your slide through different effects.
- Motion paths animations —You can make an element on your slide move to a different place, with your audience seeing this movement from where it started to where it ends up.
You can use more than one animation on a single object. For example, you can apply an entrance animation to some text, followed by an emphasis animation.

A transition effect dictates how your presentation progresses from one slide to the next, and you can choose from three different levels of complexity:
- Subtle—These are the most basic types of transitions in PowerPoint, aiding speed and slickness as you jump from one slide to the next.
- Exciting—You can make your transitions more visually entertaining.
- Dynamic—A dynamic transition applies to all parts of a slide, except for the background, giving the illusion that the content is rolling through on a single page.
Only one transition effect can be added to each slide, and it's important that you apply the transition to the slide that will be visible once the transition is complete. For example, if you have two slides and want to create a transition effect as you move from slide 1 to slide 2, you will need to apply the transition to slide 2.
Before you add animation and transition effects to your PowerPoint presentation, bear in mind the following tips:
- Don't add too many animations and transitions . Overusing these features can distract your audiences in ways you didn't intend to, and they can also look tacky and unprofessional. Ask yourself, "Does this make my presentation better?" If the answer is no, don't add it.
- Another issue with using too many animations and transitions is that it could significantly slow down your PowerPoint file's processing speed , as it adds volume to your file size.
- Keep things professional in the right contexts. For example, if you're presenting a formal business plan, you don't want to add funky transitions that take ten seconds to complete. Try sticking to slick effects that last less than a second.
- Use the same transition effect for each slide and, if you can, the same animation for each item.
It's a widely shared opinion that Microsoft 365's desktop apps offer more flexibility and functionality than their web-based counterparts. However, the exact opposite can be said for adding animations, which is significantly easier to do on PowerPoint for the web than via the subscription-only app. So, to create the animations for screenshots in this section, we have used PowerPoint online, rather than the desktop app, and we recommend that you do the same.
Before you add any animations, click "Animation Pane" in the Animations tab on the ribbon. This will open a pane on the right side of your window, which will make seeing and managing your animations much easier.

Now, select the item you want to animate. If you want several items on a slide to animate in the same way at the same time, hold Ctrl while clicking them all. Then, click the down arrow in the Animations tab, and choose the appropriate effect.

You will then see an animation card in the Animation Pane for the effect you just added. Here, you can change the animation type, how it is activated (whether via a click, with the previous animation, or after the previous animation), and the duration and delay.

If you have more than one animation on a slide and want to reorder them, click and drag the six dots next to the relevant animation card upwards or downwards.

Finally, to remove an animation, click the trash icon on the appropriate animation card.
You can also animate paragraphs of text within a text box. To do so, select the relevant text, and follow the same process.
Whether you're using PowerPoint's desktop app or the online version of the program, adding transitions involves a very similar process.
First, select the slide you want to transition to (for example, you'll select slide 2 if you want to create a transition from slide 1 to slide 2) in the slide thumbnail pane, and then click the "Transitions" tab on the ribbon.

To see more transitions, click the down arrow on the right-hand side of the Transition To This Slide group.
Clicking any of the transition effects on display will do two things—first, it will show you a preview of what that transition will look like, and second, it will apply that transition to that slide.
You can then amend the options (such as the direction of the transition) and timing of the transition using the settings on the right side of the Transitions tab. This is where you can also add a sound effect to the transition, or decide whether the transition effect occurs when you click your mouse or automatically after a given length of time.

If you want to apply the same transition effect and options to all slides, click "Apply To All" in the Timing group of the Transition tab when you have finished setting up your transition's parameters. You can then select individual slides to make further adjustments if needed.
To remove a transition, select the slide in the slide thumbnail pane, and click "None" in the Transitions tab.

PowerPoint's Morph is a transition effect that recognizes differences between the same items on two slides, and smoothly transitions between them when you proceed from one slide to the next. For example, you might have an image on slide 1, and the same image in a different position on slide 2. The morph transition gives your audience the impression that you're still on the same slide, but the objects are merely moving and resizing.
This is different to the motion path animation, which you can set for different items and activate at different times on your slide. The morph transition, however, moves all items together as you move from one slide to the next, saving you from having to apply motion path animations to individual objects. Any objects on the first slide but not the second will simply fade away during the morph transition. Similarly, any new items on the second slide will appear gradually.
In this example, we have a title and an image on slide 1, and the same objects on slide 2 but in different places and different sizes. We created this scenario by copying and pasting the whole of slide 1, and then changing the text and image on slide 2. However, you can also create a blank slide, and then copy and paste the different elements you want to morph.

Then, we need to select slide 2, and click "Morph" in the Transitions tab on the ribbon.

Then, press F5 to see your presentation, and witness the smooth morph transition from one slide to the next. You can also use this transition effect to zoom into an image or fade an image into the background. Just ensure that you copy and paste from one slide to the next before you create the transition, so that PowerPoint recognizes them as the same.
If animations and transitions are new to you, check out these other tips that you should also know before you design your next presentation.
- Microsoft PowerPoint
- Microsoft 365
Ads Preferences
These settings allow you to customize your ad experience on Roblox by managing ads personalization and the information we share with third parties. You can find your Ads Preferences on the Privacy settings page and you can update your preferences at any time.
Some users will not see Ads Preferences settings either because Roblox does not show them ads, such as our users under 13, or because they will only see non-personalized ads, such as some of our teen users.
Personalized ads controls
When the Personalize your ads setting is on, advertisers are able to reach users on Roblox based upon their interests and demographics, such as the genre of experiences they like to visit. How ads are personalized differs by country and region.
You can also turn off personalized ads altogether. If you disable ads personalization, you’ll still see ads, but they’ll most likely be less relevant to your interests.
Data selling and sharing controls
When your Data sharing and selling setting is on, Roblox will share certain personal information to advertising partners to provide a more personalized advertising experience and improve the effectiveness of our ads. This setting applies to ads served by Roblox and ads served by other companies on behalf of Roblox. We do not sell or share the personal information of known users younger than sixteen.
Global privacy control
Where available, you may use the global privacy control (“GPC”) in your browser to automatically communicate your opt-out preferences to us for data sharing and selling. If you opt in to Data sharing and selling on Roblox, this setting will override your browser preferences.
Our commitment to user privacy
We never collect, use, sell or share sensitive personal information relating to health, race, religion, or sexual orientation.
We have built Roblox to align with data privacy laws and regulations, such as the General Data Protection Regulation (GDPR) in the European Union and the California Consumer Privacy Act (CCPA) in the United States. These laws require that consumer data be collected and used in a manner that is transparent and compliant with consumer privacy rights.
We implement measures to protect our users’ data from unauthorized access, use, or disclosure. This includes implementing security measures, such as encryption and secure storage practices, to prevent data breaches.
Updating your personal data on Roblox You can update your account location, gender, and age in Settings > Account Info .
If you want to exercise rights over your data, such as accessing or deleting your personal information, please reach out to our Customer Support team here .
Additional resources Please see our Privacy Policy , our US State Privacy Policy Addendum and an overview on Roblox Ad Safety and Privacy .
Related articles
- Experience Guidelines and Age Recommendations
- Account Restrictions
- Roblox Privacy and Cookie Policy
- Add 2-Step Verification to Your Account
- Allowed Experiences Controls

Section Design Ideas
Learn how Design ideas can help elevate and beautify your section content.
What are Section Design Ideas?
Section Design Ideas are a new Pages functionality that allows users to input text and image content and see image and formatting suggestions that can be applied right to the section they are authoring. These changes include:
Suggesting an image webpart or background based on your section text
Suggesting different text sizing and formatting
Changing your layout to optimize for your content type
Proposing different banner layouts and images based on your page title.

How to See and Apply Design Ideas
Design ideas can be found by clicking the shimmer icon in the page toolbox. The first time you have a design idea available during an authoring session, a red dot will appear next to this shimmer indicating your ideas are ready.

Once you open the Design ideas panel, you can preview and apply your available ideas. You can also click the “see more” button to generate more ideas.

Once you click on any idea, it will be automatically applied to your section. To undo this, use ctrl+z or the undo button at the top of your page. You can click on as many ideas as you want in the design ideas panel to try them out, however, once you click into your section and continue editing, they will automatically update.

In what situations are Design Ideas generated?
At this time, design ideas be generated and applied to sections containing ONLY the following content:
1 banner webpart
1, 2, or 3 text webparts.
1, 2, or 3 text and image webparts in equal quantities.
If you have a section containing any other 1 st or 3 rd party webpart (Quick links, people, etc.), we will not be able to suggest design ideas at this time. Additionally, if you have unequal quantities of image and text webparts, (such as one text webpart and two image webparts) we will also be unable to offer suggestions.

Design ideas can also be generated for sections containing inline images and tables. When a text webpart contains inline images, it will still be treated as a text webpart, and the inline image or table will remain in its position within the text webpart in all design ideas suggestions.
PICTURE OF INLINE IMAGE IN DESIGN IDEAS PANEL

How does Design ideas Suggest images for me?
If you are in a non-government tenant, Design Ideas will suggest Banner, image webpart, and section background images for you based on the content of your section. This works by summarizing your section content into a set of keywords and searching for relevant images within Microsoft’s stock image service. This is the same set of images that you can search for yourself in the image picker.
If over 50% of the text in any given section is changed, design ideas will regenerate its set of relevant keywords, resulting in a different set of suggested ideas.

In situations where Design Ideas cannot find images that match your keywords exactly, it will add “abstract” and “background” to your search terms and try to find suitable images again.
If text keyword recognition is unavailable in your tenant, or if a successful image search cannot be performed, Design Ideas will instead suggest images from our fixed set of stock filler content.
Image webpart suggestions
If your section contains only text, design ideas will suggest image webparts to match the quantity of text webparts that your section contains. This allows it to suggest beautiful, symmetrical section configurations.
For example, if your section contains 2 text webparts, design ideas will suggest two image webparts. This works for sections containing 1-3 text webparts

How does Design Ideas format my text for me?
Design ideas formats. your text by applying one of 4 different text stylings. These styles will change text height, bold, and italicizes, but will never change your font to be different than that of your site.
If you have a section with a single blank text webpart, design ideas will suggest formatted, filler text to help you get started.
Design ideas will also ensure that its suggestions are accessible, suggesting only dark text colors for light backgrounds, and light text colors for dark backgrounds

How does Design Ideas work when I am coauthoring?
If you have design ideas open for a section you are editing, no other page editor will be able to edit or generate design ideas for that section. Similarly, if someone else is editing a section, you will not be able to generate design ideas for it.

PICTURE OF COAUTHORING ERROR SCREEN
Why isn’t Design ideas suggesting anything for me?
Design ideas may not be able to generate a suggestion for any of the following reasons:
Your section contains a webpart other than image, text, or banner
Example: Quicklinks is added to a text section, and design ideas are no longer available
Your section contains too many of a supported webpart:
Example: a 4 th text webpart is added to a section, and design ideas are no longer available
Your section contains an unequal quantity of image and text.
Example: a section contains two images and one text webpart, resulting in no design ideas available.
Your section is a full width or a vertical section
Design ideas does not support these section types at this time.

Need more help?
Want more options.
Explore subscription benefits, browse training courses, learn how to secure your device, and more.

Microsoft 365 subscription benefits

Microsoft 365 training

Microsoft security

Accessibility center
Communities help you ask and answer questions, give feedback, and hear from experts with rich knowledge.

Ask the Microsoft Community

Microsoft Tech Community

Windows Insiders
Microsoft 365 Insiders
Was this information helpful?
Thank you for your feedback.
Olympic basketball gold medal game: USA vs. France tipoff time in Paris

The United States men's basketball team is on the brink of a historic fifth gold medal, with a thrilling showdown against the host nation, France, on the horizon in the 2024 Paris Olympics tournament final on Saturday.
Team USA's resilience was on full display as they staged an impressive 95-91 comeback against Serbia, despite trailing by as many as 17 points at one stage in the game. Steph Curry's recorded a staggering 36 points, which included nine three-pointers. LeBron James and Joel Embiid's contributed 35 combined, a testament to their determination to get the red, white and blue in the finals.
France, the home team, is headed back to the gold medal game for a rematch of the Tokyo Games against the USA after defeating Germany 73-69. Isaia Cordinier led the scoring for France with 16 points, while big man Victor Wembanyama contributed 11 points and seven rebounds in the semifinal victory.
Here's how to watch the historic gold medal match between Team USA and France at the Bercy Arena on Saturday, August 10.
More: USA basketball pulls off furious comeback to beat Serbia: Olympics highlights
2024 Paris Olympics men's basketball bracket
Quarterfinals: tuesday, aug. 6.
- Germany 76-63 Greece
- Serbia 95-90 Australia (OT)
- France 82-73 Canada
- Team USA 122-87 Brazil
Semifinals: Thursday, Aug. 8
- Team USA 95-91 Serbia
- France 73-69 Germany
Bronze medal game: Sat. Aug. 10
- Germany vs. Serbia: 5:00 a.m. ET | USA Network
Olympic men's basketball: How to watch Team USA vs. France gold medal game
- Date: Aug. 10, 2024
- Time: 3:30 p.m. ET
- Location: Accor Arena, Paris
- Streaming: Peacock , nbcolympics.com, fuboTV
HOW TO WATCH: Catch the Paris Olympics gold medal women's soccer match with a Peacock subscription
We occasionally recommend interesting products and services. If you make a purchase by clicking one of the links, we may earn an affiliate fee. USA TODAY Network newsrooms operate independently, and this doesn’t influence our coverage.
COMMENTS
Add a section. Right-click between slides and select Add Section. An Untitled Section is added in the thumbnail pane, and the Rename Section dialog box opens. Type a name in the Section name box. Select Rename. To collapse a section, click the triangle next to the section name. The numeral by the section name shows the number of slides in that ...
Step-1: "Right-click" on the title of the section. The first step of the process is to " Right-click " on the title of the section that you want to rename. This will open a dropdown menu. Step-2: Click on "Rename section". In this step, all you have to do is to select the " Rename section " option from the dropdown menu.
Apply Themes to presentations Video; Get design ideas for slides Video; Change slide masters Video; Change the page orientation Video; Add a watermark to your slides ... Right-click between slides and select Add Section. Type in a section name. Select Rename. Click the triangle to collapse a section, and the number shows the slides in that ...
Create a more cohesive presentation by organizing your PowerPoint slides into sections.Add a section1. Right-click between slides and select Add Section.2. T...
Create a Section. To create a section, select the View tab and choose "Slide Sorter" at the top. Then, right-click the first slide you want in the section and choose "Add Section" from the shortcut menu. When the section appears, replace "Untitled Section" with the name you want, and press Enter or Return.
How to Add Section in PowerPoint. If you're wondering how to add a PPT section, go to Home -> Section -> Add Section or right-click between slides and select Add Section. From the dialog box that appears, add a name for your section and click Rename. This will give a name to your section. You can name various sections according to the topic ...
Choose Add Section from the menu. Alternatively, from the Home tab, in the Slides group, click the drop-down arrow next to Section. Choose Add Section from the menu. Type a name for the section. Click Rename. The section is now renamed. Notice the small red arrow next to the new section name.
PowerPoint sections are useful for collapsing and expanding multiple slides, removing multiple slides, and rearranging segments of presentations.. To add a section, press Alt, H, T1 in the PC version of PowerPoint and select "Add Section": (This shortcut is Alt, H, T in older, non-365 versions; there is no built-in Mac shortcut for this command, so you must go to the "Home" menu and ...
In this two minute step-by-step tutorial, we learn how to add sections to PowerPoint slide decks.Sections are a great way to organise long and complex slide ...
To add a section in Slide Sorter View: Right-click the slide you want to use as the starting slide in a section or right-click between two slides where you want to add a section. You can also click Sections in the Slides group on the Home tab in the Ribbon or press Shift + F10 or the Context key to access the context menu. A drop-down menu ...
The PowerPoint section feature is easy to be used. You can add, edit, remove sections by using the Sections menu in PowerPoint 2010. Typically, sections are added from the Slide Sorter window. Right click the Slide and choose Add Section option from the context menu. Now a new section will be added with name "Untitled Section".
Learn how to add sections to your PowerPoint presentation to help you organize your slides more effectively. For Office 365 users you'll also learn how to c...
Right-click the slide you want to use as the starting slide in a section or right-click between two slides where you want to add a section. Or click Sections in the Slides group on the Home tab in the Ribbon. You can also use keyboard shortcut Shift + F10. A drop-down menu appears.
It's easy to add new sections to a presentation. Here's how: I like to be in Slide Sorter view first. (The birds-eye-view of the presentation where you can view all the miniature slides.) Decide which slide is going to start the new section. Click on that slide to activate it. Right-click and Add Section.
Place your cursor above the slides you want to separate into a section. 2. Right-click and then click "Add Section.". 3. Rename the section. 4. Done! You have successfully added a section to your presentation. Adding multiple sections gives you more freedom to organize your content.
Sections allow you to group slides together into different categories, which makes it easier to keep a presentation organized. Add a Section. Select the slide where the new section will begin. Click the Section button on the Home tab. Select Add Section. Right-click the first slide of the section in the Thumbnails pane and select Add Section.
Click the Zoom drop-down arrow and pick "Section Zoom." In the Insert Section Zoom window that appears, check the box next to the section you want to use. You can also include zooms for multiple sections. Click "Insert." You'll see the Section Zoom pop onto your slide.
One of the best new features introduced in PowerPoint 2010 (and also included with PowerPoint 2013) is the ability to group presentation slides into sections. Business Management Daily Employment Law
Let's start with the basics - or feel free to skip to your preferred section using the list above. Adding speaker notes in PowerPoint. Adding notes to PPT is a reasonably straightforward process, regardless of your operating system. Here's how to add notes in PowerPoint: Select a slide you want to add notes to.
To add notes to your slides, do the following: On the View menu, click Normal. Select the thumbnail of the slide you want to add notes to. The notes pane will appear beneath your slide. Click where it says Click to add notes and type whatever notes you'd like to add. To hide the notes pane, click the Notes button on the task bar.
To add a section to your presentation, you can follow these steps: 1. Select the slide(s) that you want to add to a section. 2. Right-click on the selected slide(s) and choose "Add Section" from the context menu. 3. In the "Add Section" dialog box, enter a name for the section and click "Add Section."
Contact for service: https://www.fiverr.com/convert_?up_rollout=trueWelcome to our in-depth tutorial on "How to Create Sub Sections in Microsoft PowerPoint"!...
However, the exact opposite can be said for adding animations, which is significantly easier to do on PowerPoint for the web than via the subscription-only app. So, to create the animations for screenshots in this section, we have used PowerPoint online, rather than the desktop app, and we recommend that you do the same.
These settings allow you to customize your ad experience on Roblox by managing ads personalization and the information we share with...
SAINT-DENIS, France − In a stunning win, Team USA's Cole Hocker not only took the gold medal Tuesday in the men's 1,500-meter race at the Stade de France at the Paris Olympics, but broke the ...
Section Design Ideas are a new Pages functionality that allows users to input text and image content and see image and formatting suggestions that can be applied right to the section they are authoring. These changes include: ... it will add "abstract" and "background" to your search terms and try to find suitable images again. ...
Zhang Rose finished shooting 5-under for the day and in a tie for eighth place. Her teammate and No. 1 golfer in the world, Nelly Korda, shot 1-under and finished tied for 22nd.Korda shot 3-over ...
In this video, we do a step-by-step guide on How to Add Sections on Microsoft PowerPoint. https://www.simpleslides.co/Simple Slides is the largest library on...
The United States men's basketball team is on the brink of a historic fifth gold medal, with a thrilling showdown against the host nation, France, on the horizon in the 2024 Paris Olympics ...
Simone Biles missed out on the chance to add to her seven Olympic gold medals on the final day of gymnastics at Paris 2024, although she did secure silver on the floor.