- Privacy Policy
- Join Our Groups to be Guided in your Admission Search

SureSuccess.Ng Your No 1 School Information Hub
- UNEC — Portal, Faculties and Other Amazing Facts
How to Write a Composition About Myself [For All Classes]
- Best Graduation Songs for Primary School Download
- 10 Things You Should Never Do Before Exams
How to Write Letter of Undertaking [See Samples]
- Common Entrance Questions for Primary Six PDF
- Active Whatsapp Group Link for Girls 2024
- Life in UNN —Hostels, Off-campus, Eateries and Night Classes
- Literature in English JAMB Questions and Answers 2024
- Economics JAMB Questions and Answers 2024 [Revealed!]
How to Write Lesson Note [See Templates and Samples]
Henry Divine Leave a comment
Table of Contents
What is a Lesson Note?
A lesson note is a comprehensive outline of the content of a lesson, that helps teachers to remember what they want to teach during a lesson. The lesson note usually contains the main points the teacher hopes to cover, the activities they will do and the necessary materials for the lesson. Actually, a lesson note is like a cheat sheet or roadmap that guides the teacher through a class.
Important Characteristics of a Good Lesson Note
Before we begin to explore how to write lesson note for nursery, primary and secondary school, it is important to acquaint ourselves with the characteristics of a good lesson note.
Here are some of them:
1. Unlike a lesson plan owned by the school, a lesson note is the personal property of the teacher. It contains important information and instructions for both the teacher and students on delivering a specific lesson. The lesson note is the closest reference tool the teacher has while teaching in class. There, they can find the curriculum content and other necessary details needed to effectively impart knowledge to students.
2. A good lesson note contains essential information for effective teaching. For example, it contains learning objectives, instructional materials, assessment questions and so on. It, therefore, acts as a guide for the teacher from the beginning to the end of a lesson, ensuring that the learning objectives are attained.
3. It is possible for schools to modify lesson plans to suit their policies and standards, they cannot make such alterations in lesson notes. The primary focus of the school is on the instructional plan which they endorse by themselves.
4. A teacher’s lesson note does not have to be exhaustive like a lesson plan. The lesson note only needs to be practical enough to enable teachers to implement their lesson plan effectively.
5. The lesson note provides specific instructions for executing the lesson plan. Some of the instructions you may find in lesson notes include: teaching tactics, relevant examples, learning materials and any additional information required by the teacher to enhance learning.
Read Also: Basic Science for Primary 1 (Schéme, Topics &; Quéstions)
How to Write Lesson Note That is Effective
As a teacher, you need to appreciate the fact that writing an effective lesson note on a topic involves several steps. Here is how to write lesson note in simple steps:
1. Establish Learning Objectives
Clearly outline the specific learning objectives you expect from your students by the end of the lesson. With this, you establish the goal of the lesson before anything else.
2. Select a Lesson Topic
For a given term, there are normally several topics in the scheme of work arranged according to weeks and days. Select the topic you need to prepare lesson note on.
3. Gather Necessary Materials
Get all the reference materials you need in order to prepare an effective lesson note. Of course, after preparing the lesson note, you will need to also gather any other tool you need to deliver the lesson, for example textbooks, workbooks, pictures and so on.
4. Outline the Lesson Structure
Give the lesson an executable and logical structure by dividing it into sections. Examples of sections you may have in your lesson note include introduction, main content, activities and conclusion.
5. Write the Introduction
Begin your lesson note with an intriguing introduction to capture the attention of your students. If you do your introduction very well, it should also provide an overview of what they will learn at the end of the day.
6. Present Key Content
Break down the content of your lesson note into manageable parts depending on the nature of the topic. So for the lesson note, there may be direct lectures, then discussions and demonstrations.
7. Plan Activities and Exercises
Towards the end of the lesson note, include a variety of activities to actively engage students and reinforce the concepts they learned. The activities can be done individually or in groups, or as a class-wide exercise.
8. Assessment and Evaluation
This is a very essential part of any lesson note that would be effective. As a teacher, you must plan how to assess your students’ understanding and progress. So, incorporate assessment questions or exercises in your lesson note.
9. Conclusion and Review
At this point, the lesson note is about coming to an end. So you need to summarize key points and allow for questions or clarification. Thereafter, provide a brief overview of the next lesson and give your students homework assignments.
10. Reflection and Revision
Number 9 above is where your lesson note ends. This number 10 is about what you ought to do after delivering the lesson. After the lesson, you need to sit back and reflect on its effectiveness. In so doing, you will be able to identify strengths and areas that need improvement. Then use the feedback to enhance future lesson plans.
Read Also: Basic Science for Primary 2 (Schémé, Topics & Questions)
How to Write Lesson Note for Nursery School in Nigeria
Teaching nursery school or kindergarten children can be tough yet fulfilling. As a nursery school teacher, you need to have a good lesson plan as well an effective lesson note if you must be able to sustain the interest of your students and help them to learn well. This section, we are going to offer tips on how to write lesson note for nursery school to meet learning objectives. In so doing, we shall discuss setting goals, planning fun activities, and checking how students are doing.
We hope that the tips we are going to share will help you to always make lesson notes that will foster learning in nursery school students, whether you are an experienced teacher or just starting out.
How to Write a Lesson Note For Nursery Schools
When writing a lesson note for nursery school kids, you need to always remember they have unique learning needs and shorter attention spans. So you must always endeavor to keep it all simple, clear and focused.
The first step is to set clear learning objectives. Make them specific, measurable, and achievable. For example, instead of just saying “students will learn about colors,” a more specific objective would be “students will be able to identify and name at least six colors by the end of the lesson.”
Next, plan activities and materials that match their age and are fun. You can use hands-on activities, songs, games, and stories to keep them engaged. Don’t forget to vary your teaching methods to suit different learning styles, like visual, auditory, or kinesthetic.
Remember to assess their progress as you go. Use informal observations or assessments to see where they’re struggling and adjust your lesson accordingly.
Overall, writing a nursery school lesson plan requires creativity and flexibility. With clear goals, engaging activities, and progress checks, you can ensure effective learning while having fun.
Lesson Note Format For Nursery School in Nigeria
Date: Class: Subject: Topic: Sub-topic: Time: Duration: Period: Content: Specific Objectives: Entry Behavior Set Induction: INSTRUCTIONAL PROCEDURE
Steps: Content Development: Teacher’s Activities: Students Activities: Instructional Materials: Evaluation Guide (Formative Evaluation): Evaluation (Summative): Closure/Summary: Assignment:
How to Write Lesson Note for Primary School
Primary school pupils are a little older than their counterparts in nursery school. This means that they are more mature physically and cognitively. So the approach to preparing a lesson note for primary school in Nigeria would be a bit different than what we explained above for nursery school. But at the end of the day, the goal is to write comprehensive and effective lesson notes that meet the educational needs of primary school students.
Here’s a guide to help you write effective lesson notes for primary school:
- Understand the Curriculum : Try to get familiar with the Nigerian primary school curriculum and the subjects in it. Examples of subjects you will find there include: English Language, Mathematics, Basic Science and Technology, Social Studies and and so on.
- Set Clear Learning Objectives : Define clear and measurable learning objectives for the topic you want to write lesson note about. Ensure that the objectives are in alignment with the requirements of the curriculum.
- Consider Local Context and Culture : Use examples and stories that border on Nigerian culture, history and local context so that the students can easily relate to the lesson.
- Use Relevant Teaching Resources : Gather teaching resources and materials that are accessible and relevant to Nigerian primary school students. This may include textbooks, workbooks, visual aids, and educational technology tools that support learning objectives.
- Assess Student Learning : Include formative assessments and evaluation questions to monitor students’ understanding throughout the lesson. You can use a variety of assessment techniques, such as tests and class discussions to measure learning outcomes.
Sample Lesson Note for a Primary School Class in Nigeria
Now let’s show you a sample lesson note for a primary school class in Nigeria. The focus here is on a Mathematics lesson for Grade 3 students. Our objective is to teach students how to add and subtract three-digit numbers.
Lesson Title: Adding and Subtracting Three-Digit Numbers
Subject: Mathematics
Time: 45 minutes
Materials Needed:
- Whiteboard and markers
- Number cards (0-9)
- Worksheets for practice
Lesson Objectives:
- Students will be able to add three-digit numbers with regrouping.
- Stµdents will be able to subtract three-digit numbers with borrowing.
- Students will apply addition and subtraction skills to solve real-life problems.
Introduction (10 minutes):
- Begin by reviewing the concept of addition and subtraction using two-digit numbers.
- Show examples of adding and subtracting two-digit numbers on the whiteboard. Emphasize the regrouping and borrowing process.
- Explain that today, we will learn how to apply these concepts to three-digit numbers.
Main Activity (25 minutes):
- Divide the class into small groups and distribute number cards (0-9) to each group.
- Present addition problems that involve three-digit numbers on the whiteboard. For example, 234 + 189.
- Guide students through the process of adding each place value column, starting from the ones, tens and hundreds. Emphasize regrouping when necessary.
- Allow students to work in their groups to solve more addition problems on their own.
- Repeat the same process for subtraction problems involving three-digit numbers. Demonstrate borrowing when needed. For example, 456 – 297.
- Provide opportunities for students to practice subtraction in their groups.
Application (10 minutes):
- Present real-life word problems that require adding or subtracting three-digit numbers. For example, “If John has 587 marbles and he gives away 238 marbles to his friends, how many marbles does he have left?”
- Allow students to work independently or in pairs to solve the word problems.
- Encourage students to explain their problem-solving strategies to the class.
Assessment:
- Move around the classroom to observe students’ understanding and provide feedback as they work on the activities.
- Review students’ completed worksheets to assess their ability to add and subtract three-digit numbers accurately.
- Ask a few students to solve additional problems on the whiteboard to assess their understanding during the closing discussion.
- Summarize the key concepts learned in the lesson: adding and subtracting three-digit numbers with regrouping and borrowing.
- Reinforce the importance of practicing these skills to become proficient in Mathematics.
Another Illustration of How to Write Lesson Note for Primary School
The following illustration will show you how to write lesson note for primary school easily:

Sample Lesson Note: Personal Hygiene for Primary School Pupils
Topic: Importance of Personal Hygiene Grade Level: Primary School (Adaptable for specific grades) Objectives: Students will
- understand the concept of personal hygiene and its importance.
- learn about different daily hygiene practices.
- identify the benefits of good hygiene in maintaining health and well-being.
- develop positive attitudes and habits towards personal hygiene.
- Large chart paper or whiteboard
- Markers or colored pencils
- Pictures or illustrations related to personal hygiene (washing hands, brushing teeth, bathing, etc.)
- Short story or video about personal hygiene (optional)
- Hand-washing demonstration materials (soap, water, towel)
1. Introduction (10 minutes):
- Begin with an interactive activity or question to gauge students’ prior knowledge about personal hygiene. Examples: “What does personal hygiene mean?” “Can anyone think of different ways we take care of our bodies?”
- Briefly explain the concept of personal hygiene as keeping our bodies clean and healthy through daily practices.
- Introduce the lesson objectives and discuss the importance of learning about personal hygiene.
2. Exploring Hygiene Practices (20 minutes):
- Brainstorm together different daily hygiene practices students already know. List them on the chart paper or whiteboard. Examples: washing hands, brushing teeth, taking a bath, showering, combing hair, cleaning ears, etc.
- Use pictures or illustrations to visually represent each practice. You can also share a short story or video about personal hygiene.
- Discuss the benefits of each practice for maintaining health and preventing illness. Explain how germs spread and how good hygiene helps to keep them away.
- Introduce additional hygiene practices relevant to your grade level, such as washing face, cleaning nails, wearing clean clothes, etc.
3. Demonstration and Hands-on Practice (15 minutes):
- Conduct a live demonstration of proper hand-washing technique. Emphasize the importance of using soap, washing all areas of the hands, and drying them thoroughly with a clean towel.
- Divide students into pairs or small groups and provide them with materials for practicing hand-washing. Have them follow the steps demonstrated earlier.
- You can extend this activity to other hygiene practices like brushing teeth or wiping face, adapting the materials and instructions accordingly.
4. Reflection and Review (10 minutes):
- Encourage students to share their experiences with the hands-on activity and discuss how it felt to practice good hygiene.
- Briefly review the key points of the lesson: what is personal hygiene, why is it important, and how do we maintain good hygiene daily?
- Encourage students to ask questions and share their thoughts or suggestions on keeping themselves clean and healthy.
5. Closure and Assessment (5 minutes):
- Challenge students to set a personal hygiene goal for themselves, like remembering to wash their hands regularly or brushing their teeth twice a day.
- Provide assessment opportunities through observations, participation in activities, or short quizzes to gauge understanding.
- Offer positive reinforcement and encourage students to continue developing good hygiene habits.
How to Write Lesson Note for Secondary School in Nigeria
As a secondary school teacher, you need to appreciate the fact that writing an effective lesson note on a topic involves several steps. Here is how to write lesson note in simple steps:
In this article, we set out to explore how to write lesson note and we did justice to that. Remember, a lesson note is your personal guide. So ensure clarity and organization to effectively deliver lessons and engage students in the learning process.
Kindly help me to reach others with this post. by sharing with friends on Social Media. Just scroll down to see the Facebook and Twitter and WhatsApp buttons. Thank you so much!
Read Also: Learn the Laws of Indices in Mathematics
Share this:
Get in touch with us.
Follow us on WhatsApp via WhatsApp or Telegram or Facebook
Like and Follow us on Facebook @SURE SUCCESS NG
Join our 2024 JAMB Tutorial Classes on WhatsApp or Telegram or Facebook
Join our Aspirants Facebook Group @JAMB Tutorials & Updates
UNN Aspirants and Students, Join MY UNN DREAMS (MUD)
About Henry Divine

Today in our tutorial series, I would be teaching you about composition. By way of …
![How to Write Letter of Undertaking [See Samples]](https://i0.wp.com/suresuccess.ng/wp-content/uploads/2019/02/letter-of-undertaking-3.png?resize=310%2C165&ssl=1 "presentation of lesson note")
On several occasions and at different points in life, people are required to write letter …
Leave a Reply Cancel reply
Your email address will not be published. Required fields are marked *
Notify me of new posts by email.
Home Blog Education How to Present a Lesson Plan
How to Present a Lesson Plan

First days are always exciting, and expectation builds up about the contents of the task ahead, especially if you’re starting a class as a student or professor. This interaction will be significant because it will establish and define the subjects to be covered and the set of expectations flowing from the instructor towards the audience.
Perhaps you are ready to begin your career as a teacher and need some guidance; otherwise, you are a seasoned instructor searching for a refresher in your program. No matter which of the above you represent, the truth of the matter is that you are probably seeking a better way to introduce the subjects you’ll be teaching to your students.
What is a lesson plan?
A lesson plan will be the set of subject matter materials you will be teaching during a specific timeframe. The lesson plan should be an index that students can constantly consult to understand better the parts of the learning journey they will go through during each session.
Teachers and professors should have a lesson plan template that happens in every session. This is different from a syllabus because, in the latter case, the whole curriculum of the program will be laid out; however, for each lesson, there should be one individual lesson plan example to guide the instructor in the set timeframe.
When building the materials for the class or lesson’s attention, it’s always essential to share elements like the purpose or rules that guide the learning process . This article will explore the best way to present a lesson plan and drive a learning session successfully from the instructor or professor’s view.
How to write a lesson plan
Education nowadays guides different sorts of students and target specific learning needs. Therefore, it’s important and relevant to understand how lesson plans can change and be varied to truly implement the best learning path for your students. Once you have this part figured out, the next step is to understand how you will transmit the information and use a PowerPoint Presentation to simplify creating and presenting a lesson plan to your students.
Lesson plans will comprise several different sections that will clarify the first questions students can have: How long will the course be? Will it be an online course ? What will be the main objectives? Which subjects will be discussed along with the class?
1. Introduction
As the lesson begins, it’s essential to place a brief yet descriptive introduction about what the session will cover. A good practice is to create a catchy title for each lesson to have an overall understanding of the information they will be receiving.
Example: Digital Marketing Basics: Industry background, historical review years 1980-2010. In this session, we will cover the birth of digital marketing, including all the touchpoints that shaped today’s industry.
2. Audience
If your class is a one-time-only or recurring session, or even a blended learning journey, it’s essential to explain to your students who this class is for; this will allow them to calibrate their expectations about the matter to be taught ahead.
Example: This lesson is directed to professionals who work in traditional marketing, business owners, or communication specialists seeking to have a profound understanding of how digital marketing came to be.
3. Lesson Objectives
This piece is critical because it will allow the students to assess the intention of each lesson. When thinking about the objectives, it’s vital to consider the acquired skills we expect our students to have at the end of the class. Like any other goals in life or business, each one should be actionable and measurable, meaning after each class, students should be able to use what they have learned and put into action the concepts.
Example : Understand and be able to create a timeline framework of reference to explain the story of the Internet.
4. Materials
Suppose the lesson requires using any specific materials, physical or not, including any software or hardware necessary. In that case, it´s important to list or include within the lesson plan so students can set clear expectations on what they might require. This is particularly important if the session you will be delivering requires them beforehand to bring anything.
Example :
- Computer
- Scratch paper
5. Learning Activities
We´ve covered all the logistics by this point; however, now we need to start sharing the actual activities during the lesson. Ideally, this is a play-by-play of how each activity will guide the lesson towards the already established objectives. To add the list of learning activities that will be helpful for your students, take into account how all of them align with each goal and the requirements students need.
Make sure that you add variety to the activities that you are proposing, go ahead and research trends of how many other teachers or professors, students will appreciate your search to engage them in learning.
Also, consider how much time they will take so that you can note it in the next section.
- Create a timeline on the wall with the most important moments of digital marketing history, including creation of social media, mainstream of email, etc.
Time periods
Pairing each learning activity with a specific timeframe will be useful both for instructors and students. Make sure you calculate a reasonable amount of time for each activity and list it within the lesson plan so everyone can set correct expectations. Assigning time slots for each exercise will also help students and teachers stay on track with the lesson and not waste valuable time invested in learning.
Example : Creation of a timeline – 45 min

How to present a lesson plan
We have now listed the components of the lesson plan structure, everything looks beautiful in the draft, but now we need to start planning how we will present the program to the students. This part is challenging because you have to choose a template that makes sense for you and will be helpful for your students to understand.
A PowerPoint presentation is a great way to showcase all the contents of the lesson plan, however, the trick is to decide how you want to structure it.
Lesson Plan Design
By this point, you’ve structured a lesson plan template that can go through any test. Nevertheless, creating the materials to accompany it can be a key in the commitment generates between the students and the professor.
Design and Style
Before adding any text to your presentation template , think about the requirements you have: Does the academic institution where you work require the use of logos? Do you have to follow any visual guidelines? This might be important for the cohesiveness of your presentation.
It’s essential to think about how you would like to present the lesson plan. You may want to keep it simple and have a 1 pager and talk through it to understand your students fully, or perhaps you need to create one full presentation where every slide will be a relevant piece of information. Let’s explore this a bit further.
One Pager Lesson Plan
If your style is more towards simplicity, this is a great solution: succinct, minimalistic, and straight to the point. You can complete a one-page lesson plan with bullets of the relevant data and send it out to students. A great advantage of this format is that you can either send it as a PDF or even as a single image (JPG or PNG), exporting it directly from PowerPoint.
One significant advantage is that your students will only have to check for one source by choosing this simple format when revising the lesson during the class or afterward.
Several pages lesson plan
Almost like a syllabus, a more extended presentation will include several slides so you can include the information in different formats.
For example, you can use the first slide to include the lesson title; afterward, a new slide can define the purpose or introduction of the lesson. In the upcoming slides, you can include materials, contents, and even ad charts or similar to explain how grades will be affected by each lesson’s assignments on the upcoming slides.
Text in the presentation
It’s always good to follow the reliable practices of presentations and include the necessary information without overwhelming students. Don’t add an excessive amount of text to one slide; actually, make sure that every piece of data is helpful for students to plan their time both during and after class.
However, if you will be sending out the presentation to your students before reviewing it, consider that they will be using it for their reference to follow through with your lesson. So make sure all the information is easy to read and accessible.
Additional elements
Learners of all sorts have become increasingly visual, so don’t be afraid to add infographics, images, photographs, icons or any other elements to make your lesson plan presentation more appealing visually.

Final Words
Remember the lesson plan presentation will be the first approach your students will have with the subject matter. Take your time, enjoy the process, and create comprehensive and attractive lesson plan slides that will inspire your students to have thoughtful and deep learning.
1. 1-Slide Lesson Plan PowerPoint Template
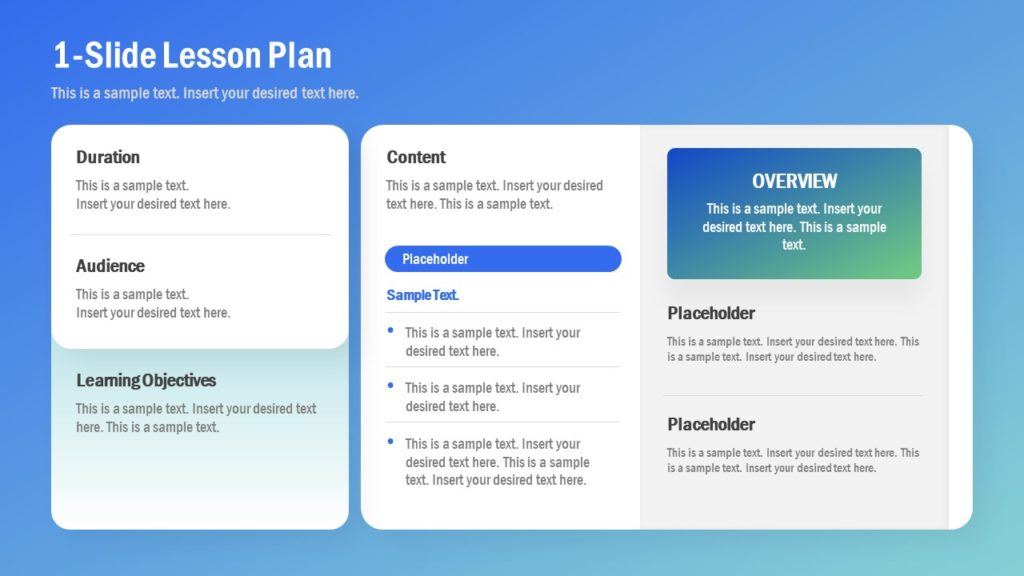
Create a simple and minimalist one-pager lesson plan for your academic uses, course planning, and even as student handouts, with this eye-catching PowerPoint template.
Use This Template
Like this article? Please share
Learning Experience, Learning Styles, Presentation Approaches, Presentation Tips, Presentations Filed under Education
Related Articles

Filed under Design • September 11th, 2024
8 Best Canva Alternatives for Presentations in 2024
Don’t feel restricted about what one application can do for presentation design. Meet a list of the best Canva alternatives in this article.

Filed under Google Slides Tutorials • September 9th, 2024
How to Convert Canva to Google Slides
Need to switch from Canva to Google Slides? Follow this guide to easily convert your Canva designs into Google Slides in minutes.

Filed under Presentation Ideas • August 29th, 2024
How to Make a Presentation Longer: 7 Strategies to Master
Extend your talk in style. Join us to discover how to make a presentation longer while providing a high-end experience to your audience.
Leave a Reply
Edu Delight Tutors
First Term Lesson Notes l First Term Mid Term Test l First Term Examination
Second Term Lesson Notes l Second Term Mid Term Test l Second Term Examination
Third Term Lesson Notes l Third Term Mid Term Test l Third Term Examination
Join Us : WhatsApp l Telegram l Facebook l Mobile App l YouTube l WhatsApp Channel
Download : Materials I Schemes I Show Love
How to writing Lesson Notes using the latest format for School Teachers
Lesson note format.
Period/Day:
Reference Book(s):
Instructional Material(s):
Entry Behaviour:
Behavioural Objectives: By the end of the lesson, students should be able to:
- Differentiate…
- Mention at least five uses of…
Presentation in Steps:
- If continuing from a previous topic, review the last lesson and correct any given assignments.
- If introducing a new topic, link it to previously learned or familiar concepts.
Step Three:
Conclusion:
Evaluation: As stated in the Behavioural Objectives.
Assignment:
Note: Use relevant instructional materials at the beginning of the lesson to introduce the topic/sub-topic, during the teaching-learning process (e.g., at Step Three) to emphasize key points, and at the conclusion to evaluate the lesson. If readymade materials are not available, improvise by exploring safe and non-scary objects in the environment for quick student assimilation, mastery, and retention of the lesson.
REFERENCE BOOK (Using APA Style):
- Surname(s) of the author(s), initials. Year of publication in parentheses. Book title in italics or underlined . Edition if not first edition. City of publication: Publisher. Page or pages.
- Tiamiyu, L.R. (2013). Basic Civic Education for SSS 3 . (Oyo: Limmy Timmy Publishers), p. 7 or pp. 7-10.
For Multiple Authors:
- For two authors, list their surnames and initials, e.g., Oke, M.O., and Ibiloye, A.O.
- For three to five authors, list all surnames and initials.
Three Centres for school development and enrollment expansion

Download The New Unified Lagos State Scheme of Work PDF

A lesson plan is a document that shows the step by step guides, presentation or procedures that are involved in delivering the content of your lesson step-by-step. It’s a list of tasks that your students will undertake, to help guide your teaching.
A lesson plan is usually prepared in advance and can either cover a one-off activity, an entire lesson, a unit or course, a day, or a week.
Junior Secondary School Scheme of Work

Download The New Schemes of Work Senior Secondary School (SS CLASS)
Lesson plans primarily include a schedule of activities that you will deliver in the lesson. Some lesson plans also include additional sections for more thorough planning as most of the content of the lesson plans are transfered to the class diary at the end of the week
A general format of a lesson plan can be like this:
Lesson subject
Lesson topic
Lesson objectives
Lesson activities
Lesson materials
Lesson goals
Lesson test or evaluation
List of Subjects offered in a typical primary school in Lagos, Nigeria
Lesson Plan Format
Lesson Subject:
Lesson Topic:
Lesson Objectives:
Lesson Activities:
- Review previous lesson or introduce new topic.
- Engage students with a related question or activity.
- Step-by-step explanation of the topic.
- Use of instructional materials to illustrate key points.
- Interactive discussions or group work.
- Students work on exercises or problems.
- Teacher provides guidance and feedback.
- Summarize key points.
- Answer any remaining questions.
- Connect lesson to future topics or real-world applications.
Lesson Materials:
- Visual aids (charts, diagrams, etc.)
- Interactive tools (smartboard, projector, etc.)
Lesson Goals:
- Ensure students understand and can apply the key concepts.
- Foster critical thinking and problem-solving skills.
- Encourage active participation and collaboration.
Lesson Test or Evaluation:
- Short quiz or written test based on lesson objectives.
- Oral questions to assess understanding.
- Group presentations or projects.
- Homework assignments related to the topic.
Weekly Summary (Transferred to Class Diary)
Topics Covered:
Key Activities:
Assessments Given:
Student Feedback:
Note: This general format ensures comprehensive planning and effective delivery of lessons, supporting both student engagement and achievement of learning goals.
Recommended Posts :
- Forming words with th words
- Types of Teachers in our Days
- Term by term school activities to develop pupils
- Starting Nursery and Primary School in Nigeria
- HABITS THAT SHOW IMPROPER UPBRINGING OF CHILDREN
- The full meaning of SALARY
- EDUCATE AND DON’T JUST ENTERTAIN YOUR PARENTS
- Effective Parenting Strategies: How to Relate to Your Child at Every Age
- General principles of good teaching
- Ultimate Personal Development Strategies for Educators: Stand Out as a True Teacher
- How to Present a Lesson
Teacher Presentation Instructions (TP)
The Write Foundation provides teaching tools which easily accommodate different teaching situations and make teaching writing straightforward and painless as possible.
All of the Teacher Presentation information is included in the instruction manuals (spirals) along with instructions, answers and examples. While the instruction manuals with a white board and student worksheets are sufficient for teaching, the teacher presentation also comes in easy to use pdfs . The Teacher Presentation pdfs in the Additional Resource folder contain the teaching forms for presenting a lesson, but do not contain the teaching instructions and all of the suggested answers and examples.
| writing sentences, poetry, brainstorm and other open-ended answers using as much of your students’ creative input as possible. Simply put, you are to fill in the blanks with student input while guiding your students through the writing process. Some examples and sample answers are already on the Teacher Presentations. You can always fall back on the instruction manual suggested answers and examples when those are not already on the pdfs. |
| As the teacher presents the lesson information using the with the , overhead projector and or or projector, students are to copy the information on their coordinating paper to use for reference as they complete their independent work. As their skills develop, students are required to produce more of their independent work on the computer using a word processor. The end result is your students learn how to write papers quickly and skillfully. |
The Teacher Presentation pdfs , which come in the Additional Resources, make it easy to present and view the lesson whether at home with 1 student or in a co-op or class setting.
- Computer monitor – use directly from files
- Overhead Projector – print on transparencies with or without highlighting
- Paper Copies – print on paper with or without highlighting
| : You will need to use a cover sheet on the teacher presentation information to keep student attention focused on what you are teaching at that moment, rather than working ahead of you. To create a digital cover sheet for your computer screen, which you can adjust by grabbing the side or top. |
1. Interactive Digital Teacher Presentation TP: Computer Monitor / Screen friendly
The computer friendly digital Teacher Presentation pages (pdfs) were created so a teacher could easily type information directly onto the digital Teacher Presentation pages while students are viewing the information on a screen, monitor or wall and writing on their worksheets.
- The digital pages can be typed on by the teacher in the colored boxes and spaces.
- As you type, the fonts are mostly Arial to make the typed words stand apart from the Times New Roman text already on the pages.
- It is easiest to click your mouse onto the next space where you want to type information. The tab works also, but not as easily.
|
You will need a reader to open and use the digital Teacher Presentation pages (pdfs). Adobe and Foxit are 2 possible readers that are free. such as highlighting more and writing in other places besides the PDFill colored spaces, but you will need to play with the reader you choose to discover what else can be done. |
Longer examples?: Blank boxes and blank pages are provided in the Teacher Presentation pdfs for you to type examples, but I recommend you switch to a blank page on your computer for longer examples. It helps students to see how to type using a word processor.
Word Processor: Microsoft Word, Microsoft Works, Pages, Open Office and others
- Have a document already open in your word processor before you begin teaching, where you can hit Alt/Tab to easily switch back and forth between the TP and your word processor as needed.
- When you use a document in your word processor for typing poetry examples or other examples with students, you have more options available for arrangement, font and other structure.
- When working directly in a word processor it is easy to show students how to use toolbar options to set up their independent work in a proper format.
Have access to an overhead projector instead of a computer?
2. Teacher Presentation TP: Overhead Projector
Copy the digital teacher presentation pages (pdfs) to transparencies and present the lesson using an overhead projector. This can work with 1 student or with multiple students.
- Print the Teacher Presentation pdfs on transparencies with or without highlighting. The highlighting on the Teacher Presentation pdfs and the PDFill colored boxes does not print if you click for your computer to print only black and white.
- Transparencies can be reused multiple times, since the information written using overhead pens can be erased.
Do you prefer to use other teaching surfaces with or without a computer screen or overhead projector ?
3. White Board, Blank Paper, Chart Tablet, Paper Copies of the pdfs, and or the Instruction Manuals:
If a computer monitor or overhead projector is not available, or you want to use other teaching surfaces alongside, use a white board, blank paper, a chart tablet and or view some things directly from the instruction manual or paper copies of the pdfs.
| a) When making word lists with student input, and then using the words in sentences, it can be easier to write the new sentences on a white board rather than switching back and forth between the digital word list and the digital page provided for writing sentences. b) Poetry examples for concrete poetry and word pictures can be challenging to make on the computer. A real white board or paper works much better for those. |
When teaching a fill in the blank chart using other surfaces, just write the words that go in the blanks being clear about which words go in which blanks.
- A white board works great.
- Blank paper
- Chart tablet: This works well with multiple students and for information that the teacher will want to save to teach another time.
For an already printed format use the instruction manuals or paper copies of the pdfs that you print for student viewing.
- For some information, when teaching 1 or 2 students, allow the students to copy directly from the instruction manuals . This works fine for fill in the blank answers where only one answer is possible.
- Paper Copies : You may copy the pdfs on paper and use the paper copies to present the lesson to your students. This works well with 1 or 2 students. This is not the easiest method because of all the printing, but you have my permission to copy the pdfs to use in this manner if it is easier for you to do so.
H e is like a man building a house, who dug deep and laid the foundation on the rock. Luke 6:48

- Complete Lesson Plans
- Free Assessment Tests
- Free Reading Lists
- Organization for Writing
- Checklists & Guidelines
- Brainstorm & Outline Forms
Open doors to writing success!
Contact Rebecca . Rebecca Celsor will answer your questions regarding how to easily teach your child to write.
" I bought the Paragraph Writing Program and loved it! I used it with a 14 year old boy and 16 year old girl. My son hates anything whole language. Writing is his main obstacle. Your program is so well written. He followed directions, and his writing improved. I loved the poetry he wrote! I have recommended your program to anyone who would listen! You have a winner! I will be working through the ESS "

- Course Selection Assistance
- Suggested Age Levels for Homeschool Writing
- Entry Level I - Prepare to Write
- Entry Level II - Creating Sentences
- Level 1 - Sentence to Paragraph
- Level 2 - Paragraph
- Level 3 - Essay
- Free Curriculum Writing Samples
- Example Teaching Videos
- Online Grading Service
- Writing Skills Reference Folder
- Grading Writing
- Key Points for Grading Writing
- MindBenders®
- Order Curriculum Packages
- Order Worksheets Only
- Refund/Return Policy
- Selecting Home School Curriculum
- Writing Preparation
- Writing Development
- High School and Beyond
- Homeschool Co-ops
- Homeschool How To
- The Story Behind TWF
- Why Another Writing Curriculum?
- Copyright Information
He is like a man building a house, who dug deep and laid the foundation on the rock . Luke 6:48
Dedicated to equipping God's children with the ability to communicate His Truth to the world.
- Teaching Tools
- Curriculum Ordering
- homeschool writing curriculum
- home school writing samples
- Mind Benders®
- Online Grading
Copyright © 2021 TheWriteFoundation.org
web site design - evolvethebrand.com

PowerPoint 101: The Ultimate Guide for Beginners

Are you struggling with PowerPoint? You need a quick design in PowerPoint but don't know where to start? Don't worry, you have nothing to be ashamed of.
In this article, we're going to refresh the most important PowerPoint basics so you can take advantage of this Microsoft software and create high-impact presentations at any time!
Millions of users worldwide use Microsoft 365 services , making PowerPoint the presentation design software with the highest market share. And with good reason! PowerPoint's features stand out for its usability and originality . We can tell you that PowerPoint is pretty intuitive software, and it's a great option to choose when working with presentations on a daily basis. So, are you ready for a quick PowerPoint 101 class?
Let ' s see what you ' re going to learn today with this PowerPoint Guide :
What is PowerPoint?
What are the best uses of powerpoint, powerpoint basics: what are the components of powerpoint workspace, mastering powerpoint: what are the main features of powerpoint, what are powerpoint templates and where to find them, time to practice how to make a presentation in powerpoint.

Microsoft PowerPoint is a presentation design software that is part of Microsoft 365 . This software allows you to design presentations by combining text, images, graphics, video, and animation on slides in a simple and intuitive way.
Over time, PowerPoint has evolved and improved its accessibility to users. For this reason, it has been adapted to the main operating systems and modalities:
- PowerPoint Online
Additionally, you can use Word and Excel in this online version. That way, you'll be able to make real-time changes in the cloud without fearing losing your files. Sounds great, right?
PowerPoint has a versatile range of uses. Here's a list of the different tasks you can complete with this presentation design software:
- Business presentations or Pitch decks.
- Marketing, Sales and HR plans.
- Project briefs and timelines.
- Inductions to new employees.
- Seminars and educational classes.
- Professional portfolio of photos or designs.
- Presentations of a research summary.
- Presentations for special occasions.
These are just a few examples of the multiple possibilities this Microsoft software offers. Your imagination is the only limit!
Stay tuned as we continue with this PowerPoint 101 Guide...

In order to deeply understand this presentation design software, you need to recognize its main components. Now it's time to learn about the PowerPoint basics!
A quick note before going any further: when opening PowerPoint, some of the commands in the ribbons will look grayish and won't be highlighted when you hover the mouse over them.
This happens since some commands need to be selected in order to function. For example, if you want to change the color of a text, you first need to select it.
That being said, let's start with this Guide for PowerPoint beginners:
PowerPoint Main Window
The first aspect to learn is PowerPoint Main Window. To facilitate the explanation, we've organized its main elements with numbers from 1 to 10:

Based on that, the main components of PowerPoint window are the following:
1. Quick Access Toolbar: allows you to customize commands to have them at hand. You only have to select it and go to "More commands."
2. Title Bar: shows you the name of your file and other "Suggested options" like Slide Master View . These options will vary depending on the use you give to the commands.
3. File Tab: you will see the Home Menu (PowerPoint backstage) by selecting it. There, you can create a new presentation, save it, print it, export it, and many other options.
4. The Ribbon: it's where PowerPoint tabs and tools are. These tools can also be called "commands" or “features.”
5. More Button or Down Arrow: these arrows allow you to view more tools or layout options in PowerPoint.
6. Slides Pane: shows your slides in thumbnail size. By right-clicking, you can access additional options for customizing each slide. Perfect for PowerPoint beginners!
7. Slide: PowerPoint's blank canvas and the frame to be seen when presenting the file.
8. Placeholders: they are dotted boxes that will store your content.
9. Status Bar: allows you to view the slide number, grammatical errors, speaker notes, and the comments on your file.
10. Zoom: allows you to enlarge or minimize your PowerPoint workspace. The range goes from 10 to 400%.
PowerPoint Tabs
The PowerPoint tabs are the control desk of your presentation . Since PowerPoint's features are too many, they're organized in tabs.
You can come and go between tabs as you need. Once you click on a tab, it will open its ribbon, and there, you'll be able to see all the tools related to that particular category.
This PowerPoint tutorial for beginners will give you an overview of all PowerPoint tabs . Pay attention to the following list:
- Transitions Tab
- Animations Tab
- Slide Show Tab
- Recording Tab
1. Home Tab
The Home tab is the most common tab of PowerPoint. This is the tab you'll probably use the most if you're designing a presentation deck from scratch.

It allows you to add new slides and change the text characteristics : font, size, boldness, underlining, alignment, etc. If you've ever used Microsoft Word, these features will be familiar to you.
Also, you will find commands to edit the characteristics of the geometric shapes you insert. This includes: fill color, line color, sharpe effects, among others.
2. Insert Tab
The Insert tab is exactly what its name says it is. In this ribbon, you'll find all the options concerning adding a new element to your PowerPoint presentation .

You can insert a picture, some geometric shapes, icons, WordArt graphics, among others. We can tell you that this tab is really helpful for PowerPoint beginners!
For example, if you have a lot of data in PowerPoint , you could add a chart or diagram to show your information in a more visual way. Also, you can embed videos or music into PowerPoint really easily.
- PowerPoint tip for beginners: To be able to write text on your slides, you need a text box. So, if you're designing your presentation from scratch, remember to go first to the Insert tab and add a text box to start writing.
3. Design Tab
If you are one of those people who enjoy choosing the design of a PowerPoint presentation, this tab will be your favorite.

The Design tab offers a wide range of premade designs , allowing you to get more polished slides. Even better, if you explore its ribbon, you can adjust the color palette and change the overall style of your PowerPoint deck.
The PowerPoint interface, as this basic PowerPoint Tutorial, is really intuitive. We believe that you won't have any problem with this tab!
4. Transitions Tab
Using transitions in PowerPoint is a dynamic way to move from one slide to the next during a presentation. This feature is PowerPoint's stamp, so don ' t miss it!

Some PowerPoint transitions are really classic, like wiping the old slide to present the new one. Others are somewhat over the top, like the “Vortex” or the “Airplane” effect.
If you click on each kind of transition, you'll see a preview on how it would look when presenting. Really cool, right?
5. Animations Tab
In case you want to add special effects for certain elements in your slides , the Animations tab in PowerPoint will interest you.

Like the Transitions tab, you will find various animation effects in this ribbon. It's a matter of trying and choosing the best one according to your needs!
6. Slide Show Tab
As its name says, the Slide Show tab is about presenting your slides . We really like that it gives you several options to show up your presentation!

Considering that you're a PowerPoint beginner, you're not likely to use the Slide Show tab very much.
But if you're curious about this command, you must read our article: How to Make a PowerPoint Slideshow that Runs Automatically?
7. Review Tab
The Review tab is not often used by PowerPoint beginners either.
However, if your job is related to writing or if you work at an international company, this tool can be extremely useful!

With this tab, you can check the slide's spelling, translate the text in real-time, and add comments to your slides . This last function can be helpful to give feedback to a colleague.
8. View Tab
This View tab allows you to change the view of your PowerPoint slides and make handouts from them, among other things.

As you can see, the majority of its commands are really specific. So you won't have any issues while designing, test and see!
In this section, our favorite command for PowerPoint beginners is Slide Master . Explore more about this tool in our guide!
9. Recording Tab
In the last versions of this design presentation software, PowerPoint added the Recording tab. As its name says, it allows you to record all your presentation slides .

This ribbon has advanced commands, so the most common action for a PowerPoint beginner is to take a screenshot or record the screen sequentially .
10. Help Tab
Finally, there is the Help tab. If you have any problem or question concerning how to use PowerPoint, you may go here to look for a solution.
In the latest versions, Windows has added a “Show Training” option. You can click this command to practice the PowerPoint basics since it will download training templates.

As a beginner in PowerPoint, you must recognize the objective of each PowerPoint tab to be able to master the software . But, in order to conduct an outstanding presentation deck, you also need to dominate its most important features. Let's see some of them in the next section!
If you feel ready to delve deeper into PowerPoint's tools, this section is for you.
As you may know , 24Slides specializes in creating outstanding presentations for any Design Project . So, we asked one of our experts about her favorite PowerPoint features, and we want to share them all with you!
Carmen Navarrete , Graphic Designer at 24Slides, highlighted the following features that will make your presentations stand out from the crowd:
PowerPoint Feature #1: Crop to Shape
This first PowerPoint feature is simple but effective!
Let's see how to use it:
- First, choose an image you want to cut and insert it into your workspace.
- Once inserted, select it with the mouse.
- Go to the "Picture Format" tab.
- Press the arrow of the "Crop" button (right side of the screen).
- Select "Crop to Shape."
- Choose your favorite shape and customize your PowerPoint presentation!

PowerPoint Feature #2: Merge Shapes
If you don't like any figure enough, you can create one from scratch!
This is possible thanks to the "Merge Shapes" option. Follow these steps to unleash your creativity:
- First choose an image you want to cut.
- Check the list of PowerPoint shapes (Insert tab > Shapes).
- Choose two or three figures you want to merge (they can be the same figure).
- Select the figures you are going to merge (see the image).
- Once selected, go to the "Shape Format" tab.
- Press the "Merge Shapes" option and the type of merge you want (test and choose!).

- A new figure will appear, and you must fill it with the image from the first step.
- Stay on the Shape Format tab and go to "Shape Fill" (button in the middle of the ribbon).
- Select "Picture Fill" and browse for your image.
- Select the image to fill your new figure, and that's it!

- PowerPoint tip for beginners: When your merged figure is ready, paste the image to the background of your slide to achieve a better result. This way, you can use your image as a canvas and see if both elements fit well.
PowerPoint Feature #3: Insert Icons
This PowerPoint feature is quite easy to follow for PowerPoint beginners!
Just follow these steps:
- Go to the Insert tab.
- Select the "Icons" option.
- A Microsoft 365 library will open, where you can search for the required icon.
- Now, you must insert it into your presentation and adapt it to your design.
- If you have an active Microsoft 365 subscription, you'll have access to a larger number of icons in PowerPoint.
- PowerPoint tip for beginners: If you want to learn more about icons in PowerPoint, read our article on How to Use Icons to Make Amazing PowerPoint Presentations .
PowerPoint Feature #4: Insert SmartArt
PowerPoint's SmartArt is one of the most popular and accessible tools to dominate while learning about PowerPoint basics.
To use it in your slide deck, you must:
- Select SmartArt.
- See all SmartArt categories and choose your favorite based on your needs.
- Add the text you have prepared and adapt it to your presentation.

We want to give you some ideas to master this SmartArt tool in PowerPoint: you can make timelines , flowcharts , and even a Venn diagram in just a few seconds. Try and see!
PowerPoint Feature #5: Remove Background
If you don't know how to use Photoshop and want to remove the background from an image, in this PowerPoint 101 Guide, we show you how:
- First choose the image you want to remove the background from.
- Insert the image in the PowerPoint workspace.
- Select the image and go to the "Picture Format" tab.
- Select "Remove Background" (first option on the left).
- You can keep and remove parts of the image with the first two tools of the ribbon (see image).
- Keep in mind that all the sections highlighted in purple will be deleted.

- We recommend zooming in to keep or remove parts of the image with more detail.
- Once you're done, press the "Keep Changes" button.
- Finally, adapt the new image to your PowerPoint presentation.

- PowerPoint tip for beginners: Choose a high-contrast photo or image for best results. In other words, the outline of the person or object you want to cut out must have clear edges and cannot blend with the image's background color.
PowerPoint Feature #6: Add Speaker Notes
The latest PowerPoint feature is a command you can use to prepare your speech before presenting to an audience.
Learning how to add speaker notes in PowerPoint is simple:
- Select the slide that needs some notes.
- Usually, there is a footer below the slide, but if not, you will have to activate it.
- Go to the View tab and select "Notes."
- The Speaker Notes section will appear, and you can add whatever you want!

- PowerPoint tip for beginners: In case you want to practice your entire presentation and have a lot of notes, go to the View tab and select "Notes Page" (fourth command). You'll be able to see all your Speaker Notes faster!
PowerPoint Feature #7: PowerPoint Translator
If you've ever wondered how to translate your PowerPoint Slides, we'll explain the step by step here:
- Go to the Review tab.
- Select the text you want to translate.
- Press the “Translate” button.
- A panel will open on the right side of the screen.
- Choose the language you need and you'll see the translation in real-time.
- If you press Insert, the text will change to the new translation!
PowerPoint Feature #8: Screen Recording
The process of recording your screen in PowerPoint is straightforward and intuitive. Let's see:
- Go to the “Record” or “Recording” tab.
- Press the "Record Slide Show" button or the “From Beginning” button (depending on your PPT version).
- A new window will open.
- Select the red record button and start recording!
- When you're done, select “Export.”
- By default, the video will be 1080p. If you want to lower the video quality, go to "Customize export."
- Name the video, save it to a folder and that's it!
As you may have noticed, this software has endless PowerPoint design options for beginners. We encourage you to try and test each functionality!
However, we're clear that PowerPoint has different features, so it can be hard to know where to start. That's why understanding PowerPoint basics is crucial if you truly want to master this software!
Our PowerPoint 101 Guide continues; stay tuned to discover more great stuff about this Microsoft software. Keep reading!
A PowerPoint template is a pre-made design that you can use for your own means, and that will save you a lot of time!
Templates in PowerPoint are a great resource for designing since all the structure is already done, and you only have to update the content . We can tell you they're the perfect resource for PowerPoint beginners!
They can be incredibly specific. For example, there are templates for a SWOT analysis or a complete Marketing report. Otherwise, templates can also be very general, with several slides with a similar design.
If you struggle with the artistic part of designing presentations, downloading PowerPoint templates will be a life changer!

How to download PowerPoint templates for free?
If you didn't know, 24Slides has an extensive repository of PowerPoint templates. But how to obtain them? It's really simple:
- First, create an account on our Free Templates Website with the button “Register” (that way, you can download everything without problems!).
- Think about the graphics you need and the ideal structure for your presentation deck (you can also change the color palette later!).
- Download it in PowerPoint format (if you prefer it in Google Slides format, you'll also find this type in our repository).
- Edit and change everything you need for your PowerPoint presentation!
24Slides Designers specialize in business and corporate PowerPoints, but you'll also find other types of templates on our website: Data templates, Timelines, Roadmaps, Matrixes, Diagrams, and more.
Keep in mind that a well-designed PowerPoint deck helps you communicate stronger messages to your audience . Don't waste this opportunity to make your presentation shine!

If you want to learn more about how to master PowerPoint, do not miss the last section. We'll show you some PowerPoint basics from the software itself!
A PowerPoint 101 Guide wouldn't be that useful with no examples. So, if you enjoy the step-by-step guides, this section is for you.
Below, we'll show you how to make a simple PowerPoint presentation. But first, here are some tips to be more efficient in the process:
- Be clear about what type of presentation you're going to create (is it corporate, playful, or more creative?).
- Make a draft with the most important information you need to add and, thus, generate a good structure in your presentation .
- Get inspired by examples on the internet , but adapt them to your needs and audience.
- If you will create a business presentation, keep in mind your brand identity .
- Make sure your PowerPoint works , you may need to update to the latest version or pay for the subscription.
Step 1: Make a draft to structure your presentation
As we said before, writing a draft or script of your content will be vital to start on the right foot as a PowerPoint beginner.
This advice is so important that we choose it as the first step to learning how to make a PowerPoint presentation. Remember: Planning is key!

Regarding the process of planning, we share some good practices:
- If your presentation will be very long , write down all subtitles and content in a Word document. This will help you organize your ideas and give a correct sequence to your narrative. In addition to avoiding redundancies in the message you want to communicate.
- If your presentation will use many visual resources , we recommend choosing high-quality images. This will help you have a starting graphic base. Some good free image repositories are Freepick , Unsplash , and Adobe Stock .
- If your presentation is based on data , have all your results summarized or your most relevant conclusions at hand. The idea of making a PowerPoint presentation is to show your information in the simplest way possible for your audience.
Step 2: Create a new document in PowerPoint
Once you check that all the functions are working fine with the software, please open it and go to the File tab. If you've ever used Word or Excel, you'll probably find this Home Menu familiar.
In short, this is the main page of PowerPoint, where you can create a new presentation or open an older one. Let's see:

In order to follow this part of our PowerPoint Tutorial correctly, take into consideration the following points:
- On the lower side of the screen, you'll find your recently opened PowerPoint files. This option is great for saving some time.
- If you don't find the presentation you're looking for, click on the “Open” option at the left bar and find older files.
- Don't forget to save your presentation with a relatable name so you won't lose sight of it!
Step 3: Choose the perfect design for your presentation
With your information ready in a draft, it's time to choose the design of your PowerPoint slide deck. You must imagine that the available design options are endless!
For practical reasons, you have three options regarding the design:
- Start a design from scratch (very difficult for a PowerPoint beginner).
- Choose an established PowerPoint design or layout.
- Download a PowerPoint template and modify some details.
Don't worry if you don't know how to continue! In this PowerPoint 101 class, we're going to explain step by step the second option:
How do you set a default design in PowerPoint?
- First, go to the Design tab.
- Open the list of options by clicking on the third arrow.
- Choose the design you like the most for your PowerPoint presentation.

If you want to explore more PowerPoint designs, there is a way to research online. For that, you only need to:
- Go to the File tab (first tab, next to the Home tab).
- Select "More themes" (see image).

- Use the search engine and write the keyword you want (it can be related to your business or it can be a color).
- Check the list of PowerPoint themes and choose your favorite.
- Wait a few minutes while it loads and keep designing in PowerPoint!

How do you change the layout of one slide in PowerPoint?
In this PowerPoint 101 Guide, you will also learn how to configure the layout of each slide.
Keep in mind that to have a high-impact presentation, you must adapt your slides' design to the type of content you'll add. And using layouts is perfect for this purpose.
To change the layout type in PowerPoint, follow these steps:
- Right-click on the slide you want to change.
- Select the "Layout" option.
- You will find more than ten layout models.
- Choose the one that best suits your content.
- Repeat these steps for each slide (if you wish or require).

How do you customize your slides in PowerPoint?
The design process in this PowerPoint 101 Guide doesn't stop there.
You also can customize your presentation's color palette , font style, background format , and graphics effects .
Just go to:
- Design tab > Variants.
- Select Colors, Fonts, Effects or Background Styles (as you need).
- If you're inspired and want to create your own background in PowerPoint, select Background Styles > Format Background.
- Finally, custom your slides as you want!

Step 4: Add all your information to your presentation
Now, it's time to add all your information to your slides. If your script is long, take your time to copy each part of it.
In this PowerPoint Tutorial, we're going to show how our design is going so far. We design at your side!

Step 5: Add transitions or animations to your presentation
The stamp of PowerPoint is its transitions and animations! Naturally, our PowerPoint 101 has considered these essential commands.
If you want to add them to your presentation and make your speech more fluid, follow these steps:
- Go to the tabs section of PowerPoint.
- Select "Transitions" or "Animations" and try your favorite effects.
- Remember that if you select Transitions, these will modify the entire slide, while Animations can be added to each element individually.
When choosing one Animation, you can eliminate it if you aren't 100% convinced. You only need to:
- Select the Animation number that appears on the corner.
- Press the "Delete" or "Backspace" button on your keyboard.
- Choose another Animation in PowerPoint if you want!

This “PowerPoint for dummies” is full of tips and tricks! So here is one more: Don't overuse transitions or animations in PowerPoint ; they can make your presentation slower and unprofessional . Use this tool in a subtle way!
Step 6: Refine the final details
As always, every final product must be reviewed. Especially if you're learning the PowerPoint fundamentals with us.
We recommend reviewing each slide of your PowerPoint presentation one final time. In this process, you will be able to:
- Add icons if your presentation requires it.
- Change any image or illustration if they don't convince you.
- Change transitions or animations.
- Customize your presentation's color palette .
- Proofread your slides' text or add more information.
- Add speaker notes to your presentation.

Step 7: Slideshow your presentation
When your presentation is finished, it's essential to know how to make a PowerPoint slideshow. This way, you can see your slides from the exact same perspective your audience will see them.
To slideshow your presentation in PowerPoint, follow these simple steps for PowerPoint beginners:
- Position yourself on your first slide.
- Go to the bottom right of the software.
- Select the "Slide Show" button (see image).
- Have a look of your presentation by clicking on each slide or pressing the right arrow on your keyboard.
- To go out from the Slide Show mode, you have to press the ESC key.

Now you can present your slides like an expert!
When you master this presentation design software, you'll be able to create amazing things in PowerPoint : infographics, diagrams, charts, pitch decks, business cards, calendars, you name it!
This was our PowerPoint Guide for beginners. We hope that our compilation today will be useful for conducting more professional presentations in the future and, why not, achieve all your goals!
Don't forget to share this PowerPoint 101 Guide with your co-workers or whoever you want!

Want to boost your beginner PowerPoint skills? Check out this content:
- How to Work with Multiple Images in PowerPoint
- How to Add a Timer to Your Powerpoint Presentations
- PowerPoint Charts, Graphs, & Tables Made Easy | Tips & Tricks
- How To Use PowerPoint Design Ideas - All Questions Answered!
- 36 Fun Icebreakers for Your Next Presentation
- The Cost of PowerPoint Presentations: Discover the hidden expenses you might overlook!
Create professional presentations online
Other people also read

Tutorial: Save your PowerPoint as a Video
How To Convert Google Slides To PowerPoint and Vice Versa

How To Add Animations To PowerPoint
The Ultimate Guide to Effective Teacher Presentations: Strategies & Tips

Dianne Adlawan

Teachers, by nature, are considered professional presenters. Their main responsibility is to talk in front of their students to relay educational knowledge, sharpen their minds and skills, and even serve as a second guide alongside their parents. They also speak in front of parents, co-teachers, and school administrators. This just means that preparing for a presentation is already not new to them.
Still, teachers can become so comfortable with their presentation routine that their techniques turn into autopilot. The result of a repetitive task can become tiring and not challenging anymore which may result in students losing interest or attention span in the process.
The tips featured in this article are dedicated to these hard-working professionals. This will help them prepare and perform a better presentation in front of any type of audience.

Why You Should Prepare for a Presentation
- Preparation helps you build to structure your thoughts to create a well-organized presentation. By taking the time to prepare, you can decide what information is most important, plan the flow of the presentation, and make sure that everything is connected and easy to follow.
- Second, it allows you to think ahead of the questions that your audience might ask. Especially if you’re giving a presentation to a group of various audiences, who are curious about the topic at hand. By preparing in advance, you’ll be able to answer any questions they may have, which will not only increase their understanding but also boost your credibility as a teacher.
- Lastly, preparation helps you make the most of your time. Advanced preparation ahead of the presentation can ensure that you’re not wasting time trying to organize your thoughts at the last minute.
Effects of an Organized and Well-Planned Presentation
An audience engages with a speaker who knows their words and poses a confident attitude. While the projector may display clear and concise slides, the presenter is the main ingredient to every presentation.
For teachers, a well-planned lesson presentation helps the teacher maintain the attention and interest of their students, which is crucial for effective learning. Additionally, being organized and prepared will help teachers convey their ideas more effectively and it will help the teacher to feel more confident, which also impacts their teaching and in turn can help to build trust and rapport with their students.
Possible Outcomes of An Unprepared Presentation
Let’s suppose you haven’t allocated enough time to plan and prepare for an important presentation. What could be the potential outcomes?
- Increased Stress and Anxiety: Lack of preparation can lead to increased anxiety and stress, which can not only hinder your ability to deliver a convincing presentation but also hurt your mental health and work balance. It can cause a “mental block,” causing you to lose focus and concentration during your delivery.
- Poor Presentation Delivery: Without proper preparation, your presentation can appear scattered and disjointed. This can lead to an incoherent message that fails to convince your audience.
- Diminished credibility: Delivering an unprepared presentation can harm your reputation as a professional. It can portray you as disorganized and unreliable which could lead your colleagues or students to question your competence and reliability.
Effective Visual and Content Organization Tips
Consider this as the first stage towards an effective teacher presentation. Before moving on to improving your verbal communication cues, let’s enhance first your presentation visuals and content.
Visual Tips
1. add powerpoint animations and different media.
Establishing an attractive slideshow is one of the keys to a successful presentation. This will put a good impression on your audience that you’re prepared just by seeing how well-designed your presentation is. Of course, images add to slideshow attraction, but consider adding another forms of media such as GIFs and videos, as well as animations! Microsoft PowerPoint has a lot of fun & captivating features that you may not be aware of. Check out this example of an easy yet appealing Slide Zoom trick in PowerPoint that you can add to your presentation to wow your audience.
@classpoint.io Did someone say FREE??? Yes, we did. Here are free websites to help you upgrade your next PowerPoint presentation! 😎 #powerpoint #presentation #design #studytok #edutok #tutorial #tipsandtricks #ai ♬ original sound – r & m <33
Read Next: Make Your Presentations POP With This PowerPoint Animation Template
2. Use Readable Font Styles
Make sure to use the best font style that makes your presentation look sleek, readable, and won’t strain your audience’s eyes while reading. We all want to use a fancy font, trust me, I get it. But most of the time, simplicity is beauty, especially if you’re presenting a professional-looking slideshow. Font styles such as Poppins, Tahoma, Verdana, Montserrat, and Helvetica are great examples of font styles that screams simple yet professional to look at.
On the other hand, font styles such as Bradley Hand, Comic Sans, and Chiller are not ideal choices as they are not meant to captivate your audience’s eyes. And another tip is to stick to two or three fonts only!

3. Use Relevant Graphics
Selecting graphics for designing your presentation depends on your audience and the goals you aim to achieve with the presentation. For example, if you are presenting in front of students and your goal is to keep them engaged, motivated, and actively participating, then you might consider incorporating charts, tables, and relevant shapes into your design.
It’s important to remember that your presentation design should align with the theme of your topic.
Free Websites to Upgrade your Presentation Graphics:
- Craiyon. com
- The Noun Project
4. Use Audience Engagement tools to Activate Learning
Want the quickest solution to an engaged audience? Well, it’s audience interactive activities! Adding interactive activities to your presentation can help keep your audience engaged and interested. One of the easiest ways to do this is to use ClassPoint, an audience engagement tool added right into PowerPoint presentations.
With ClassPoint, you no longer need to worry about strategies to keep your students engaged, as this tool transforms PowerPoint into a teacher presentation tool with a teacher toolbelt and student quizzes , polls, and games that make presentations more fun & engaging.
By combining ClassPoint with your presentation techniques, you can focus solely on setting up your lesson content in PowerPoint and allow ClassPoint to handle the rest for achieving a learning-activated presentation lesson .
🔍 Learn more about ClassPoint, the teacher add-in for better lessons & student engagement 👍
5. Use a Laser Pointer
Help focus your audience attention by using a laser pointer!
With the help of a laser pointer device, teachers are able to attract the attention of their audiences and concentrate on essential points in their presentations. Highlighting these main ideas and terms assists the speaker in organizing their speech, preventing distraction, and increasing retention of the information presented.
You can use a physical laser pointer & clicker, or with the addition of ClassPoint into PowerPoint, presenters can easily turn their cursor into a laser or a spotlight . This can make it even easier for students to follow along and is a convenient tool for creating a more captivating teacher presentation.
Secret tip: if you write on your slide with the laser, it will leave disappearing ink! 🪄
Content Tips
1. research and fact-check your presentation.
As educators, it is crucial to equip ourselves with reliable and accurate information before presenting to our students. We have a responsibility to not only educate them but to also mold them into critical thinkers who are equipped with factual knowledge. Without thorough fact-checking, we risk disseminating misinformation and hindering their intellectual growth.
To avoid such situations, we must prioritize research and fact-checking before presenting any information. Conducting research helps us not only in finding accurate information but also in ensuring that the sources we use are reliable and credible. Moreover, taking the time to fact-check demonstrates our commitment to providing students with high-quality education and the desire to create a safe and accurate learning environment.
2. Be Prepared to Anticipate Questions during the Presentation
It is important to be well-prepared for a presentation especially anticipating and addressing questions. This applies particularly to a teacher presentation, as educators face varied expectations and questions. Adequate preparation allows you to organize ideas and justifications, and it can deepen understanding, boost confidence, and improve adaptability. Addressing questions, makes your audiences feel heard and appreciated. This will result in comprehensive presentations, enhanced confidence, improved information flow, and an atmosphere of respect and understanding.
A great & visual way you can elaborate, or explain your material in new ways, is by using ClassPoint’s whiteboard tools added to PowerPoint. ClassPoint’s added toolbar presents teachers with unlimited whiteboard slides they can open whenever they need, and user-friendly yet comprehensive pen tools with available shapes, and text boxes. Plus you can also use ClassPoint’s quick poll or other question types to assess students’ understanding with hard data & insights.
Addressing questions well makes your audience or students feel heard & appreciated leading to improved learning, enhanced confidence, and a respectful, safe learning environment.
3. Provide an Outline Structure of your Content
When you are preparing your presentation, it is best to first create an effective outline structure that will guide your presentation flow and help you focus on the main learning objective. But what you may not be doing, is offering that outline structure to your students, but you should!
Providing students with a clear understanding of what this lesson is about, the structure of the lesson, and what they will be able to take away from it is important. By doing so, you can help students stay focused and follow along with the material. Additionally, you are setting expectations and ensuring that everyone is on the same page, which can help promote student autonomy. So, include an outline at the start of your presentation lesson.
Step-by-Step Strategies for a Successful Presentation
Before presentation, know your audience, your students, or observers.
Once you have completed your deck, you may want to add a guide script and any additional notes with important points you don’t want to forget or you want to highlight in your presentation to impress your students .
Practice your presentation delivery/lesson
Practice delivering your presentation give you a chance to fine-tune your content and get your facts down. This will help you become more comfortable with the material and identify areas that need improvement. You can practice in front of a mirror, record yourself and watch it back, or even rehearse with a colleague or friend. When practicing, pay attention to your posture, tone of voice, and pacing. By doing so, you’ll be able to deliver a confident and engaging presentation that will captivate your audience.
Use a friendly tone of voice and pace
Adjust your tone to match your message, and avoid speaking too quickly so that your audience will get the chance to absorb the information you’re sharing. By being mindful of these aspects, you will capture your audience’s attention and leave them feeling informed and inspired.
Use engaging body language
Body language is essential for engaging your audience during a presentation. Stand up straight, make eye contact, and use hand gestures to emphasize important points. You can also move around the classroom to keep your students’ attention. By using engaging body language, you’ll be able to convey your message more effectively and keep your students interested throughout the presentation. You’ve got this!
During Presentation
Create an icebreaker.
Having an icebreaker is a warm-up for your students’ brains, allowing you to focus and engage with the material being presented. It also helps break down any barriers or tension between the presenter and the audience, making for a more relaxed and welcoming atmosphere. Additionally, an icebreaker provides an opportunity for the presenter to showcase their creativity and personality, adding an extra level of excitement and engagement to the presentation.
Good thing that ClassPoint has numerous features to help you perform an entertaining and unforgettable icebreaker. Here are some examples that you can use during an icebreaker.
- Quick Poll : Quick Poll allows you to create interactive polls right inside your presentation. When used as an icebreaker, it can engage the audience, initiate discussions, and provide valuable insights that help tailor the content to participants’ preferences.
- Word Cloud: Presenters can ask thought-provoking questions related to the topic or general interest. Using Word Cloud, the audiences can answer through their mobile which can be instantly seen as collective responses, with the most frequently mentioned words appearing larger.
- Short Answer : In short answer, you can challenge your audiences’ thought process in a short-form writing activity with no options to get from to test their ability to understand.
- Image Upload : Using single image, audiences can interpret what they feel like, or their mood using only the photos in their gallery or surroundings. A creative yet fun way for an icebreaker!
Speak clearly
Effective communication is crucial when presenting important information to students. Speaking clearly helps ensure that students understand the concepts being taught and follow instructions effectively. As a teacher, it’s important to focus on clear speech to promote effective communication and help your students comprehend the material being presented.
Pay attention to your audience’s attention
Since distractions are aplenty, attention spans are dwindling, it’s important for presenters to captivate their audience’s attention right from the beginning. For teachers, when speaking in front of your class, you should not only focus on the content of your presentation but also on your students’ attention.
To ensure that your students won’t start drifting away or zoning out, start with a compelling opening that immediately grabs their attention. Use vivid storytelling, examples, or demonstrations to engage your students and drive home your message. Don’t forget the power of humor, and never be afraid to be yourself – authentic, passionate, and confident.
Add Personality: share short relatable stories
“A great personality makes everyone feel energized; just like a flower’s fragrance that freshens ups the complete surrounding.” 29 Personality Quotes to Achieve Greatness
As to what is stated in the quote, having a positive and vibrant personality affects the overall mood of your surrounding, it can capture the audience’s attention and maintain their interest throughout the presentation. While the ultimate goal is to deliver a presentation rich with new learnings and knowledge, adding humor can do no harm to lift up the mood in the room. You might want to start by segueing a short story that your students can relate to and make interactions by encouraging them to share a story too or ask questions.
Post-Presentation Reflection
Take the comments by heart.
Receiving feedback from your students is a great way for evaluating the efficacy of a teacher presentation. This can help you identify areas where you can improve and tailor your teaching tactics to better suit the needs of your students. Listening to your students’ feedback can also promote a feeling of cooperation and enable them to become more actively involved in the learning experience. So, don’t be afraid to ask for feedback and take it to heart in order to continually improve your presentations.
Experienced educators understand that they are perpetually crafting their skills, and feedback from their audience brings an opportunity for professional advancement. In addition, accepting audience feedback illustrates esteem and worth for the students’ views. It promotes a feeling of cooperation and enables students to become more actively involved in the learning experience.
Preparing for a presentation is essential for teachers to deliver engaging and impactful content to their students. By structuring thoughts, anticipating questions, and preparing ahead, teachers can achieve a well-organized presentation that will enhance the students’ understanding and leave them feeling confident.
By following our strategies and tips teachers can achieve successful lessons using PowerPoint presentations. And, with the help of an advanced educational technology tool like ClassPoint, teachers can create dynamic and memorable presentations that their students will enjoy and actively participate in.
Try out ClassPoint today and experience a whole teacher presentation in PowerPoint! ✨
About Dianne Adlawan
Try classpoint for free.
All-in-one teaching and student engagement in PowerPoint.
Supercharge your PowerPoint. Start today.
800,000+ people like you use ClassPoint to boost student engagement in PowerPoint presentations.
How to Create an Effective Lesson Plan Presentation
Regardless of the subject or content you’re teaching, having a lesson plan in place prepares you for class by offering detailed guidelines for the session. The lesson plan doesn’t have to be lengthy or complex—it just needs to include elements about what you’re teaching, the method of presenting this material, and what objective and goals you wish your students to achieve as part of the curriculum.
Why Lesson Plans Are Important
It’s crucial for teachers to prepare their lessons in advance and implement the best teaching approaches. Attending a session without a lesson plan can be counterproductive for both students and teachers. Without the right preparation beforehand, classes can end up being unproductive or confusing.
Below are a few reasons why you should consider lesson planning:
Lesson Planning is Handy for Classroom Management
Developing the lesson plan from the learning objectives provides flexibility in adapting to different teaching methods and classroom management techniques. For instance, hybrid or online classes require a different delivery approach from the traditional classes, which means making modifications to any existing plans. With the right foresight and plan in place, classes can stay on topic and effective. Such circumstances underscore how crucial lesson plans are in ensuring that the class runs smoothly, regardless of the learning environment.
Lesson Planning Creates Student Success
Various studies have shown that students benefit immensely from and appreciate well-structured lessons. Thus, success is more likely when students engage and show interest in the material being taught. Using a curriculum guide, teachers can develop valuable lesson plans based on specific objectives and goals (what’s intended for students to learn).
Lesson Planning Is Central to Teacher Success
Teachers’ success is, to some extent, pegged on students’ success. Besides that, the documents you develop as part of the lesson planning process are often part of your assessment by school administrators. What’s more, as you advance your teaching career, your lesson plans serve as a repository for your expanding body of knowledge. Thus, the significance of lesson planning cannot be overlooked when it comes to advancing your career as an educator.
Lesson Planning is Vital in Student Assessment
Lastly, lesson plans turn the learning sessions into clear objectives for students and a way to gauge their understanding of the subject matter. One notable benefit of the lesson plan is tailoring the assessment to a particular objective while considering students’ specific needs. You can use common assessment methods such as quizzes, tests, and homework assignments.
How to Write a Lesson Plan
Lesson plans include different sections that clarify questions students might have about the subject on hand. What are the lesson objectives? What subjects will be covered during the session? How long will the course take?
- Introduction – As the lesson commences, it’s good to have a concise yet vivid introduction about what the lesson will cover. The ideal practice is to create a memorable title for every lesson to create a general understanding of the learning material students will be interacting with.
- **Lesson Objectives –**This section is critical as it allows the students to ascertain each lesson. When it comes to objectives, it is crucial to consider the acquired skills you expect the students to gain by the end of the session. Each objective should be measurable and actionable; meaning after every session, students should be able to apply what they’ve learned.
- Learning Activities – This should be a detailed account of how each activity will lead the class to achieve its predetermined goals. To create valuable activities, consider how each learning activity fits each objective, and the requirements students need.
- Practice – Practices are primarily intended to assess students’ comprehension of the material and aid in memorizing what they have learned in class. Therefore, it is crucial to include this in the lesson plan so that assessments can always be done at the appropriate time.
Today, lesson planning has been made less time-consuming and easier, thanks to smart whiteboards for the classroom . A digital whiteboard like the Vibe Board Pro provides unmatched performance that shows you know your craft and are way ahead of the pack.
Download Our New E-book
The Future of Learning
Download Our New E-book The Future of Learning
Read our privacy policy .
We’ve sent you an email with the PDF download link. Enjoy!
Can't wait? Read now
How Smart Whiteboards Simplify Lesson Plan Creation and Presentation
Not only does using a smart whiteboard make learning accessible , it’s also a great way of enhancing and enriching your lesson plans with interactive activities for the class. Smart whiteboards function as a touch screen for all; during class sessions, you and your students can use it as a digital whiteboard to create a space where students’ engagement, knowledge, and teamwork are appreciated.
While the smart whiteboard aids in making your lesson more engaging, interactive, and educational, you as the teacher can still customize your teachings to what you want them to be. This helps in foiling any hitches in your lesson presentation and makes switching from one topic to another seamless.
Below are more specific ways how smart whiteboards make your lesson plan presentation better:
Take Advantage of Built-in Templates
Once you invest in a smart whiteboard, make sure to take advantage of the wide variety of built-in lesson planning templates. You can use these templates to improve lesson plans while leveraging the technology associated with smart whiteboards. Even better, these templates can be easily customized for every lesson plan and cover different subject matters, allowing you to create new lesson plans without always starting from scratch quickly. How cool is that?
Organize and Present Lesson Plans Better
Smart whiteboards combine the power of the traditional whiteboard and a TV/projector into one hub, allowing you to write on the board while concurrently projecting it to the classroom. This allows you to conduct lesson plan presentations on a larger scale while also letting students see what’s going on.
For instance, if you’re presenting on an extensive topic involving multiple subtopics, a smart whiteboard will help you walk students through each subtopic with ease. Begin with the presentation divided into primary or main sections, highlight key definitions, and add infographics and videos to ensure that every student understands the tiniest detail.
Additionally, you can get students involved in the lesson plan presentation by asking questions, polling them on key points, or allowing them to follow along on their tablets or laptops.
Record Lesson Plan Presentations
Another benefit of using smart whiteboards in the classroom is that a lesson plan presentation can be recorded and accessed long after the session is over. This allows your students to access the material on their own time.
Final Words: Creating a Lesson Plan Presentation
Lesson plan presentation offers students the first interaction with the material they will learn. Take your time, appreciate the process, and create an attractive and comprehensive lesson plan that will encourage your students to have deep and thoughtful learning experiences. Even better, all of this can be made easier with smart whiteboard technology. Leave the spiral notebooks and sticky notes at home. A smart whiteboard is all you need.
What is the presentation stage in lesson planning?
Presentation is usually the core of the lesson plan. During this stage, theteacher introduces the topic and the key subject matter the students need to master. Presenting with smart whiteboards is exceedingly easy and less time-consuming.
What are the 5 steps in lesson planning?
The five steps are:
- Objective: A learning concept or objective is introduced.
- Warm-up: Revise the previous lesson
- Presentation: Present the material using suitable tools and techniques.
- Practice: Students try to apply what they have learned.
- Assessment: Evaluate whether the objectives were achieved
How does lesson planning help teachers?
Planning lessons in advance allows teachers to arrive at class each day prepared to introduce new concepts and facilitate engaging discussions rather than improvising as they go. In other words, without a lesson plan, teachers may be left scrambling, making students lose interest in the material to be learned.
Subscribe to get updates on all things at Vibe
Got any suggestions?
We want to hear from you! Send us a message and help improve Slidesgo
Top searches
Trending searches

mexican independence
5 templates

hispanic heritage month
21 templates

10 templates

49 templates

indigenous canada
47 templates

39 templates
Sketchnotes Lesson
It seems that you like this template, sketchnotes lesson presentation, free google slides theme, powerpoint template, and canva presentation template.
There’s an increasing trend in education regarding visual techniques to help students learn concepts, and it’s called sketchnotes. This free presentation template focuses on this design, so you can turn a lesson into an easy teaching experience.
Paying attention to a lesson is very important, and our template makes it easy for your students to keep their eyes on the screen. Our included illustrations remind of hand-made drawings, like the ones anybody would do on a notebook. The backgrounds look like paper, ready for you to use it as your canvas for the content you want to teach. The elements present on the different layouts also have a hand-drawn treatment, and the use of pastel colors could work as if they were sharpie marks. Even the font used for the titles is appropriately called Permanent Marker! Download the template and customize it easily using Google Slides, PowerPoint or Keynote.
Features of this template
- A lesson presentation template with a hand-drawn look and paper backgrounds
- 100% editable and easy to modify
- 21 different slides to impress your audience
- Available in five colors: white, green, blue, pink, and yellow
- Contains easy-to-edit graphics and maps
- Includes 1000+ icons and Flaticon’s extension for customizing your slides
- Designed to be used in Google Slides, Canva, and Microsoft PowerPoint
- 16:9 widescreen format suitable for all types of screens
- Includes information about fonts, colors, and credits of the free resources used
How can I use the template?
Am I free to use the templates?
How to attribute?
Combines with:
This template can be combined with this other one to create the perfect presentation:

Attribution required If you are a free user, you must attribute Slidesgo by keeping the slide where the credits appear. How to attribute?
Create your presentation create personalized presentation content, writing tone, number of slides, available colors.
Original Color

Register for free and start downloading now
Related posts on our blog.

How to Add, Duplicate, Move, Delete or Hide Slides in Google Slides

How to Change Layouts in PowerPoint

How to Change the Slide Size in Google Slides
Related presentations.

Premium template
Unlock this template and gain unlimited access

Register for free and start editing online
IMAGES
VIDEO
COMMENTS
A lesson note is a comprehensive outline of the content of a lesson, that helps teachers to remember what they want to teach during a lesson. The lesson note usually contains the main points the teacher hopes to cover, the activities they will do and the necessary materials for the lesson.
When building the materials for the class or lesson’s attention, it’s always essential to share elements like the purpose or rules that guide the learning process. This article will explore the best way to present a lesson plan and drive a learning session successfully from the instructor or professor’s view.
Presentation in Steps: Step One: If continuing from a previous topic, review the last lesson and correct any given assignments. If introducing a new topic, link it to previously learned or familiar concepts. Step Two: Step Three: Step Four: Step Five: Conclusion: Evaluation: As stated in the Behavioural Objectives. Assignment:
Teach the lesson writing sentences, poetry, brainstorm and other open-ended answers using as much of your students’ creative input as possible. Simply put, you are to fill in the blanks with student input while guiding your students through the writing process.
What is PowerPoint? Microsoft PowerPoint is a presentation design software that is part of Microsoft 365. This software allows you to design presentations by combining text, images, graphics, video, and animation on slides in a simple and intuitive way. Over time, PowerPoint has evolved and improved its accessibility to users.
By structuring thoughts, anticipating questions, and preparing ahead, teachers can achieve a well-organized presentation that will enhance the students’ understanding and leave them feeling confident. By following our strategies and tips teachers can achieve successful lessons using PowerPoint presentations.
How to Create an Effective Lesson Plan Presentation. August 17, 2022 | 7 minute read. Regardless of the subject or content you’re teaching, having a lesson plan in place prepares you for class by offering detailed guidelines for the session.
This theme is based on a lesson structure. Its colorful design is notable for reproducing a notebook with highlights, tape and post-it notes. It also contains hand-drawn and collage-like elements, perfect for students! The title typeface is rounded, and it is inspired in some 19th-century fonts.
Lesson Presentation templates Explore these free PowerPoint templates and Google Slides themes designed for teachers and educators who need to create great Lesson presentations to make learning a dynamic and appealing activity.
A lesson presentation template with a hand-drawn look and paper backgrounds. Available in five colors: white, green, blue, pink, and yellow. Includes 1000+ icons and Flaticon’s extension for customizing your slides. Designed to be used in Google Slides, Canva, and Microsoft PowerPoint.